• TalkBass has been independent since 1998. Add your voice.
    Create a free account to reply to discussions, view embedded media, and browse with fewer display ads.
    Join freeLog in
    Want zero display ads or expanded classifieds tools? Compare plans.

Brubaker Brute Club, Part 2

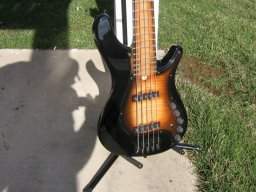
My brute 5er, finally got a picture. I really want make the mod that phillybass made on that humbucker switching but can't find any resources (diagrams) online. Might just have to go to a shop. Does anyone know if brubaker is going to make pickguards more readily available as an accessory?

If you want to wire up the switch yourself, it's pretty easy to do if you're a little handy with a soldering iron.

First, make sure that your humbucker has 4 wires coming from the pickup. One (hot) will go to the blend pot, one will be grounded to a pot (probably along with a shield), and the other two leads will be tied together - this is what makes it a "series" configuration - the output of the first coil is tied to the input of the second coil.

On my 4 string, my pickup was wired as follows:
Front Coil: Green (start) -> Black (end)
Rear Coil: Red (start) ->White (end)

If you have a voltmeter, you can verify that you have correctly identified the individual coils by testing the resistance from the assumed start to the assumed end. If you have infinite resistance, then you haven't selected a matching pair of coil leads. Both of your coils should be fairly close to the same resistance.

To verify front/back coil position an analog volt meter works best, but a digital meter may be OK if it's fast enough. Set the meter for the lowest DC volts you can and hook the red lead to the coil start and the black lead to the coil end. Take a large screwdriver or other magnetic metal object and quickly put it across a coil (over the poles/perpendicular to where strings would be) and remove. Repeat with the other coil. The meter should swing one way on the approach and the other way when you remove the item. Whichever coil position causes the largest voltage reading is the coil you have the meter connected to.

Take care to keep track of the start and end for each of your coils. Write it down and/or take pictures.

Once you have identified your coils and wiring, figure out what configurations you would like to have available. There are plenty of choices, but doing more than 3 gets pretty complicated and requires hard to find switches.

I chose to do series, rear coil, and parallel - this required an on,on,on switch. You can find the three position switches at GC or StewMac or other various places online. If you want two positions, you can probably find a suitable DPDT switch at a local electronics store. If you're feeling experimental, you can use some alligator leads to try different configurations before you solder everything to the switch and drill the hole in your pickguard!

Here is a very handy chart that shows the most common configurations:
4044630163_661f69db30_o.png


From a useful TB topic:
http://www.talkbass.com/forum/f38/stingray-mod-adding-coil-selector-series-switch-717929/

Once you've got the leads connected to the switch, connect the output of the switch back to the blend pot where the pick "hot" lead was originally connected, and connect the ground of the switch back to the pot housing that was being used for ground originally. You may need to extend the shielding conductor from the pickup and reconnect it to the ground as well (I did).

Here is a video that shows in-depth how to figure out the humbucker wiring ID:
http://youtu.be/7UfxQBhqen8
 
Hi again, thanks for your response, still looking for a 5 string Brute with no luck, I've searched at guitar center and there's none...

Shoot TRichardsbass a PM.. he might be able to help you find a dealer too.

I am so lucky to have one. All of my gear was stolen and i needed a bass pronto. I honestly purchased mine with the fact that "i needed something to get by". I will never get over my Fender that was stolen, but i had no idea i was getting something special as well. These are great instruments, i happened to be on the lucky end of an already-modded, early Brute.

I can't thank TB'er Shooter McGavin enough for the deal he gave me and to TB'er Robear22 for doing the killer mods in the first place. If i have my way I'll be getting a US Brubaker in the future, but for now... i'm a happy, and thankful Brute owner.
 
Hi again, thanks for your response, still looking for a 5 string Brute with no luck, I've searched at guitar center and there's none...

Yeah, that one I saw on their used site a few days ago, and tried to point you towards several posts ago, was only up for 1 -2 days afterwards. Was hoping you saw my post and was the one to snag it, but guess not. Bummer. Anyway, if I were you, I'd check at http://used.guitarcenter.com --> search Keyword: Brubaker, a few times a week, if not daily. They show up from time to time, usually at a great price, but don't ever last long. Good Luck!
 
Hey club members. In Nov of last year I went to a Looping clinic by Brittany Frompovich and she heard me play. She later invited me to do a clinic myself for the Virginia Bass Forum. Well we have penciled in two dates. The clinic will be either the 2nd or 9th of June. I am giving a Slap Bass Clinic and will have both of my Brutes as well as my brand new off the bench Brubaker KXB5 (fingers crossed). The clinic will be geared for beginners or experienced players who just don't quite get it. Intermediate slappers are welcome as well. The clinic will be in Fredericksburg VA. If any of you live in the area stop buy and give a fellow TBer and Brubaker bass owner some support.
 
Any chance of getting a video of that posted on youtube? A few pointers are always welcome...

I use my brute primarily for slapping, even If I'm sitting down & watching TV unplugged, its a pleasure to play.

That's a great idea and I'll try to work something out with Brittany where we can get good sound quality. I have some time to work on this. It should be a great clinic because I'm not afraid to break it down so that players can get it. it's one thing to see a guy go from 0-60 in six seconds but this doesn't allow the player to really get it. I am going to painstakenly break down several techniques geared to the most inexperienced player at the cliniic. After that I'm going to back it up with a real world application of it.
 
If you want to wire up the switch yourself, it's pretty easy to do if you're a little handy with a soldering iron.

First, make sure that your humbucker has 4 wires coming from the pickup. One (hot) will go to the blend pot, one will be grounded to a pot (probably along with a shield), and the other two leads will be tied together - this is what makes it a "series" configuration - the output of the first coil is tied to the input of the second coil.

On my 4 string, my pickup was wired as follows:
Front Coil: Green (start) -> Black (end)
Rear Coil: Red (start) ->White (end)

If you have a voltmeter, you can verify that you have correctly identified the individual coils by testing the resistance from the assumed start to the assumed end. If you have infinite resistance, then you haven't selected a matching pair of coil leads. Both of your coils should be fairly close to the same resistance.

To verify front/back coil position an analog volt meter works best, but a digital meter may be OK if it's fast enough. Set the meter for the lowest DC volts you can and hook the red lead to the coil start and the black lead to the coil end. Take a large screwdriver or other magnetic metal object and quickly put it across a coil (over the poles/perpendicular to where strings would be) and remove. Repeat with the other coil. The meter should swing one way on the approach and the other way when you remove the item. Whichever coil position causes the largest voltage reading is the coil you have the meter connected to.

Take care to keep track of the start and end for each of your coils. Write it down and/or take pictures.

Once you have identified your coils and wiring, figure out what configurations you would like to have available. There are plenty of choices, but doing more than 3 gets pretty complicated and requires hard to find switches.

I chose to do series, rear coil, and parallel - this required an on,on,on switch. You can find the three position switches at GC or StewMac or other various places online. If you want two positions, you can probably find a suitable DPDT switch at a local electronics store. If you're feeling experimental, you can use some alligator leads to try different configurations before you solder everything to the switch and drill the hole in your pickguard!

Here is a very handy chart that shows the most common configurations:
4044630163_661f69db30_o.png


From a useful TB topic:
http://www.talkbass.com/forum/f38/stingray-mod-adding-coil-selector-series-switch-717929/

Once you've got the leads connected to the switch, connect the output of the switch back to the blend pot where the pick "hot" lead was originally connected, and connect the ground of the switch back to the pot housing that was being used for ground originally. You may need to extend the shielding conductor from the pickup and reconnect it to the ground as well (I did).

Here is a video that shows in-depth how to figure out the humbucker wiring ID:
http://youtu.be/7UfxQBhqen8

Followed these directions and successfully pulled off my first pickup modification and soldering ever. I went for the north/series/south configuration. Some notes:
1. alligator clips would have made this determining the leads easier
2. Some sort of vise or clamp station would have made soldering easier
3. Pickup leads were the same as above (makes sense)
4. I love the new single coil options!

Below are some pictures...1361111977954.jpg
 
Congrats baloo. When I did my mod, I was "supervised" by my greyhound - she hates a cold solder joint :)

I did use alligator clips to try a bunch of different combinations to see what worked best for me. I strongly recommend it if you have them around. If you don't have them around, you can solder little pig-tails to the switch lugs - it's usually easier to join a bunch of wires up temporarily this way and you don't risk melting the switch with repeated soldering/desoldering.

One other item I neglected to mention - the ROHS lead free solder used by the factory has a much higher melting point than the "good old fashioned" stuff that I prefer (don't breathe the fumes!). You might need a higher wattage iron to desolder the initial connections. Or just cut them.

One cool Brute feature that I didn't consider initially, but grew to appreciate was just how handy the top-loading bridge is for getting strings on and off in a hurry.
 
Very nice baloo, and congrats on your successful mod. Looks good. I've been thinking about doing the same thing, but I'm curious as to whether or not there will be a noise issue when pairing just the neck pup+north coil or neck pup+south coil. Are you experiencing one of those positions being noisy?
 
Followed these directions and successfully pulled off my first pickup modification and soldering ever. I went for the north/series/south configuration. Some notes:
1. alligator clips would have made this determining the leads easier
2. Some sort of vise or clamp station would have made soldering easier
3. Pickup leads were the same as above (makes sense)
4. I love the new single coil options!

Below are some pictures...View attachment 318416

Wow, the neck has it's own Tone Block. LOL!!!! for lack of a better term.
 

Latest posts