• TalkBass has been independent since 1998. Add your voice.
    Create a free account to reply to discussions, view embedded media, and browse with fewer display ads.
    Join freeLog in
    Want zero display ads or expanded classifieds tools? Compare plans.

fEARful 12/6 Flatpack Deluxe Kit From Speaker Hardware Build Thread & Review

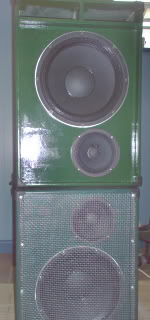
Drivers installed, sitting above its older brother:

Brothers2.jpg


Still needs the handle and feet installed after I brush on a couple more coats of paint...AND tone down the gloss a bit. (What ever possessed me to buy "Gloss" paint?:confused:)

Cool.

Why gloss paint? To give it that shiny new car appearance!
 
Drivers installed, sitting above its older brother:

Brothers2.jpg


Still needs the handle and feet installed after I brush on a couple more coats of paint...AND tone down the gloss a bit. (What ever possessed me to buy "Gloss" paint?:confused:)

Just throw a John Deere sticker on there and you are good to go! :D
 
I’ll close out this thread with my overall comments on the kit.

Even if you’ve never done any woodwork, putting one of Leland’s kits together is a breeze. I would think a first time builder could easily assemble the cab in one evening. Apply the finish will take longer, depending on what you’re using.

The only tools that are absolutely required are a drill (for pilot holes), 2 C-clamps (to align the first panels), a phillips-head screwdriver, and pliers (to crimp the wire connectors). Although not absolutely required, it would help to also have a few extra clamps (including bar clamps); either a brad nailer, or a hammer and small nails (to put pressure on the glue joints); an electric sander; and wood chisel or paint scraper (to trim away glue squeeze-out).

The only materials you’ll need to supply are sandpaper, wood filler, finish of your choice, grill(s), and whatever fasteners you choose for putting pressure on the glue joints.

The cuts are very precise. I cut my first 12/6 with a circular saw and most of the cuts looked like a snake had done them. I used almost a full tube of PL to be sure all the gaps were filled. I only used half a tube on this kit.

If you follow the assembly order Leland recommends and get the first panels square to each other, everything else falls right into place. If time doesn’t permit you to assemble the main box in one sitting, I’d highly recommend putting the remaining panels in place, dry, to keep everything aligned. Once PL Premium cures, there’s no going back to adjust anything.

I erred in an earlier post when I wrote that the Arauco in my kit had 7 plies. (Leland: I’m surprised you didn’t correct me.) I based that on the first few pieces I’d looked at from the kit. My kit was a prototype and Leland apparently included a few braces he’d cut from Baltic Birch. Arauco has 5 equal-thickness plies.

Due to the pre-assembly warping I experienced, Leland has made a few changes to the flatpacks. These changes, along with proper pre-build storage/handling by the recipient, should prevent anyone else from having this problem.

Thanks for making this kit available, Leland!
 
I’ll close out this thread with my overall comments on the kit.

Even if you’ve never done any woodwork, putting one of Leland’s kits together is a breeze. I would think a first time builder could easily assemble the cab in one evening. Apply the finish will take longer, depending on what you’re using.

The only tools that are absolutely required are a drill (for pilot holes), 2 C-clamps (to align the first panels), a phillips-head screwdriver, and pliers (to crimp the wire connectors). Although not absolutely required, it would help to also have a few extra clamps (including bar clamps); either a brad nailer, or a hammer and small nails (to put pressure on the glue joints); an electric sander; and wood chisel or paint scraper (to trim away glue squeeze-out).

The only materials you’ll need to supply are sandpaper, wood filler, finish of your choice, grill(s), and whatever fasteners you choose for putting pressure on the glue joints.

The cuts are very precise. I cut my first 12/6 with a circular saw and most of the cuts looked like a snake had done them. I used almost a full tube of PL to be sure all the gaps were filled. I only used half a tube on this kit.

If you follow the assembly order Leland recommends and get the first panels square to each other, everything else falls right into place. If time doesn’t permit you to assemble the main box in one sitting, I’d highly recommend putting the remaining panels in place, dry, to keep everything aligned. Once PL Premium cures, there’s no going back to adjust anything.

I erred in an earlier post when I wrote that the Arauco in my kit had 7 plies. (Leland: I’m surprised you didn’t correct me.) I based that on the first few pieces I’d looked at from the kit. My kit was a prototype and Leland apparently included a few braces he’d cut from Baltic Birch. Arauco has 5 equal-thickness plies.

Due to the pre-assembly warping I experienced, Leland has made a few changes to the flatpacks. These changes, along with proper pre-build storage/handling by the recipient, should prevent anyone else from having this problem.

Thanks for making this kit available, Leland!

Does it work for you on the gig? Tried it with a tube amp?

Cheers,
Cameron
 
Haven't gigged the new cab yet, but I've been gigging my first fEARful 12/6 (Alpha) for about a year. I REALLY like it. (I put my Acme B2 on C-list the morning after the very first gig with the fEARful.)

I haven't used a tube amp for bass guitar since the 70s, but I don't see why the cab wouldn't sound great with one. I use overdrive/distortion quite a bit when I'm trying to sound like a skinny-string guitar and am pleased with the 12/6 sound. (Note that I don't have tweeters in the cabs.)