• TalkBass has been independent since 1998. Add your voice.
    Create a free account to reply to discussions, view embedded media, and browse with fewer display ads.
    Join freeLog in
    Want zero display ads or expanded classifieds tools? Compare plans.

Fender Rumble Club

And the other question is, do the control knobs on the first combo drive both speakers? Does combo 2 effectively become just an extra speak and the combo 2 knobs don't do anything?
Yes, if it's the 8 ohm version. (no pre-post switch)


As you need to connect the FX send from combo 1 to the FX return to combo 2, does this mean that you can't use pedals in the FX loop anymore?
You could, but not "natively". It would need an ABY pedal (signal splitter).
efx send > pedals > ABY split > combo 1 and 2 returns.

Otherwise You would end up with a wet-dry setup where only the 2nd combo (wet) has the effects of the send/return pedals, the other would stay dry.
 

Attachments

  • Screenshot 2026-01-14 120436.png
    Screenshot 2026-01-14 120436.png
    976.5 KB · Views: 26
Yes, if it's the 8 ohm version. (no pre-post switch)
Thanks.
You could, but not "natively". It would need an ABY pedal (signal splitter).
efx send > pedals > ABY split > combo 1 and 2 returns.

Otherwise You would end up with a wet-dry setup where only the 2nd combo (wet) has the effects of the send/return pedals, the other would stay dry.
Double thanks! It occurred to me something along these lines, but thought I shouldn't double up my question with solutionising! Having said that, my thought might have been along the wet-dry setup so good to have it clarified about the ABY pedal.
 
And the other question is, do the control knobs on the first combo drive both speakers? Does combo 2 effectively become just an extra speak and the combo 2 knobs don't do anything?
If the combo that you are FX Send'ing into (from the combo that your bass guitar (or pedal board) is plugged into) is one of the newer 4 Ohm combos, the the Master control on it would work and you would be controlling each combo's volume output individually.

Otherwise the 2nd combo's power amp would be running as though the Master control was turned all the way up.
In this case you might want to turn the 1st combo's Master all the way up and then control the overall volume with the 1st combo's Gain control so that both combos will be putting out the same volume level.
 
  • Like
Reactions: GonePlaid
In this case you might want to turn the 1st combo's Master all the way up and then control the overall volume with the 1st combo's Gain control so that both combos will be putting out the same volume level.
That is not true! On the orig. 8Ohm version, the amp's Master control _is_ before the efx send/return. So the sender's Master controls both amp's volume.

The return there is basically a fully open 100W classD amp circuit.

On the 4Ohm version, Master _is_ after return.
 
Last edited:
  • Like
Reactions: GonePlaid
If the combo that you are FX Send'ing into (from the combo that your bass guitar (or pedal board) is plugged into) is one of the newer 4 Ohm combos, the the Master control on it would work and you would be controlling each combo's volume output individually.

Otherwise the 2nd combo's power amp would be running as though the Master control was turned all the way up.
In this case you might want to turn the 1st combo's Master all the way up and then control the overall volume with the 1st combo's Gain control so that both combos will be putting out the same volume level.
Thanks, that makes sense. I'd literally just seen G-Dogs old post (linked in the WiKi) which stated the "primary unit controls the auxiliary unit except MASTER".

Fender Amp Manual for Connecting Multiple Amps
 
That is not true! On the orig. 8Ohm version, the amp's Master control _is_ before the efx send/return. So the sender's Master controls both amp's volume.

The return there is basically a fully open 100W classD amp circuit.

On the 4Ohm version, Master _is_ after return.
That's the same thing my comment says (little bit different wording).

Please re-read my comment.
 
  • Like
Reactions: GonePlaid
That's the same thing my comment says (little bit different wording).

Please re-read my comment.
No. You were saying:
"In this case you might want to turn the 1st combo's Master all the way up and then control the overall volume with the 1st combo's Gain control"
Which is incorrect.
As I said (and as it's in the block diagram) Master is BEFORE efx send/return (and EQ). So it controls both amp's volume, by regulating the outsent signal. (including r100 8Ohm version)

On the 4Ohm, it does not matter as You control masters individually. That part at least was correct. :)

If You meant a mixed setup, then I'd just use an 8Ohm as the "master" amp. That way it controls both amp's volume (again by regulating internal AND sent signal levels via Master knob) after 2nd one's max volume been set up to needs/taste.

A lot of ppl were confused/whined about Fender's original design, but in real life, on the stage, having only 1 master control is just easier, simpler to manage. Specially if your combos are stacked with the controls buried under Your top box. :) Plug in 1 cable, just like if it were an ext. cab.
The only thing should be taken considered that Your efx send/return pedals' input volume _is_ affected by master. And You got no volume control after aforementioned pedals.
 
Last edited:
  • Like
Reactions: GonePlaid
Oops! Highlights the naivety of me saying something without thinking properly! As a friend once say, "those who think before they speak usually don't!" :laugh: Harsh, but true!


I'm 100% home practice for the forseeable future, and then I'd like to venture out to play with others. I'm happy that the 100 is more than enough for my needs for some time (if not realistically forever!), but the thought is always there of "what if". It's good to know that an option of grabbing a second 100 one day if I need it seems more suitable to my situation, and would give the extra. There are pros and cons of everything, but this seems like a good option.

Just a couple of additional curiosity questions, again, apologies if this has been said before, but I've not seen it yet....

As you need to connect the FX send from combo 1 to the FX return to combo 2, does this mean that you can't use pedals in the FX loop anymore?

And the other question is, do the control knobs on the first combo drive both speakers? Does combo 2 effectively become just an extra speak and the combo 2 knobs don't do anything?
The second(slave) amp has to be "on", but no other controls work. In effect it becomes a powered speaker. That is, everything is controlled by the knobs on the first(master) amp.
FWIW, I once hooked up my R100>R200c. Overkill for anything I'd ever do.
 
Thanks, that makes sense. I'd literally just seen G-Dogs old post (linked in the WiKi) which stated the "primary unit controls the auxiliary unit except MASTER".

Fender Amp Manual for Connecting Multiple Amps

Sorry, g, that post was an excerpt from my older Bassman 250 combo, which is different from most Rumbles 100 to 500 (except the 4 ohm R100).
 
Sorry, g, that post was an excerpt from my older Bassman 250 combo, which is different from most Rumbles 100 to 500 (except the 4 ohm R100).
I have two Rumble 100's (both V3). When chained together, the top maser combo controls everything for both except the volume on the second one.

Are you saying that if one of them is an 8 Ohm version it will control volume on both? If so, I'm wondering if both my combos are 4 Ohm or if one of mine is an 8 Ohm. If one is an 8 Ohm, perhaps if I make it the Master to the 4 Ohm Slave the 8 Ohm Master volume would control both?

I'll have to look. Does it say on the back panel what the Ohm rating is? I'd hate to have to take the speakers out to check.
 
I have two Rumble 100's (both V3). When chained together, the top maser combo controls everything for both except the volume on the second one.

Are you saying that if one of them is an 8 Ohm version it will control volume on both? If so, I'm wondering if both my combos are 4 Ohm or if one of mine is an 8 Ohm. If one is an 8 Ohm, perhaps if I make it the Master to the 4 Ohm Slave the 8 Ohm Master volume would control both?

I'll have to look. Does it say on the back panel what the Ohm rating is? I'd hate to have to take the speakers out to check.
The 4-ohm unit has the pre/post switch, the 8-ohm does not.
 
The 4-ohm unit has the pre/post switch, the 8-ohm does not.
Thanks. Both of mine have the Pre/Post switch. Of course it's not all that hard to adjust two volume controls even when stacked. Not as convenient of course, but doable.

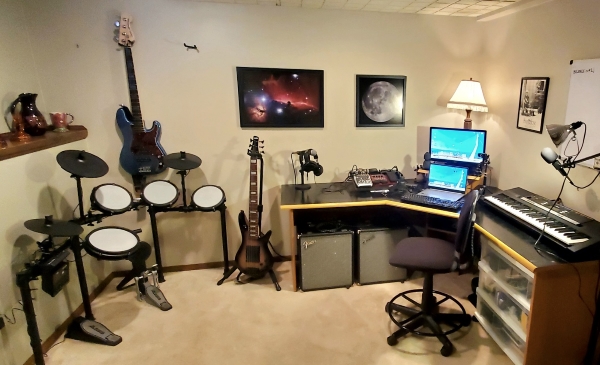
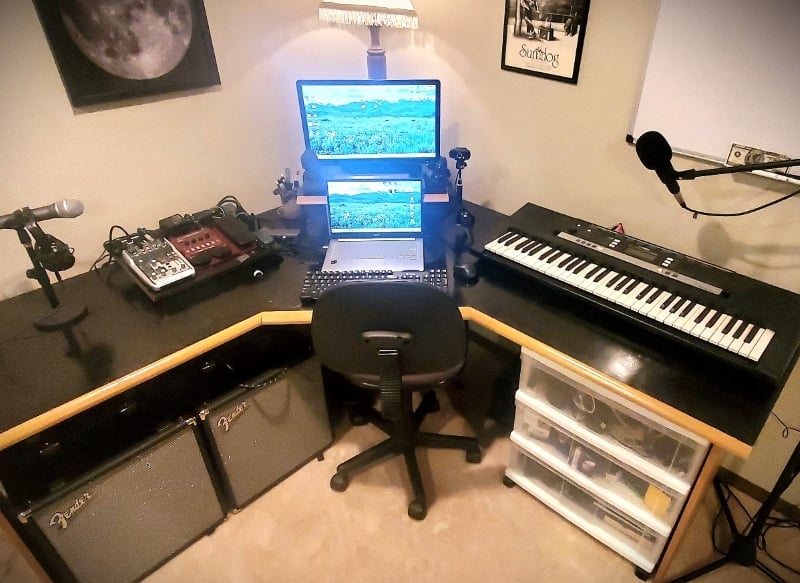
Currently, in my home studio they aren't chained as I use one as a monitor (or another amp for my e-drums, synth, guitar or for other musicians to use when not using headphones) and it's set flat. Most of the time I use headphones anyway. My Rumbles are under my studio desk side by side currently...

Music-Studio-complete.jpg


Music-Room-2.jpg
 
Sorry, g, that post was an excerpt from my older Bassman 250 combo, which is different from most Rumbles 100 to 500 (except the 4 ohm R100).
No worries G-Dog, I looked at it quickly and maybe jumped to conclusions 😕
Currently, in my home studio they aren't chained as I use one as a monitor (or another amp for my e-drums, synth, guitar or for other musicians to use when not using headphones) and it's set flat. Most of the time I use headphones anyway. My Rumbles are under my studio desk side by side currently...
Nice home studio, and so tidy!
 
Nice home studio, and so tidy!
I always clean and straighten up for photos. But yeah, I have it setup so all the cables and such are hidden behind my corner desk. It's a huge corner desk, which helps a lot. My goal was to have access to everything without resorting to moving things around. I can use various instruments and my mixer is centrally located so my headphones reach to all instruments. I also use a wireless mouse so I'm not tied to my computer to start/stop recording on my computer.
 
3.1 Stripping The Adhesive

It took some elbow grease to get the black spray adhesive off the lower back of the cab.

IMG_20260112_191457929.jpg

I had to use the Acetone and an old t-shirt to strip the heavy layers of the adhesive off. Wet the t-shirt with the acetone and and scrub vigorously and the adhesive will ball up in little pills. Brush the pills off and repeat until you finally get all the heavy concentrations off.

*When using the acetone, do so in a well ventilated area (I had a fan circulating the air with the window open.), wear gloves (you really don't want that stuff to seep into your hands or dry your skin out) and no open flames (or powered electrical equipment. The Variac, buss strip and meter in the corner were unplugged).


4. Prepping The Cabinet

Next, I started sanding using an orbital sander with 60 grit sandpaper. Several areas still has a thin layer of residual adhesive. This residue will pill up as you sand. Just keep brushing it away and keep sanding until the surface is mostly clean and leveled. At this point you should be able to switch to an 80 grit paper and this should pull any remaining residue off the surface. Once everything is sanded, then I sand it again, this time with a 120 grit paper.

From here, I dusted everything off, in preparation for the next step.

IMG_20260114_144752479.jpg

The bottom section in this photo is where that black spray adhesive was and is stripped down to the bare MDF. The remaining black is the flat black spray paint, inside the chassis compartment.

I have one spot on the cabinet that is going to require filling. It's at the bottom-middle of the front, below the grill opening.

IMG_20260114_153429583.jpg

If you look closely, you'll see a crack radiating down and to the right from the gouge. I thinned few drops of Titebond with a a couple drops of water, mixed it with a toothpick and then worked a few drops off the toothpick, down into the crack. The thinned wood glue will seep into the crack through capillary action. I then took a couple pieces of scrap wood and a pair of clamps and pressed the MDF back in line.


IMG_20260114_160108195.jpg

I will have to let this sit until tomorrow, then I'll be able to remove the clamps and fill the gouge with some wood putty. That should give me time to go to the hardware store to get some more wood putty, as what I had has dried out solid.

More to come...​
 
...

As you need to connect the FX send from combo 1 to the FX return to combo 2, does this mean that you can't use pedals in the FX loop anymore?
Sadly, yes. This is teh biggest drawback to this setup -- for those who use the FX loop as such, or who like to drive the amp through hte FX loop rather than using the built-in preamp.
And the other question is, do the control knobs on the first combo drive both speakers? Does combo 2 effectively become just an extra speak and the combo 2 knobs don't do anything?
The knobs on the first are indeed in control, *except* that if your second R100 has a pre/post switch as some newer R100s have, its master volume knob controls its volume, so you'd likely want it dimed to get the same volume from both cabs.
 
  • Like
Reactions: GonePlaid and g-mca
I have two Rumble 100's (both V3). When chained together, the top maser combo controls everything for both except the volume on the second one.
This tells me the second one has the pre-post switch and you need to run its master wide open *or* if the current first amp does not have the pre/post switch, swap which comes first. Either way will work.
 
  • Like
Reactions: GonePlaid
3.1 Stripping The Adhesive

It took some elbow grease to get the black spray adhesive off the lower back of the cab.

View attachment 7409658

I had to use the Acetone and an old t-shirt to strip the heavy layers of the adhesive off. Wet the t-shirt with the acetone and and scrub vigorously and the adhesive will ball up in little pills. Brush the pills off and repeat until you finally get all the heavy concentrations off.

*When using the acetone, do so in a well ventilated area (I had a fan circulating the air with the window open.), wear gloves (you really don't want that stuff to seep into your hands or dry your skin out) and no open flames (or powered electrical equipment. The Variac, buss strip and meter in the corner were unplugged).


4. Prepping The Cabinet

Next, I started sanding using an orbital sander with 60 grit sandpaper. Several areas still has a thin layer of residual adhesive. This residue will pill up as you sand. Just keep brushing it away and keep sanding until the surface is mostly clean and leveled. At this point you should be able to switch to an 80 grit paper and this should pull any remaining residue off the surface. Once everything is sanded, then I sand it again, this time with a 120 grit paper.

From here, I dusted everything off, in preparation for the next step.

View attachment 7409672

The bottom section in this photo is where that black spray adhesive was and is stripped down to the bare MDF. The remaining black is the flat black spray paint, inside the chassis compartment.

I have one spot on the cabinet that is going to require filling. It's at the bottom-middle of the front, below the grill opening.

View attachment 7409677

If you look closely, you'll see a crack radiating down and to the right from the gouge. I thinned few drops of Titebond with a a couple drops of water, mixed it with a toothpick and then worked a few drops off the toothpick, down into the crack. The thinned wood glue will seep into the crack through capillary action. I then took a couple pieces of scrap wood and a pair of clamps and pressed the MDF back in line.


View attachment 7409696

I will have to let this sit until tomorrow, then I'll be able to remove the clamps and fill the gouge with some wood putty. That should give me time to go to the hardware store to get some more wood putty, as what I had has dried out solid.

More to come...​
When I clamp a repair like that, I'll usually place a piece of parchment paper or wax paper between the cabinet and scrap wood so that the scrap wood does not accidentally become glued to the cabinet. Ask me how I know to do this...