• TalkBass has been independent since 1998. Add your voice.
    Create a free account to reply to discussions, view embedded media, and browse with fewer display ads.
    Join freeLog in
    Want zero display ads or expanded classifieds tools? Compare plans.

My New Studio Build (perhaps overly detailed)

Been there, done that, back in my landscape construction days. I liked that part of the job as much as I liked arranging orchids for Bill Gates, but my body gave out.
 
Last edited:
Young'ish...

I'm not sure what the cut-off for being "young" is anymore. I'm 33 and will be 34 in a few months. At that point I will officially be in my mid-30s. Does that still qualify as young? I don't know anymore. I don't really like much new music coming out these days, I don't go out to scenes where you typically find young people... I don't feel old, but young might be a stretch, haha.

I started going down hill when I turned 21. Sore muscles are there to let you know that you're still alive.
 
  • Like
Reactions: sjrash
Site Construction Day Two:

To say that the last eleven days have been taxing would be a positively massive understatement. I'm going to attempt to recreate the flurry of activity in chronological order. I should mention that everything went surprisingly well despite being such hard work. As such there are no long expository passages for me to explain difficulties with things like tools not working and being forced to rent a Bobcat or the utter perplexity of the Seattle DPD permitting process. This will be more of a photo journal than anything.

The first thing to mention is that the main thing I needed to accomplish all of this site work was a couple of friends willing to work on Superbowl Sunday. Our goal was to finish the bottom course of blocks. Once that was done it just becomes a game of stacking Legos. Super heavy Legos. Legos made of concrete. The first course was unbelievably tedious. The most time consuming part was ensuring that each block was both level and plumb, then checking the level of a span of four blocks to ensure that the whole thing was going to work out.
DSC_1747.jpg


The process went much like this for all of Sunday.
DSC_1755.jpg


This was the scene when we broke for lunch after completing the western face.
DSC_1772.jpg


The corners were especially tricky. You have to ensure level and plumb across perpendicular faces AND you have to make sure that you're building on a 90-degree angle. We used the handy Pythagorean's Theorum (A^2 + B^2 = C^2) to make sure that the angle was actually 90-degrees. With some tweaks we got it done correctly on both of the structure's corners.
DSC_1776.jpg


Other than a shovel, mattock and exterior broom these were the tools that made the job possible: A level, home-made level guide (to check plumb on each block) and a rubber mallet borrowed from my neighbor (a bigoted old racist, sexist, seemingly everything-ist who just happened to have a tool that made the job easier despite having to hear is offensive ramblings about immigrants, women, homosexuals, etc. and how they're all ruining the country... Ugh...).
DSC_1782.jpg


My buddy Todd putting the level and level guide to good use.
DSC_1766.jpg


We weren't able to get everything knocked out in one day. This was the scene at the end of the day. We had finished the western and northern faces (the bottom course only mind you). The flash on my wife's camera makes things a little deceiving here. We were rapidly running out of daylight, and decided to call it. Fortunately my wife had picked up pizza from Zeke's and we happily chowed down to cap off a productive day.
DSC_1786.jpg
 
Last edited:
Site Construction Days Three, Four and Five:

The next day was Monday and I had to get back to work. This meant that my evenings would be spent trying to finish off the first course of the block wall in the dark working via a headlamp and by myself. I had one day of dry weather before the rains were forecast to set in, so I bit the bullet and got to work as soon as I got home from work. Work + more work = miserable.

Much to my surprise my buddy Jesse came back for one more day of fun. I'm seen here displaying the highest caliber of fashion sense known to man. Work boots, basketball shorts stained with beige paint from working on my last house, a plaid shirt, and orange work gloves. Sorry ladies, I'm taken.
DSC_1806.jpg


Jesse, an avid mechanic and motorcycle racer (don't ask me what kind... The fast kind... The north of 1,000cc sport bike kind) brought a mechanic's shop light to help illuminate the work site. We hung it off of a recycling bin in true MacGuyver fashion (if you don't get that joke you're clearly younger than I).
DSC_1794.jpg


It doesn't look like much, but we were able to get 12 more blocks installed in a couple of hours worth of work.
DSC_1801.jpg


The following two days (four and five) were spent doing the same type of work albeit by myself and in the rain. It was a soggy, lonely, boring mess, but I'm happy to say that I was able to get almost all of the first course completed. I didn't have it done before the weekend, which was my goal, but I got close enough to feel happy about it.
 
Site Construction Days Six, Seven and Eight:

I was nearing the end of the first course of blocks. It was a real light at the end of the tunnel sort of realization. I could see the finish line. This was the scene at the completion of that task. There's a slight bow in the wall where I didn't correct for a deviation in the line of the blocks. I thought I was doing a good job of checking it against a string level, but it clearly got away from me. It's not enough for me to lose sleep over it, but I do wish that it would have come out more straight. Oh well. The good news is, the first course is completed and I can get on to heavier and more brainless activities, which was oddly comforting.
DSC_1812.jpg


The rains were coming in down in full force as far as Seattle weather is concerned. It's always more of a drizzle than a downpour, but throughout the day I looked like a drowned rat.
DSC_1816.jpg


Earlier that morning I had rented the mighty Norton BBM307 block saw to make all of the required cuts. The first day I accomplished all but three of the cuts. I knocked out the others the second day, and returned the saw this morning. Here it is in all of its glory.
DSC_1824.jpg


It was an absolute roaring beast. It has a garden hose hookup to keep cool water flowing over the blade while cutting. This keeps dust down and helps to keep the blade from getting too hot while slicing through solid concrete like it was cheese. Hard cheese, but cheese none the less. Also note that I had full goggles and construction-grade ear plugs on at all times while operating the saw. SAFETY FIRST PEOPLE!
DSC_1814.jpg


Just look at that proud beast. I must admit that I have a little man-crush on ol' Norton.
DSC_1821.jpg


By the end of the day on Saturday the wall was really starting to take shape.
DSC_1833.jpg


My wife was really enjoying her new camera. The wall was getting some serious Glamour Shots.
DSC_1843.jpg


Even my tape measure got in on the action. Sadly I must report that the tape measure did not survive the weekend. It's in a better place now... A recycling bin.
DSC_1842.jpg


This was the scene at the end of the day on Saturday. @Selta commented on Facebook that this picture looks like an album cover from 1982. I'm inclined to agree.
DSC_1836.jpg


Sunday was spent finishing up the last three remaining cuts and then packing up the saw so I could return it on Monday. I was also able to set a majority of the caps. I still need to align them all properly and secure them with construction adhesive. I'm waiting for the weather to warm up and dry out before I even bother, otherwise you're not guaranteed a secure bond. The caps are 73lbs a piece, so I'm not worried about them going anywhere in the meantime. I was short four blocks on the eastern wall when I wrapped things up yesterday.
Picture%201.jpg


Here's an idea of what the finished product looks like minus the dirt on the inside and a building on top.
Picture%202.jpg


Today I placed an order for the missing blocks, as well as some for a series of steps I'm going to make from my driveway/parking pad down to the studio area. My supplier was able to fill the order and deliver them this afternoon. How's that for service huh? No shortage of projects on my end. Now comes the next part of the hard part. There's never an end to the hard parts. I should just get used to it. I need to finish spreading the existing dirt inside of the walls and getting it compacted. Beyond that I need to have 21 cubic yards of fill dirt brought in. It has to be delivered inside the wall without destroying the wall, so a conventional dump truck is out. Presumably this will take several deliveries either with yard buckets on a forklift, or some other method I haven't considered or know about. I have calls in to three different suppliers and am waiting for a response. Being a federal holiday (President's Day) I suspect I won't hear anything back until tomorrow. Once the 21 cubic yards of fill dirt are placed I'm going to need about 7 cubic yards of crushed rock to finish off this portion of the site prep. Lastly I'll need to install the French drain system around the top and bottom of the walls, but that might have to wait until the building is installed as there could be complications with the installation of the earth anchors that secure the building if I have a series of perforated pipes running around it. It never ends...

More on this as things develop.
DSC_1840.jpg
 
Great, progress, great photos! That brick looks beautiful.

Thanks. We were very happy with how well the dark gray matched our siding and the orange matched the pressure treated support posts and stained fir doors around our house. The studio has the same color and type of siding as the house, so it should make for a nice cohesive theme.
 
  • Like
Reactions: Luke19Boarder
After moving 16,000 pounds of concrete over the weekend (seriously), and moving 14,400 pounds of dirt by shovel (also seriously) by the end of the day tomorrow... Well... Let's not talk too much about back surgery please :p

Dude - as you described your upcoming weekend a few days ago, I immediately recalled doing the same thing in 2013.

I cut, broke up and hand bombed 16,ooo lbs of reinforced concrete slab in my backyard and moved it all twice - once into a pile outside my back gate and THEN into the hauler. 100+ chunks ranging between 100 and 200 lbs.

Did it all myself, which in retrospect was stupid. It's only been a couple of months now that my back is back to normal (no surgery required)! Next time I do that, I'll hire someone. I spent almost as much on massage and PT.
 
One of the three companies I asked for a quote has a shooter that they call the "Slinger Truck." I'm going to follow up with them tomorrow to see how much it costs.

I just got the first of three quotes back on fill dirt (not from the company with the Slinger Truck). At first glance it seems pretty great. $530 for all the fill dirt I would need, minus the 6" of crushed rock that goes on top. The problem is that they have no way of placing the dirt inside the structure. That means it would have to go in my driveway/parking pad and then I'd have to hire laborers to help me move all of it inside the structure. Add the cost of two wheelbarrows to the proceedings, the fact that it would have to be delivered on two separate days and the cost really looks like about $2,000. Additionally the staging area would be left with a fine layer of dirt that would rapidly turn to mud the next time it rains. That's where my wife parks her car, so it's hardly optimal. The cost to have my current concrete block supplier bring ALL crushed rock (they don't carry fill dirt) and place it inside the wall using a forklift with a boom one yard at a time works out to $2,400. That's $400 more for a considerably more stout base material, no additional work on my end, no dealing with laborers, no creating a mud patch where my wife parks her car, and way less of a pain to my back making all of the trips back and forth with a wheelbarrow since I'd end up working alongside the laborers. Thus far spending the extra $400 is definitely making a stronger case than this first quote.
 
A load of fill and a Bobcat rental for a day could be a less expensive route and less laborious than shovels and wheelbarrows. Haven't rented a machine in a while, but I did get a mini-excavator, delivered and fuelled, for about $350 for one day a few years back. A Bobcat should come in around the same price for a day's rental. Check Home Depot.
 
Young'ish...

I'm not sure what the cut-off for being "young" is anymore. I'm 33 and will be 34 in a few months. At that point I will officially be in my mid-30s. Does that still qualify as young? I don't know anymore. I don't really like much new music coming out these days, I don't go out to scenes where you typically find young people... I don't feel old, but young might be a stretch, haha.
34 is very young. Just saying. It is amazing how long you can keep doing things like you are doing, so long as you don't mind how sore you know you will be.

Consider using pea gravel instead of fill dirt and crushed rock. You might need to use some crushed rock, but you will have to compact everything or the slab you pour for the building will settle and crack. Pea gravel will be a bit more expensive, but they can deliver it in a concrete mixer and place it like concrete. It just comes down the chute. You don't have to use a plate compactor or any other kind of vibrating, nasty machine to keep the place from sinking where you least expect it. Since the pea gravel is contained by the block wall, it won't roll away. You will have to deal with the open end somehow, but whatever that means, it's got to be easier than horsing around wheelbarrows full of dirt and crushed rock. It's just a thought from a semi-reformed former professional knuckle dragger.
 
Last edited:
To clarify: I've mentioned this several times throughout the thread, but people seem to consistently miss it. There is no concrete slab. None. Doesn't exist. The building is constructed on top of a galvanized steel substructure that is placed directly on top of a base of compacted 1/4"-minus or 5/8"-minus (both are acceptable) that is no less than 4" thick after compaction, and then secured to the ground with Manta Ray earth anchors.

Pea gravel is an interesting idea, but just moments ago I got off the phone with the inspector for this project and he's headed in the other direction. He wants to see a larger subgrade course. He wants to see the minimum 4" of compacted 1/4"-minus or 5/8"-minus, followed by a second course of 3/4"-minus extending all the way down to compacted native material. I confirmed that with my building guy and he said that would be just fine.

Earlier today I spoke to one of the outfits from which I requested a quote for backfill material. They've got a slinger truck that can easily place the material behind the walls without the need to stage and wheelbarrow it after the fact. They recommended 4" lifts, which would require six separate deliveries of about 4.67cy a piece. I'm going to see if everyone involved (material supplier, building guy, inspector) all agree that 6" lifts and a plate compactor will ensure proper compaction. If they agree, that cuts the deliveries down to four, which is much more reasonable. First things first is that I have to finish spreading, leveling (roughly) and compacting the existing native material currently behind the wall. Once that's wrapped up I'll have a better quantity to use as an estimating tool for materials.
 
Tonight I got the existing dirt inside the walls spread out and roughly leveled. Tomorrow night I'll do a little more spreading to fill in some noticeable low spots and then compact it.

The good news is that I'll need less backfill imported than I had expected. I was expecting 2' deep, but now it's closer 1'. My only concern is that the inspector will say I need more crushed rock. I'll find out tomorrow. If 1' of compacted rock is sufficient I'll be placing an order for Saturday (hopefully) and renting a vibratory plate compactor. The slinger truck will be the go-to method for this. Definitely moving smoothly now.
 
  • Like
Reactions: theLimeyBrit
Site Construction Days Three, Four and Five:

I'm seen here displaying the highest caliber of fashion sense known to man. Work boots, basketball shorts stained with beige paint from working on my last house, a plaid shirt, and orange work gloves. Sorry ladies, I'm taken.
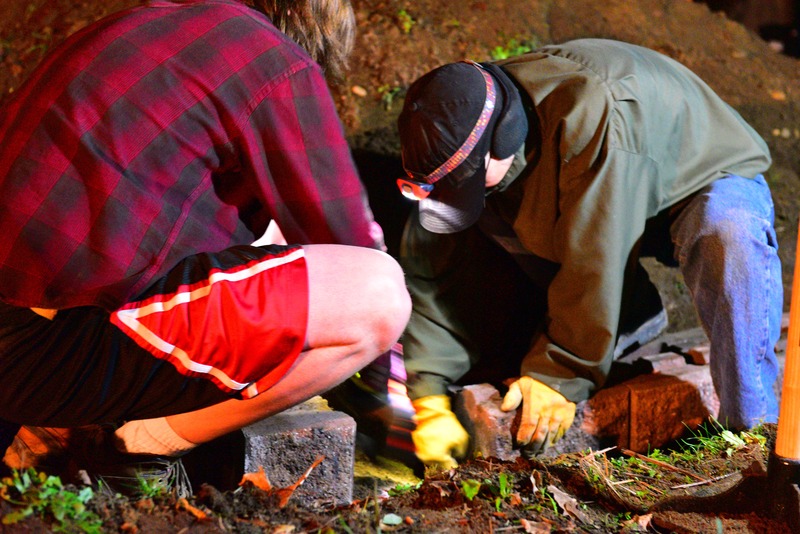
DSC_1806.jpg
Jeff Ament made a mint with that basketball-lumberjack look. He's in your hood; maybe you can share closets! :thumbsup:
 
  • Like
Reactions: GrizzleTone