
• TalkBass has been independent since 1998. Add your voice.
    Create a free account to reply to discussions, view embedded media, and browse with fewer display ads.
    Join freeLog in
    Want zero display ads or expanded classifieds tools? Compare plans.

My ultimate Jazz Bass build.

Feb 19, 2021
1,191
3,414
38
Oregon
It's a parts bass. A body from here, a neck from there...

The woodwork is Chinese. I'm ok with that. It's accurately made and keeps my cost down.

The bridge is a Babicz string thru body, tuners are Guyker (Korean, you need to try them. They are very good, but beware Chinese knock-offs - buy direct). Generic control plate, full size pots, oil in paper tone cap, and a really nice quality pearloid pick guard. Graphtec nut, Schaller straplocks, Hipshot control knobs, copper shielding, star earthed, etc., etc.

The body is sycamore, it's light but rings like a bell and I think it will go well tonally with the (mostly) aluminum bridge. The neck is Canadian maple, and allegedly has carbon fiber reinforcement beams. I can't afford to cut it in half to verify this.

The pickups are custom wound on fiber bobbins, wax potted. Alnico-v magnets, and alll the insultion is waxed cloth. 6.8k neck, 7.8k bridge. There's a lot more to voicing than DC resistance and vintage materials, so let's see where this goes.

This is the rough cut...

2021-05-17 08_32_05-IMG_0077.JPG - IrfanView (Zoom_ 1213 x 910).jpg


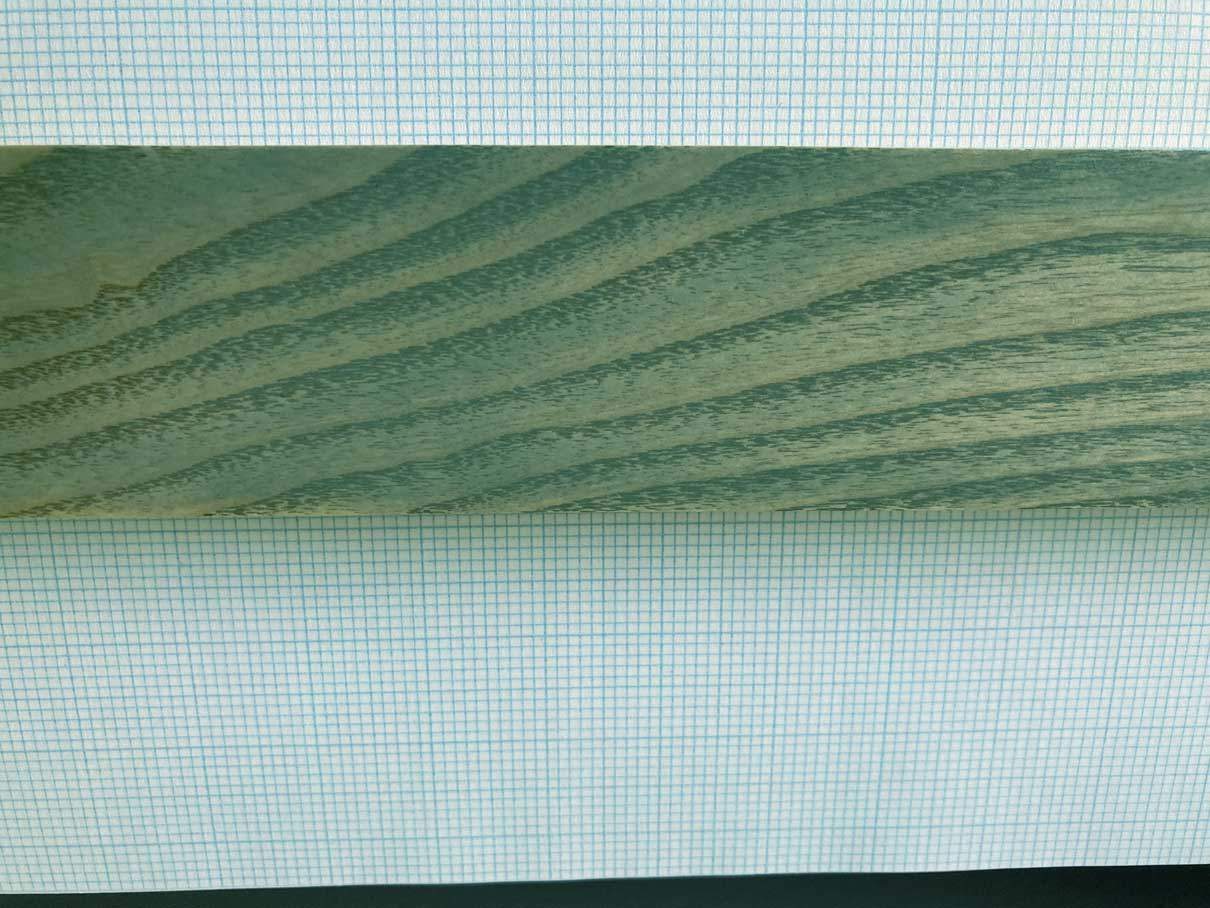
I'm bleaching the wood out now before filling the grain with a deep teak color for a sage green stain. I think I will switch out the pickguard for white.

Sage green test piece...
IMG_0070.jpg


Tung oil and refined beeswax over that. I don't want something difficult to repair.

Headstock shape will be vintage P style/ Tele. I'm laying that out now taking into account the slightly different sizes of my tuners. I could have just bought straight up Kluson type copies but I wanted to use the Guykers. I have them on other basses and they work really well. They do manufacture a Kluson style but I am a sucker for punishment.

2021-05-17 07_48_49-IMG_0074.JPG - IrfanView (Zoom_ 1213 x 910).jpg


img20210517_05114425.jpg


I suppose it can either work really well, or be pretty firewood. Let's see how this goes.
 
I like the tele headstock myself. Looks like it’s gonna be really cool and bet it will sound great ! Congrats and best of luck !! As far as reinforcement beams I would care either way as the vintage stuff didn’t have it or need it. Reinforcement rods can sometimes change tone, that’s what I have found. It’s very subtle but in steel bar neck I can hear a little less bloom of the notes but it doesn’t bother me. Carbon fiber rods don’t seem to effect tone as much as steel. Anyway, enough of my opinion :)
 
  • Like
Reactions: ChickWithaRic
After a lot of very careful measurement and chickening out, I've had a really productive day.

First task was to perfect the neck pocket. I didn't take pics, I'm sorry. Next task was to mark out for the six (count them, six) neck bolts, drill through for those, and bolt on the neck so I could mark out for the bridge placement.

You will notice that I gave scant, if any, attention to the finish of the counterbored holes for the neck ferrules. There's a reason for this. All will be revealed.

IMG_0082.jpg


Next, headstock. I have spent quite some time making a very accurate template from 1/2 flooring grade MDF using a drawing I made in Adobe Illustrator. I know Illustrator is not a great CAD tool but it's perfectly sufficient for simple 2D tasks and it's what I am used to using professionally.

I used three 3/4" woodscrews to locate the template (the screwholes are covered by the machines) and drew the outline. Removed the template, and set about it with a jigsaw using a Bosch clean cutting blade. Then, I reattached the template, and used a top bearing guided router cutter in my Makita trimmer to finish the basic outline. Before removing the template, I drilled through the very accurate holes made in it to locate the machine heads.

IMG_0081.jpg


There's still fine sanding to do but I am happy with my Tele-Jazz head.

Now why would you make your own template and spend hours on it? Because you might be using a machine head that doesn't follow Fender dimensions. I'm using genuine Guykers, out of preference, and they measure out very differently to a Kluson style macine. It's only a matter of 1/16 or 3/32 here and there but the differences are absolutely critical. These are not a straight swap part.

Because my template gave me a perfectly perpendicular (double word score) pilot hole through the headstock, I felt confident enough to use a stubby auger bit to drill the final 16mm (metric sytem) hole required. Auger bits are very good, you just need to be gentle but firm. They also cut very accurate holes because of the way they are designed. We've used these for a couple hundred years. They just **work**.

IMG_0084.jpg


I had already marked out for the exact centerline of the instrument and worked out where the Babicz bridge needed to be relative to the nut so that all four strings can be intonated. One of the quirks of the Babicz is that you need to entirely dismantle it to fit it. Kind of a nuisance but hey whatever. It's a really lovely piece of enginerding.

I got the bridge baseplate fitted then marked out for the strings-through-the body holes. I piloted them all the way through with a 3/32 then took them out to 3/16 before flipping the body over and going part way through at 3/8 for the ferrules.

Babicz supply 1/2" ferrules. No way am I using those. By the time you've drilled out, there's next to nothing left. It almost defeats the object of stringing through.

I fitted my 3/8 ferrules but didn't press them home yet as there is a lot of finishing left to do. They are a good tight fit and in a nice straight line. I'm happy.

IMG_0080.jpg


IMG_0083.jpg


Whilst the body centerline was marked up, I drilled out for the rear Schaller straplock and fitted that too, just for fun.

Then I fitted the machines to the head. Hardly a square inch of wasted space, and I like that. I also really like the look of the Guykers, which was why I spent quite a long time doing the drawings for them to work. The Hipshot stringtree also showed up for its beauty shot.

IMG_0087 (1).jpg

IMG_0091.jpg


They are not correctly lined up and I have no intention of installing their set screws until the last possible moment. I hate those little f#!@Ke#s.

Next job is to rout the heel scoop. I intend to reduce the heel by a third of its depth, but over a fairly large area. I have marked out for it, and now need to template that for the router. I will modify a cove cutter with a top bearing guide to run on the template to take out the curve, then use a straight cutter to remove the rest. That's quite a big job but perfectly achievable.

IMG_0089.jpg

See? I told you all will be revealed, and that's why I was unfussy about setting up the drill press and a forstner bit to cut the ferrule recesses. That will come after the scoop has been... erm... scooped.

And my head is yelling "NO!" but my heart is saying "HELL YEAH!" about the pickup cover. I shall drill the pickguard for it and countersink the holes so it can be on or off, and still look nice if you put the screws back in after removing it. Jazz bass pick up covers are my guilty pleasure.

IMG_0090.jpg


Overall beauty shot of the game so far...

IMG_0088.jpg

I had a really enjoyable morning making a mess of perfectly good things, and thank you for reading along. I think we can have a lot of fun with this.
 

Attachments

  • IMG_0089.jpg
    IMG_0089.jpg
    67.5 KB · Views: 37
  • IMG_0091.jpg
    IMG_0091.jpg
    96.9 KB · Views: 27
  • IMG_0088.jpg
    IMG_0088.jpg
    101.3 KB · Views: 35
I like the tele headstock myself. Looks like it’s gonna be really cool and bet it will sound great ! Congrats and best of luck !! As far as reinforcement beams I would care either way as the vintage stuff didn’t have it or need it. Reinforcement rods can sometimes change tone, that’s what I have found. It’s very subtle but in steel bar neck I can hear a little less bloom of the notes but it doesn’t bother me. Carbon fiber rods don’t seem to effect tone as much as steel. Anyway, enough of my opinion :)

I went for the tele headstock, I just think it is so much neater and so much better looking than the later shapes. I agree about reinforcement beams, it introduces a lot of non resonant material into a structure that is supposed to resonate. In Oregon we probably don't need them as we have a fairly temperate climate. Florida people, on the other hand, may feel the need.
 
My only gripe with Tele headstocks, and perhaps that won't be a thing with this bass (it's still larger overall than the guitar version, yes?), is that it doesn't seem to hang/fit properly on guitar stands. Well, the ones that hold the neck at the headstock. I have a Tele which I needed to fuss over the stand for, so it sat the way it's supposed to.

As I say, there's a chance that just won't apply here. And regardless of that function flaw on my guitar, I do love the look of a Tele headstock for sure
 
Indeed it was. It's not a super frequent occurrence, but I've seen it enough that it's fair to say not all hanging stands will work with that shape headstock

Hanging stands don't work well with Fender style headstocks, period. I'm not a fan of them anyway. I feel they put a lot of stress into the instrument. I'm not saying that really is the case, but it just seems like it to me.

One thing about stands I learned the hard way - remove that butyl rubber sleeving and replace it with cloth tennis racquet tape. Butyl attacks paint. I have a couple of instruments with bad stand rash because of that.
 
I had intended to get on with this yesterday, but woman plans and God laughs.

So, I'll get on with it today instead. Hopefully by the end of the day the body will have had its neck heel reduced, have been finish sanded, grain enhancer/ filler applied and scotchbrited back, and at least have received the first coat of sage green stain. I also want to drill out the neck bolt holes to take threaded inserts. What could possibly go wrong.
 
Here's the scoop. Not quite finished or properly blended in.

IMG_0094.jpg


I'm not happy with the quality of the wood. It's way too soft. I've ordered an ash body to replace it, but I will carry on with this one anyway as a test mule. It just means I won't go the extra mile on finishing. It's really not a big deal. About to sand back grain filler.

EDIT: Actually, no I'm not about to do that, as it's not dry enough yet. This sycamore is like a sponge. It was, on reflection, a poor choice, but this is how we find things out. It's all good.
 
Last edited:
Alrighty so, moving on and accepting I made a poor purchasing decision which is hardly the end of the world as we know it, I have nonetheless made progress.

Maybe I won't junk this body after all. I'll let you into a little secret. I bought two of everything. Enough to make two complete basses. Number 2 will have the ash body but despite my misgivings over material quality, this one is going how I had vizualized.

I think we left this yesterday as I had just applied grain enhancer/ filler. This is when things often look disastrous. That's ok. It's a stage in a process.

IMG_0095 (1).jpg


That's a traditional grain filler, diluted from the tin with mineral spirit and applied with a traditional "rubber" (a wad of cotton wrapped in a lint free cloth), and then squeegee'd into the grain. An old credit card is ideal for this. You MUST get it right down deep in those pores. It will look AWFUL. It doesn't matter. It's temporary and you'll fix it.

I knocked that back with a cordless palm sander to 400 grit and gave it a thorough brushing over to remove loose sanding dust.

Then, I applied the stain. I am using a stain made by a UK company called Village Green, I have mentioned this before. This actual color is called "Basil", but for me it's very close to a Fender sage green. The stain was applied with a good quality brush (a Purdey, for tool freaks), and I did not dilute any of the coats.

IMG_0097.jpg


That looks very dense, almost like the current Fender "trans" colors on the higher end Squiers, and it's not what I'm shooting for at all. Forgive my iPhone for making it look more blue than green.

That was left for 24 hours to fully cure.

This is when we start to have fun. I began to apply tung oil, with a very fine scotchbrite pad. The tung oil and scotchbrite together can burn through the stain, and you can get quite creative with producing age and wear effects.

Once I had the precise effect I wanted, I walked away, did other things, and let the oil cure. Then, I used several coats of refined beeswax to "fix" the color.

IMG_0102.jpg

IMG_0099.jpg


And yes, I know, not everybody will like that aesthetic, and that's ok. If we all liked the same things, it would get boring very quickly. If you hate it, feel free to say so, and I mean that. I'm a grown up and I can accept constructive criticism, it helps me become better at the things I do.

Personally, I love it and it's exactly what I had in mind.

Next, we'll make it playable. Thanks for looking.

May your strings remain tensioned, and your lives remain relaxed.
 
The body is sycamore
Thought I recognised the grain, any chance it was described as "barrel scyamore" ?

I knocked up a P-bass made from it last year, needed a test subject for varitone pots. It's very light, very soft and very porous. I'd say it's really Paulownia going under a different name.

I'd advise against pre-drilling for screws. Just thread the screw in with a driver, unscrew it then flow some thin CA into the hole.

It's actually a nice timber to work with, once you get your head round the softness. Takes oil and wax finishes well.
Still need to resolve the neck dive on that build but turned out a sweet sounding bass.
Budget Bass (5).JPG
 
It was sold as London Plane. Which is, essentially, sycamore. It's light and resonant but tears out even with new/ sharp tooling, and is unacceptably soft for anything but the most careful of use. There's no fun in "carefully using" a bass guitar.

I'm going for ash, but I think this was an acceptable, albeit temporary, result.
 
It was sold as London Plane. Which is, essentially, sycamore. It's light and resonant but tears out even with new/ sharp tooling, and is unacceptably soft for anything but the most careful of use.
London Plane isn't that soft,much harder than say Alder. It's halfway between US sycamore and the species we have in Europe. Course our sycamore is really a maple, not far off black maple on the janka rating.

If you look at the grain on this you'll see why I thought Paulownia.
paulownia body.jpg
 
  • Like
Reactions: ChickWithaRic
Sold as London Plane. I'd say it was Asian sycamore, my fingernail can easily leave a deep impression in it. Either way, ash solves the problem, and it was not an expensive experiment.

I'm actually very happy with the finish I achieved, which is 100% what I had in mind.