• TalkBass has been independent since 1998. Add your voice.
    Create a free account to reply to discussions, view embedded media, and browse with fewer display ads.
    Join freeLog in
    Want zero display ads or expanded classifieds tools? Compare plans.

Router Planing Fixtures

Happy 2021 All!

Just thought I’d share this...

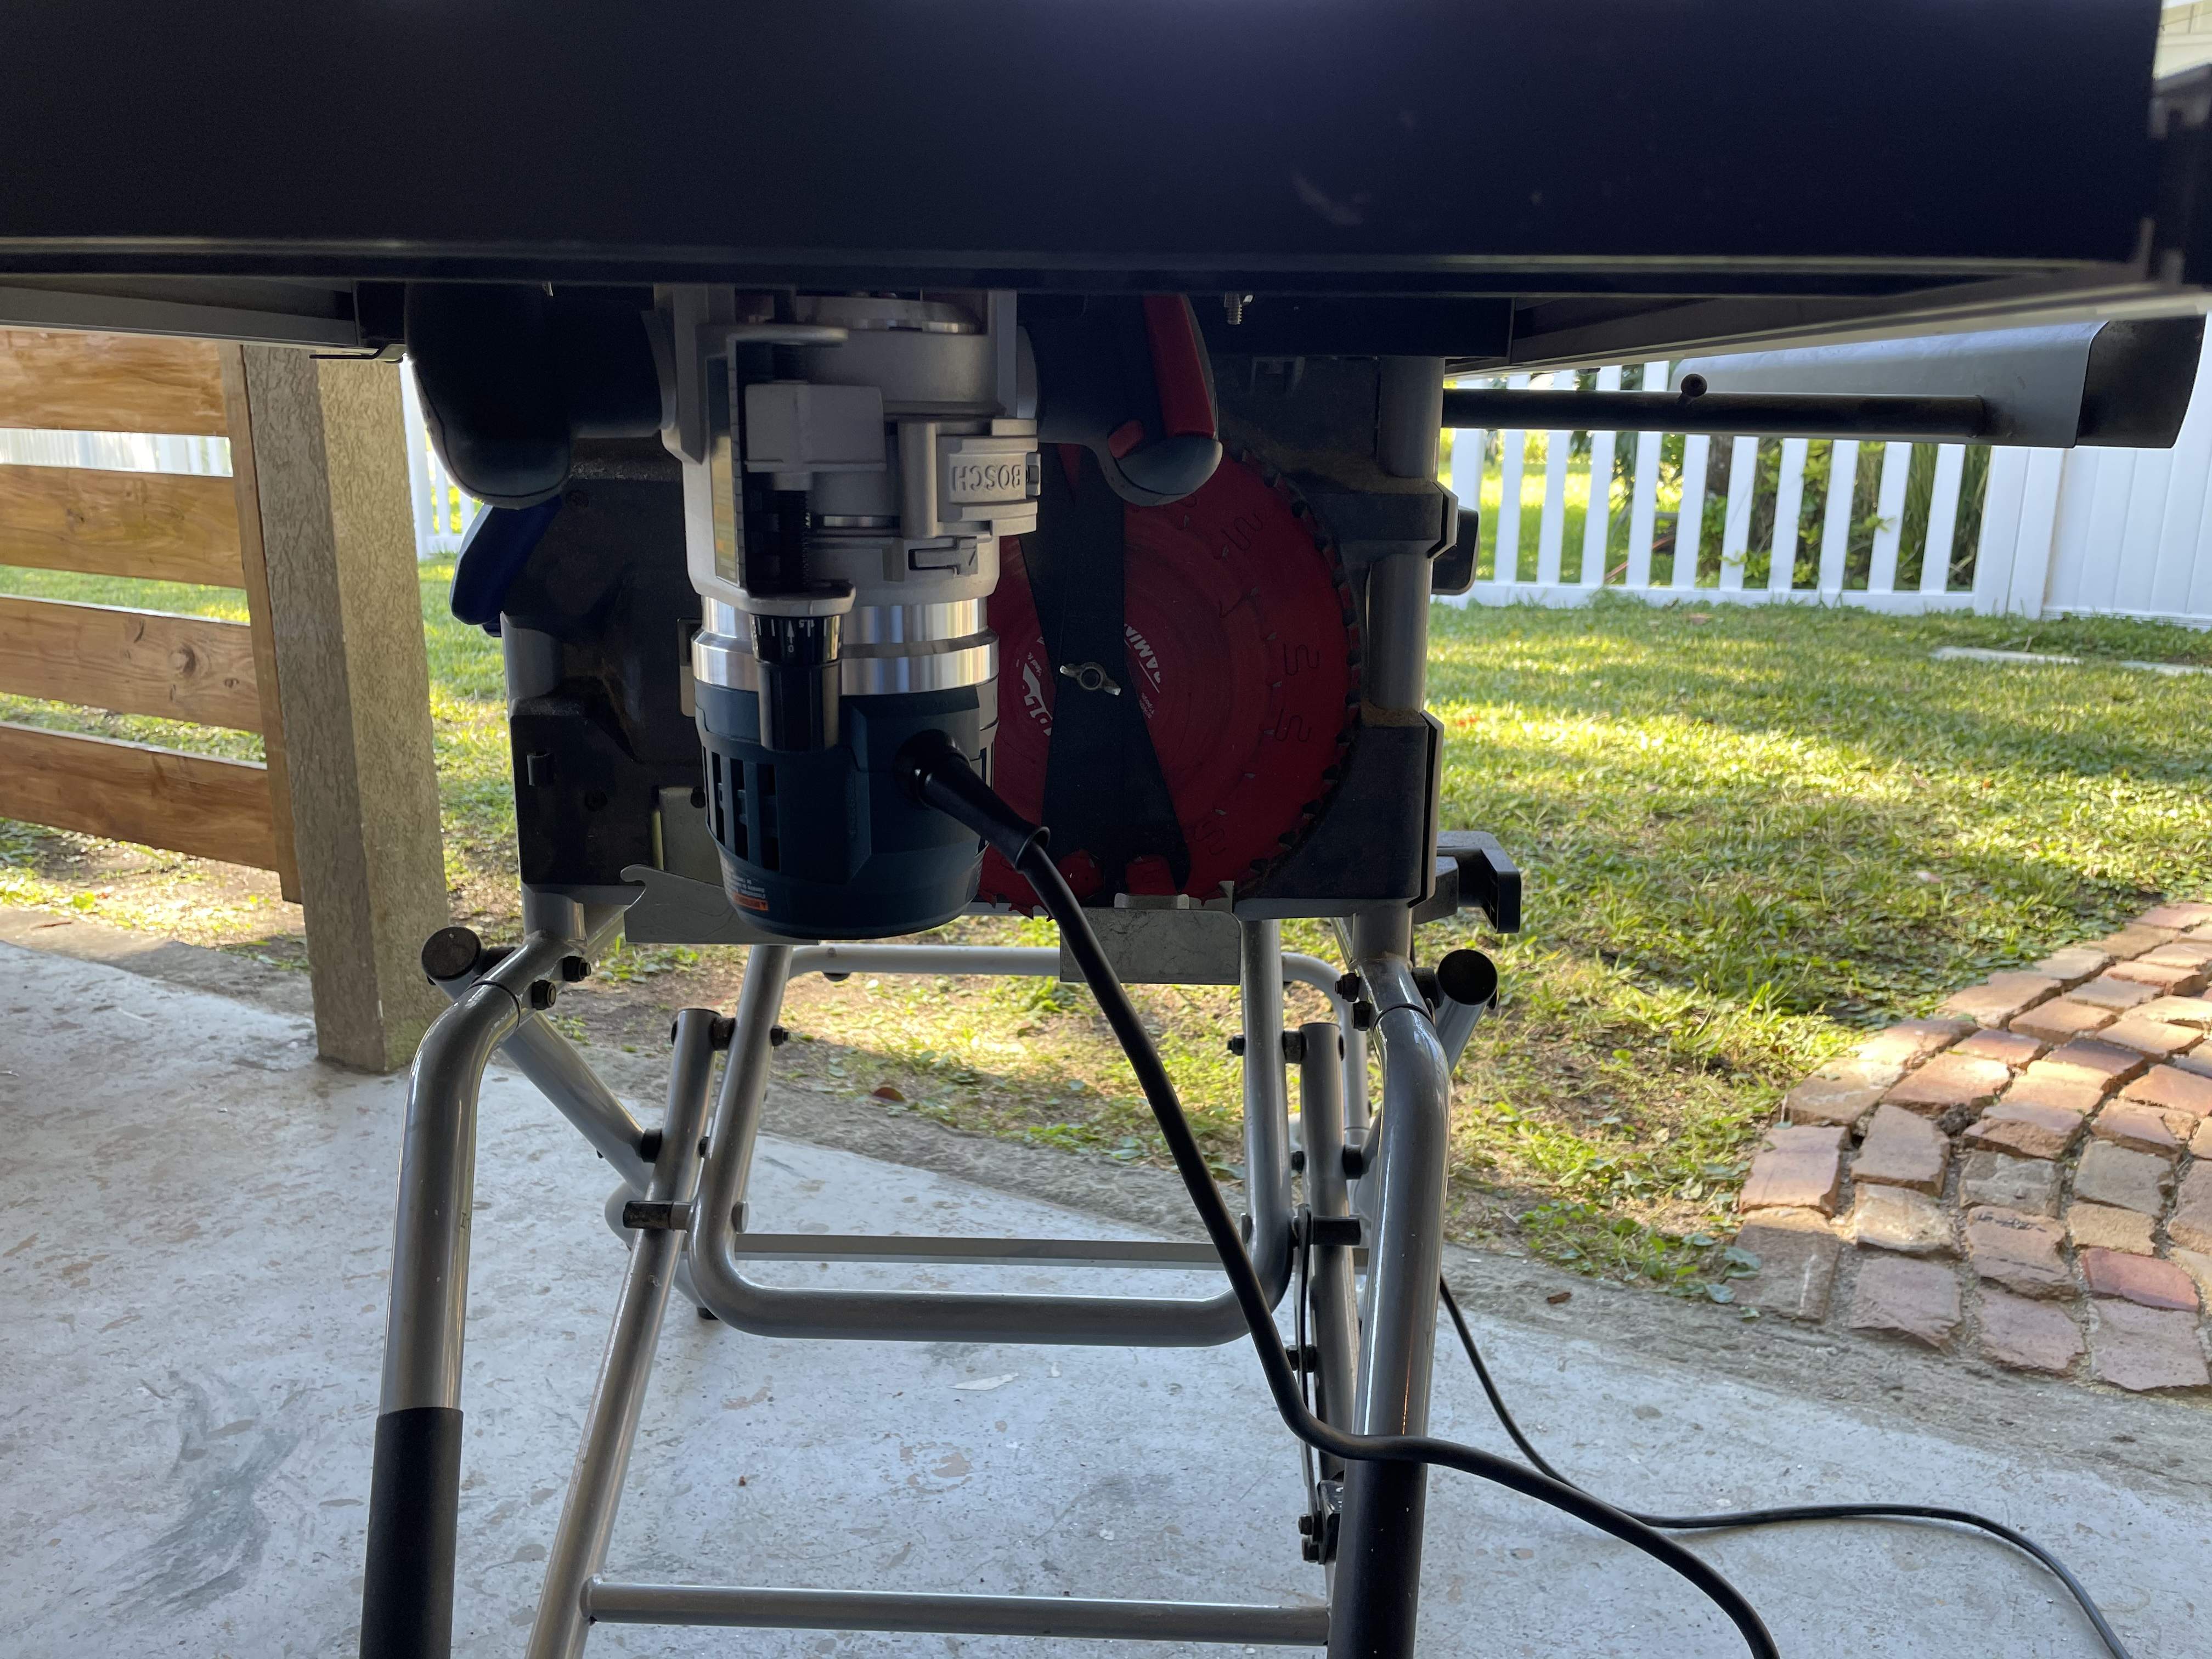
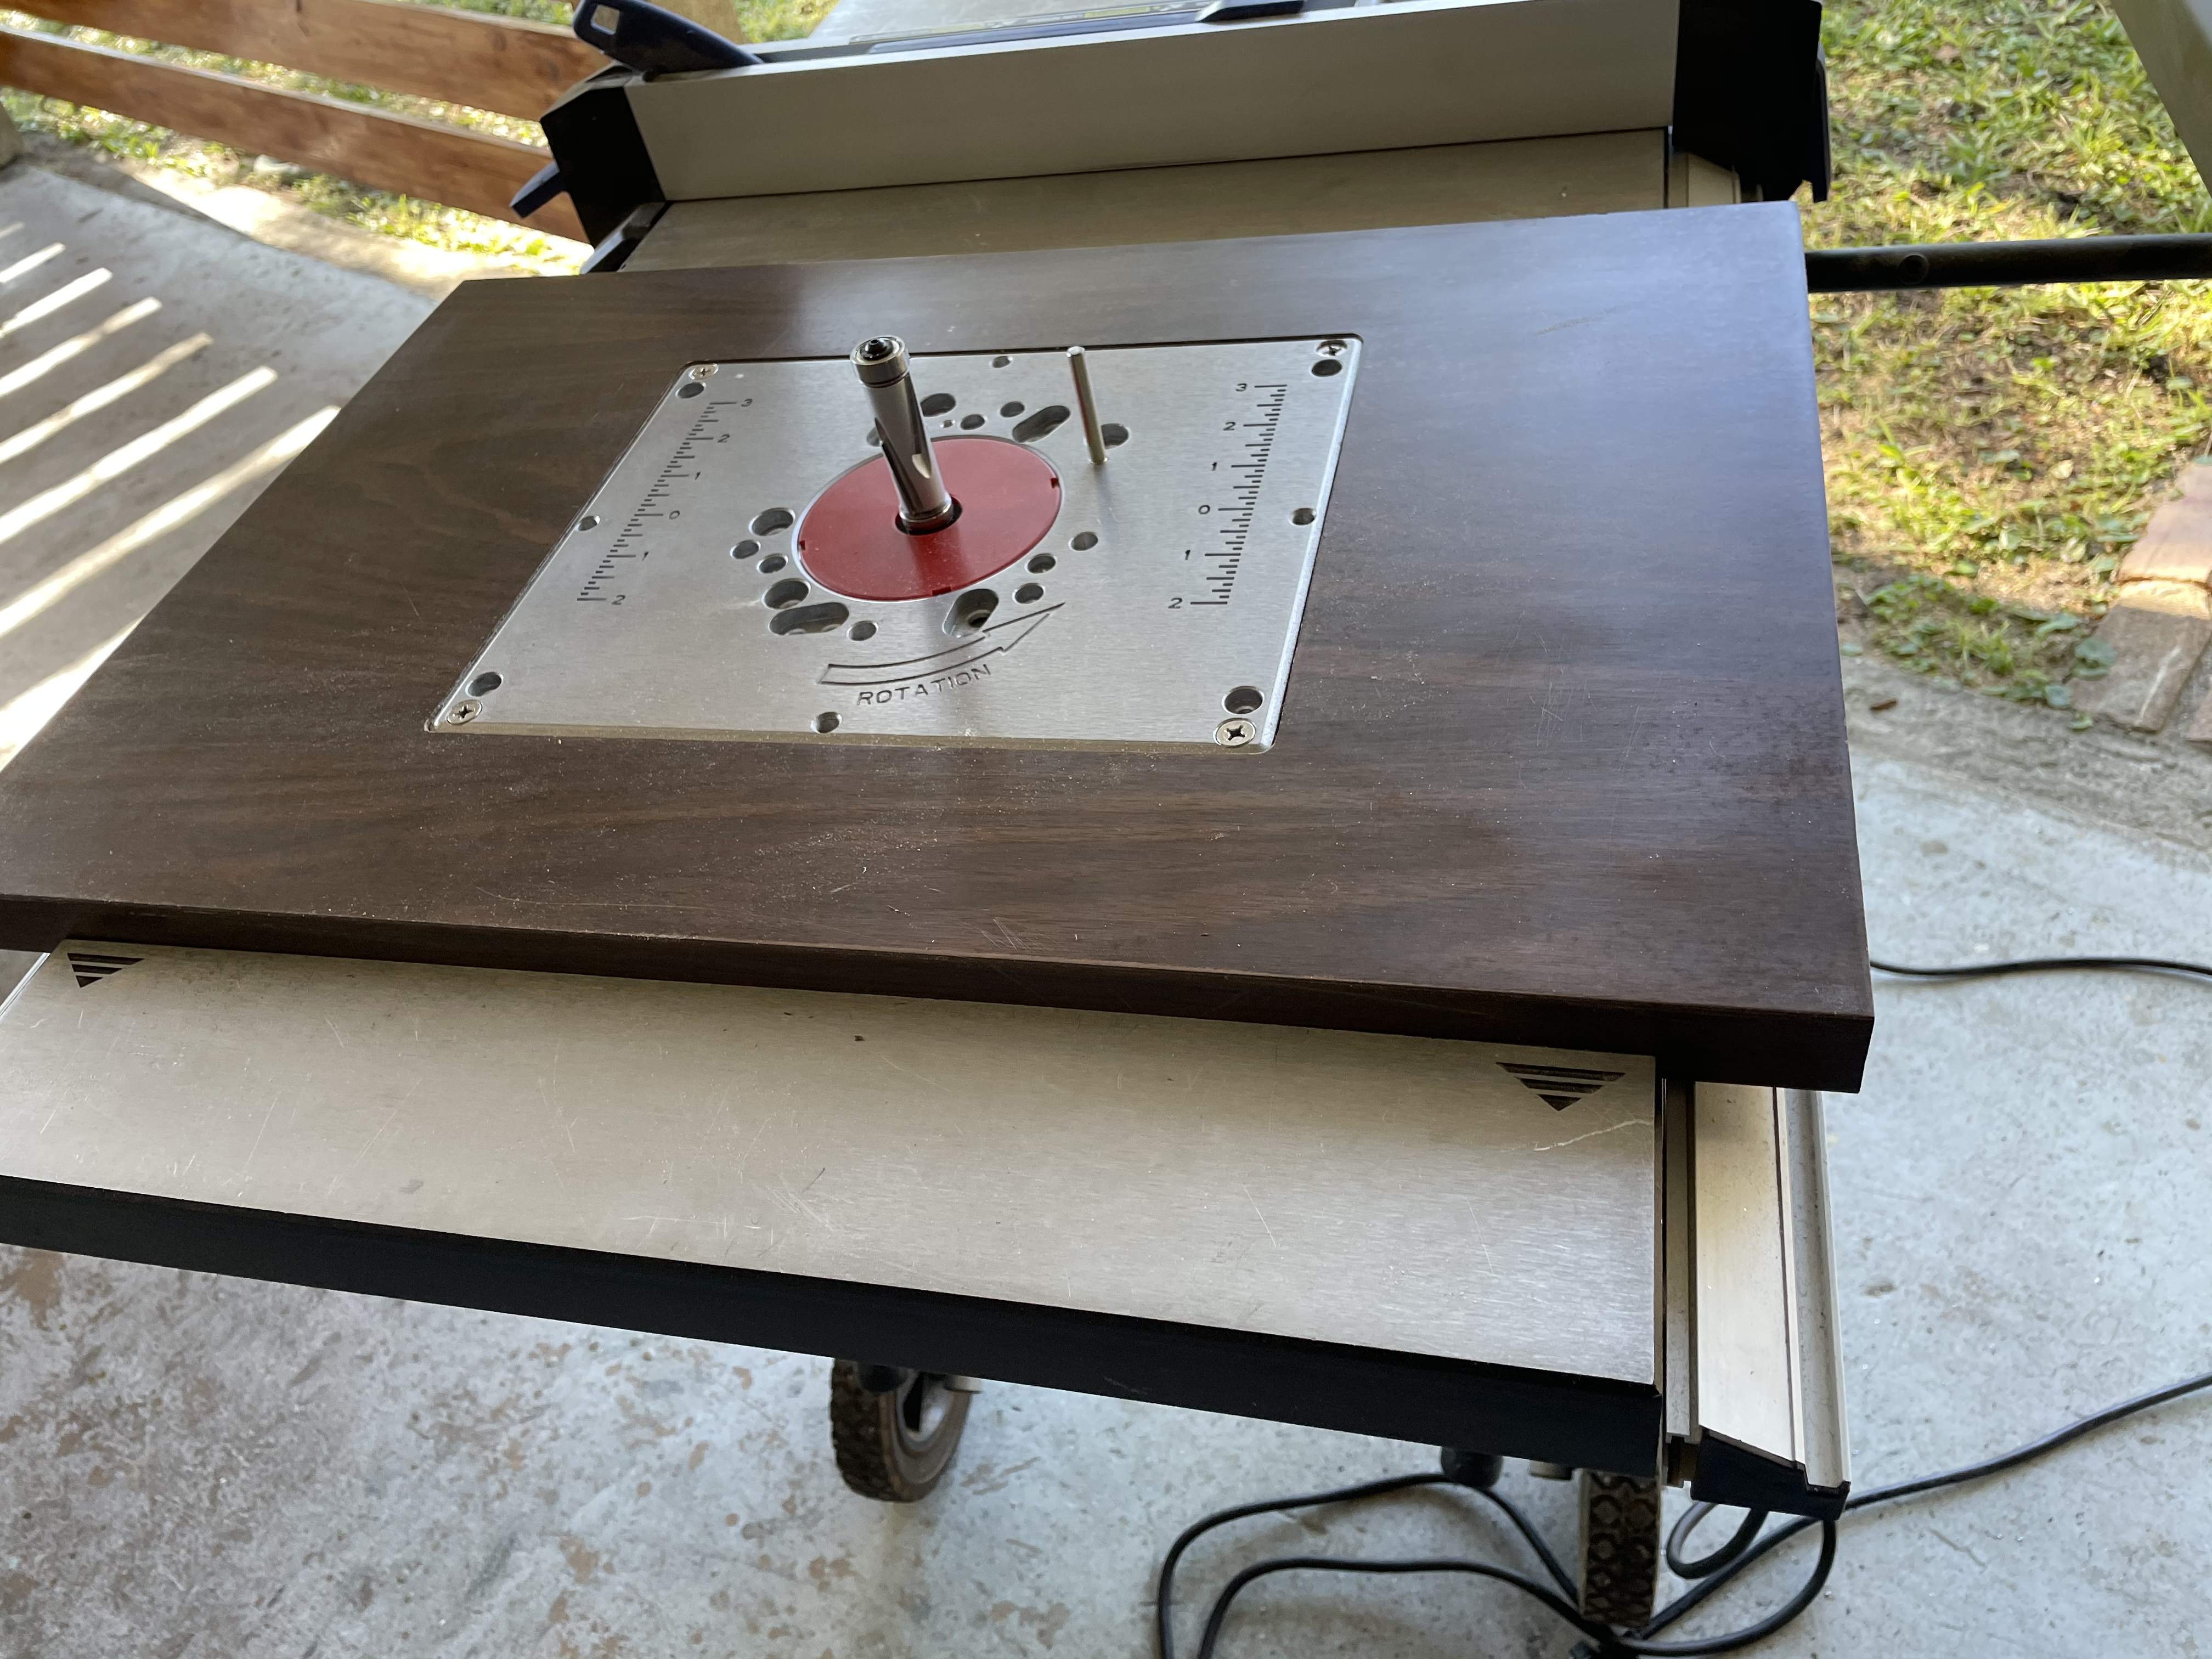
I had been not so happy with template routing the perimeter of the last few bodies I worked on and started researching a new variable speed router and settled on this Bosch MRF23EVS 2.3 HP , as well as a new Infinity 2” Mega Flush Trim Router Bit. Got it mounted into an old formica counter top with a Bosch base plate.
237CE86B-9E95-47E3-885C-0BC1A420A7DB.jpeg

50B30904-89E0-4953-8F8C-386A42F4E82B.jpeg


Only ran a few light tests but it definitely seems like an improvement over the cheap yellow bit and single speed PC router I had.

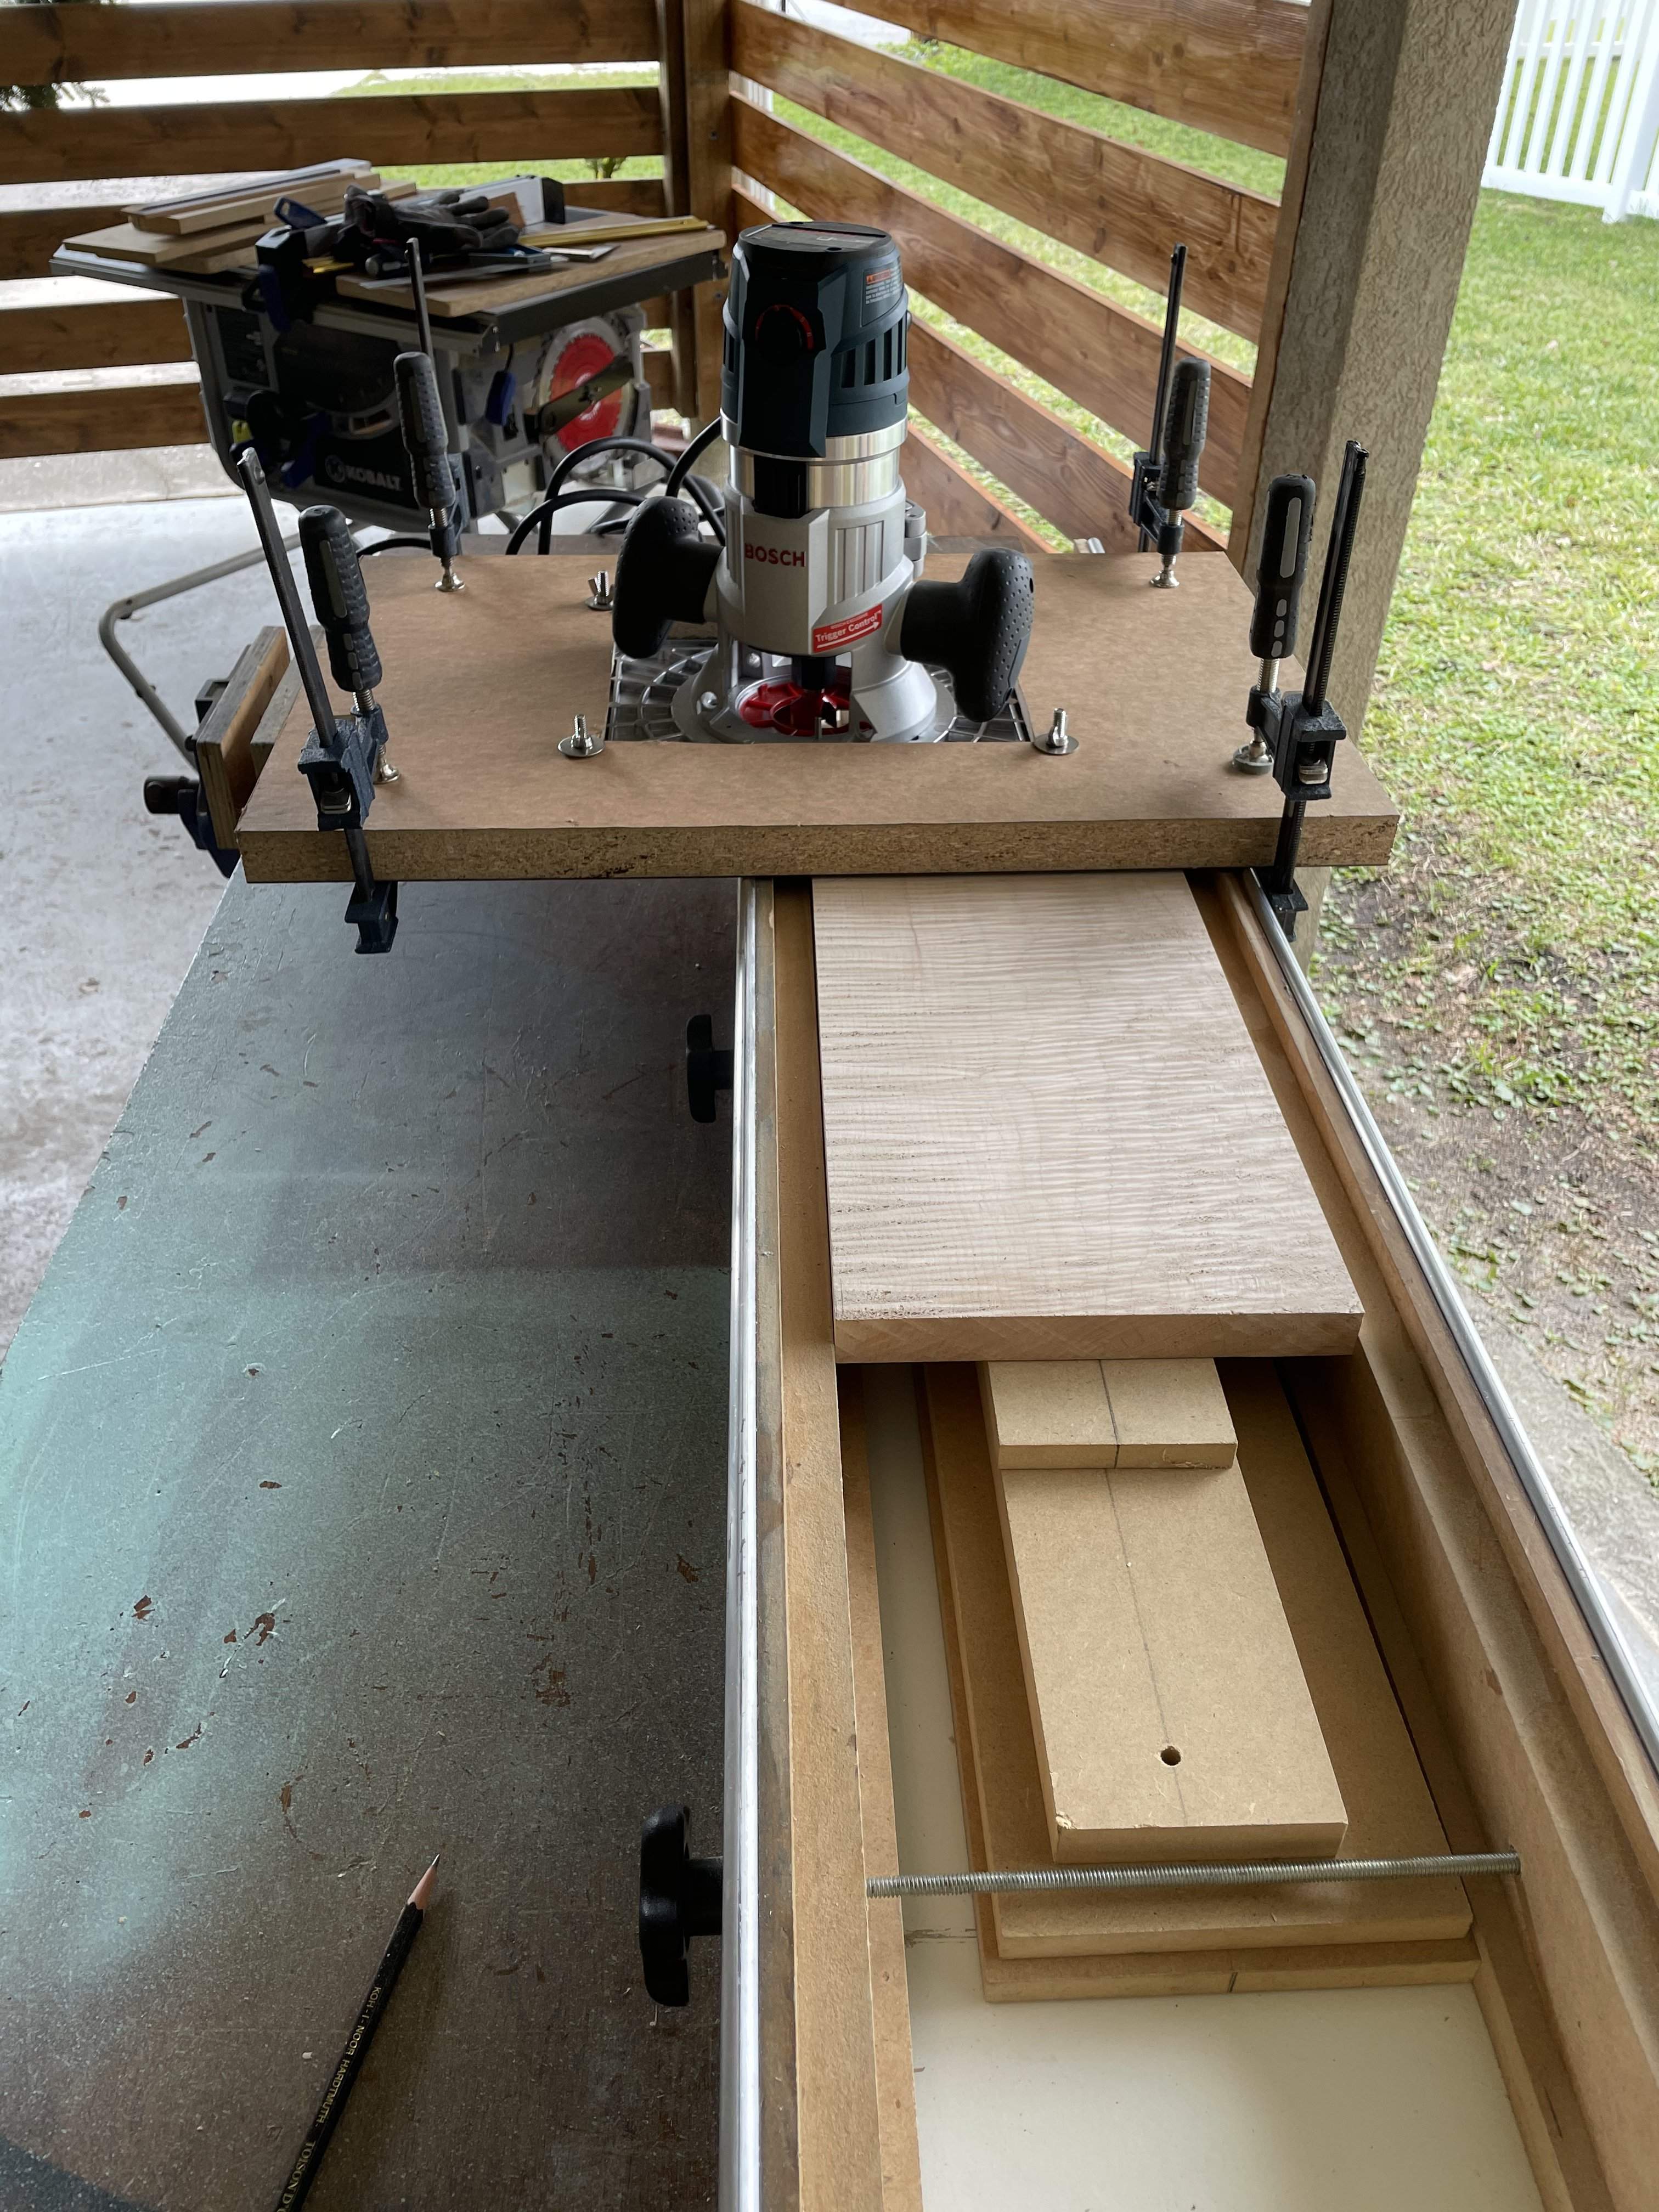
I needed to surface a figured book mach and in a pinch just flipped it upside down and it worked out nicely for with a Freud 1 1/4” surfacing bit. Having a stronger router with variable speed is quite nice actually.
DCFC947D-02DE-4437-8B7F-4C5B3BE902C9.jpeg

Was a tad bit weighty but slid nicely. Got the router on sale but in hind sight I should have bought the kit that had both plunge and fixed bases..
 
Last edited:
but in hind sight I should have bought the kit that had both plunge and fixed bases..

Meh. I have that kit (circa 23 years ago, how time doth fly) for the PC690 and the number of times I've used the plunge base is small, and the number of times it's been essential/particularly useful to use the plunge base is even smaller. If you just want another base that isn't bolted to the table, just grab another fixed base - says my 2021 hindsight.
 
Meh. I have that kit (circa 23 years ago, how time doth fly) for the PC690 and the number of times I've used the plunge base is small, and the number of times it's been essential/particularly useful to use the plunge base is even smaller. If you just want another base that isn't bolted to the table, just grab another fixed base - says my 2021 hindsight.

Sage advice. I thought about that actually as the fixed base is pretty nice.
 
Meh. I have that kit (circa 23 years ago, how time doth fly) for the PC690 and the number of times I've used the plunge base is small, and the number of times it's been essential/particularly useful to use the plunge base is even smaller. If you just want another base that isn't bolted to the table, just grab another fixed base - says my 2021 hindsight.

I just mounted my fix base to my router sled and use my plunge base for everything else.
 
  • Like
Reactions: John_Nicholas
A general comment on Chinjazzs' setup:

You can do router planing upside-down, if you like. Build up a router table with a sturdy, large, flat top surface. A normal router bit sticking up above the surface. Build your fixture as usual, with the wood part mounted securely between the two raised parallel rails. Then flip the fixture over and slide it over the table top, on the rails, straddling the router bit.

It would certainly work like that. You'd set the depth of cut by adjusting the height of the bit above the table surface. You couldn't see the cutting path of the bit, so you'd probably want to use some kind of guide to keep the fixture in the correct zone to cut. A collar around the bit, or some pins, or clamp some fences down to the table. Something to block you from running the fixture's rails into the bit.

If you had a good dust collection hookup to the table router, it would be a lot cleaner operation than the normal way!
 
Forgive me all if I didn’t read this whole thread. I’m not a luthier but spent years as a cabinet maker. My question: is there a reason you don’t use a conventional thickness planer vs. a router for initial thicknessing. ...or is it just $$ overkill?
 
Forgive me all if I didn’t read this whole thread. I’m not a luthier but spent years as a cabinet maker. My question: is there a reason you don’t use a conventional thickness planer vs. a router for initial thicknessing. ...or is it just $$ overkill?
Thickness planer will tear out figured wood. A router with a routing jig can minimize or eliminate that.
 
Thickness planer will tear out figured wood. A router with a routing jig can minimize or eliminate that.
Additionally, the jig/sled options, allow you to have (hopefully) the ability to tailor your tools to the need.

For example, you might be thickness planing a thin piece for a guitar top. If its sub 1/4" I dunno if a planer can do that. But you can use the same router/planing bit combo as you would for other planing jobs, the only difference is the jig/sled... if that. Since these are usually mdf, they are cheap to make.

So as long as you have room for any all jigs and sleds, its a nice option.
 
Another factor, for me anyway, is a thickness planer wide enough to do some glued up body blanks is fairly expensive and another tool to find space for in the garage when it’s not being used. A large router planing fixture is comparatively easy to make and store and could even be disassembled when not in use.

Which is why I opted to build a 2'x4' Vacuum Board bass and I can just add "rails" of the appropriate height, stand it against the wall when not in use. In theory I should be able to plane a thru-neck bass...
 
Forgive me all if I didn’t read this whole thread. I’m not a luthier but spent years as a cabinet maker. My question: is there a reason you don’t use a conventional thickness planer vs. a router for initial thicknessing. ...or is it just $$ overkill?

A couple of reasons:

As mentioned above, we're often working with highly figured wood, and planers will tend to chunk it out badly. Newer planers with spiral insert heads are much better, but still, cutting with the flat face of a router bit is the best way to minimize chunking.

We're also usually working with boards that are odd shaped or thin and flexible. Feeding them through rubber rollers under pressure causes problems, deflecting the parts, causing bad edges and uneven thickness. Planers are made for thicknessing straight rectangular boards of moderate thickness. We use routers with fixtures because the fixtures hold the wood parts still while the router cuts them. And many times we need to put a precision surface on a partially completed assembly, like a neck.

And yes, most Luthiers have small shops and don't have the space or money for a good size planer. I have two planers in my shop. I use them fairly often for thicknessing full boards. But I do the precision surfacing of cut parts with routers and fixtures.
 
A couple of reasons:

As mentioned above, we're often working with highly figured wood, and planers will tend to chunk it out badly. Newer planers with spiral insert heads are much better, but still, cutting with the flat face of a router bit is the best way to minimize chunking.

We're also usually working with boards that are odd shaped or thin and flexible. Feeding them through rubber rollers under pressure causes problems, deflecting the parts, causing bad edges and uneven thickness. Planers are made for thicknessing straight rectangular boards of moderate thickness. We use routers with fixtures because the fixtures hold the wood parts still while the router cuts them. And many times we need to put a precision surface on a partially completed assembly, like a neck.

And yes, most Luthiers have small shops and don't have the space or money for a good size planer. I have two planers in my shop. I use them fairly often for thicknessing full boards. But I do the precision surfacing of cut parts with routers and fixtures.
That all makes sense, y’all. We only used planers to obtain rough thickness as almost all of them leave marks, however subtle. ...and for cabinets we also did most of the fine work with a spindle router, jigs or hand-held with a collet. Thanks for “straightening me out” :).
 
Another perspective supporting the majority of recent posts: I also have a Cutech thickness planer that has individual cutter heads which mimic helical cutting, and more times than not I find myself surfacing bodies, tops, and neck parts with a router fixture. In hind sight, I would have gotten more use out of a drum sander than a thickness planer for guitar work. It's on my wish list :).
 
I have basically zero space for tools, but I had just assumed a thickness planer was a thing I needed for lutherie. But after having read this, and other, threads, and now having built my own sled, I have zero desire for a thickness planer now. Here is my list of top reasons a router planer is better than a thickness planer:
  1. You don't have to plane the whole board. Just recently I thicknessed the headstock of one neck, and I have a couple of neck blanks where I plan to use the jig to thin just the contoured center portion of the neck.
  2. You can perfectly flatten warped/twisted boards. With a thickness planer, a flaw longer than the distance between the rollers is difficult to remove without a sled, which has its own set of problems.
  3. Related to the previous point, you have very fine control over how much material is removed so you can remove only the bare minimum material to achieve flatness, and you can reliably figure out how much that is before starting the process.
  4. You can thickness really wide stuff. My small table can do boards up to 17" wide, and I could fairly easily/cheaply build one capable of 48" or more.
  5. You can plane an entire face without any snipe
  6. You can approach the edges of the board from any direction, using conventional or climb cuts as most appropriate for the grain/figure.
  7. Carbide router bits are readily available and inexpensive
  8. Easy to store. My table stands on end along a wall when I am not using it.
Of course, there are some downsides. I would still recommend a thickness planer for doing large volumes of material, or where the quality of the finish isn't important, or where speed is paramount, but I tend not to need any of that when building guitars.
 
I have basically zero space for tools, but I had just assumed a thickness planer was a thing I needed for lutherie. But after having read this, and other, threads, and now having built my own sled, I have zero desire for a thickness planer now.
Of course, there are some downsides. I would still recommend a thickness planer for doing large volumes of material, or where the quality of the finish isn't important, or where speed is paramount, but I tend not to need any of that when building guitars.

I agree with you on this. While I have a thickness planer it has not been used for years. As you mentioned the downsides of the planer are numerous. The set up, the noise, how long it takes to level a board and having to fix the snipe makes the the planer not nearly as efficient as my router sled.

Boards are leveled quickly and accurately on the router sled.

In fact since you mentioned it, my planer should just be sold.

This is a fabulous thread. I'm going to make some of these jigs as soon as it gets warmed up a bit.
 
You may think that I already have all the router planing fixtures that I could possibly need, but no, I need more!

I just built this one this week. One of my Luthier clients sends me guitar and bass neck blanks to do some machining and install truss rods and heel bars. These are all flat headstock necks, made from highly figured maple. Nasty wood that chunks real easily. He sends the blanks to me rough bandsawn, and they are all a little different size. They come through varying in thickness from 0.900 to 1.000, and sometimes with some warpage and lumps. I need to create a flat top surface, then thin the blanks down to 0.800".

I've been doing these for him for years, and have always been fighting with this process. The surfacing and thicknessing need to be done with a router, in a rail fixture. The problem is how to hold these blanks securely, in some kind of reasonably efficient operation. I was working on a batch of three of them this week, and got frustrated with them. I tried several of my usual fixture methods, and they kept slipping and moving.

So, I decided to make a permanent solution to this problem.

I designed up a clamping assembly made up from machined aluminum blocks. Three of these assemblies are built into the new fixture. It's designed to hold guitar-size and bass-size blanks up to 3 1/2" wide. One clamp grabs up near the nut. The others grab near the heel.

IMG_7347B.jpg


Each clamp assembly is made from two T-shaped aluminum blocks. The far side one is threaded 1/4-20, and the rear one has a 1/4" through hole. A long 1/4-20 bolt draws them together like a vise. Two 10-32 socket head cap screws go down through each block into a cap block on the bottom. Tightening them clamps the block solidly onto the 3/4" plywood of the bottom of the fixture. On the face of each block, I drilled two small holes and pressed in small hardened nails. Then clipped them off close and ground them to chisel points.

IMG_7348B.jpg


Here's a look at the underside.

IMG_7349B.jpg


The procedure is to loosen the 4 machine screws in the tops of the blocks. This lets the blocks float and slide side-to-side. Use the nut driver to tighten the long bolt, drawing the blocks together and pinching the blank. The pins dig into the sides of the blank a little bit and allow for the non-parallel sides. Then tighten the machine screws, locking the blocks to the base and pulling the blank down tightly against the base.

IMG_7350B.jpg


A successful design! It works very well. I router-planed three of these blanks last night in less than 20 minutes.

You all are welcome to copy and improve on this design of the clamps and fixture. Somebody should manufacture and sell a kit of the machined aluminum parts.
 
You may think that I already have all the router planing fixtures that I could possibly need, but no, I need more!

So, I decided to make a permanent solution to this problem.

A successful design! It works very well. I router-planed three of these blanks last night in less than 20 minutes.

You all are welcome to copy and improve on this design of the clamps and fixture. Somebody should manufacture and sell a kit of the machined aluminum parts.

As I look at your router planing jigs I want to say why didn't I think of that. They are fabulous solutions, using fabulous creativity and deceptively simple ideas.

Thank you so much for sharing these. Quite a few of these are on my wish list for the spring!
 
Last edited:
You may think that I already have all the router planing fixtures that I could possibly need, but no, I need more!

I just built this one this week. One of my Luthier clients sends me guitar and bass neck blanks to do some machining and install truss rods and heel bars. These are all flat headstock necks, made from highly figured maple. Nasty wood that chunks real easily. He sends the blanks to me rough bandsawn, and they are all a little different size. They come through varying in thickness from 0.900 to 1.000, and sometimes with some warpage and lumps. I need to create a flat top surface, then thin the blanks down to 0.800".

I've been doing these for him for years, and have always been fighting with this process. The surfacing and thicknessing need to be done with a router, in a rail fixture. The problem is how to hold these blanks securely, in some kind of reasonably efficient operation. I was working on a batch of three of them this week, and got frustrated with them. I tried several of my usual fixture methods, and they kept slipping and moving.

So, I decided to make a permanent solution to this problem.

I designed up a clamping assembly made up from machined aluminum blocks. Three of these assemblies are built into the new fixture. It's designed to hold guitar-size and bass-size blanks up to 3 1/2" wide. One clamp grabs up near the nut. The others grab near the heel.

View attachment 4128111

Each clamp assembly is made from two T-shaped aluminum blocks. The far side one is threaded 1/4-20, and the rear one has a 1/4" through hole. A long 1/4-20 bolt draws them together like a vise. Two 10-32 socket head cap screws go down through each block into a cap block on the bottom. Tightening them clamps the block solidly onto the 3/4" plywood of the bottom of the fixture. On the face of each block, I drilled two small holes and pressed in small hardened nails. Then clipped them off close and ground them to chisel points.

View attachment 4128112

Here's a look at the underside.

View attachment 4128113

The procedure is to loosen the 4 machine screws in the tops of the blocks. This lets the blocks float and slide side-to-side. Use the nut driver to tighten the long bolt, drawing the blocks together and pinching the blank. The pins dig into the sides of the blank a little bit and allow for the non-parallel sides. Then tighten the machine screws, locking the blocks to the base and pulling the blank down tightly against the base.

View attachment 4128114

A successful design! It works very well. I router-planed three of these blanks last night in less than 20 minutes.

You all are welcome to copy and improve on this design of the clamps and fixture. Somebody should manufacture and sell a kit of the machined aluminum parts.

This is one of the applications I'm *hoping* the vacuum board will help with... as long as the back is planed and I cover any excess holes, it should hold still for thickness planing...