• TalkBass has been independent since 1998. Add your voice.
    Create a free account to reply to discussions, view embedded media, and browse with fewer display ads.
    Join freeLog in
    Want zero display ads or expanded classifieds tools? Compare plans.
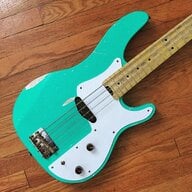
So let’s build another bass.

Let’s put some frets in this sucker.

Clean those slots out first.

5AEB58CD-1D58-41D5-A485-449D9CCD83F4.jpeg


This little fret cleaning saw is one of my new favorite things. Great for getting all the junk out of fretslots and good if you need to deepen a slot a hair.

229F8FFA-FA15-4591-A162-132B111B3C35.jpeg


Then prep the slots for frets by putting a little V groove.

6A62A6CE-BFAA-4D6C-BF39-82D668CF50CC.jpeg


I’ll pop out my nut slot real quick too with a couple of chisels, a hammer and a little file.

9DBDA290-D19E-4E5B-A362-554638746882.jpeg


C616D20C-8B86-424D-84A6-88FEA40AB73E.jpeg


706D917F-F5F3-4EC7-A1BF-DACDBB00685F.jpeg


Re
9BFAE7D0-FE8D-4914-B131-FF3090D39986.jpeg


Just go until the file sits flat in the slot. No rocking and no gaps. Hard to see here but we’re good to go.

16E7E36D-EEFC-48D4-8F44-F17D5CC809D7.jpeg


Hammer time!
568308A1-E788-4971-8EDD-E08D7D5A3D87.jpeg


So Wenge is a little chippy and I can’t imagine a refret being fun on this. I was going to just go with stainless wire but I’m on a time crunch and trying something new here might throw a wrench so we’re going with this.

DB718E9C-336A-4F01-AAC2-081500ADD7E6.jpeg


Cryowire. Supposedly it works and sounds just like regular nickel but the process makes it more durable. We’ll probably have to wait 10 years to really see but let’s go with it. It works the exact same.

It might just be marketing fluff like Roasted woods but I’m using that too!

Anyway press them in after tapping them in with the hammer.

0F1691C8-7B09-4814-9311-65561E7AAF1B.jpeg


Snip snip

ADF634C2-C2B2-4627-9EBE-D769C4AF2C63.jpeg


Flush em all.

9BD75C7E-D086-43F2-B7D9-21B538DB5A05.jpeg


Bevel file. Tape protects the frets from all the fine shavings that stick to the bottom of this thing.

43BE99CD-5E05-4746-B722-92C942CDD2C6.jpeg


Good.

9C12E489-AE84-40E5-9048-ABC0D6090F53.jpeg


I plan on working into the night in this tonight so let’s see what else happens.

Oh yeah and electronics are done.

B4BEF35D-642C-4A02-9521-7A2E6B6479A0.jpeg


I didn’t shield it cause my 66 isn’t shielded and that works just fine lol!

I did do an active pre on the 5er, so that one’s all shielded. Hopefully I’ll post some side by sideshots if the two of them soon.

Ok back to work!
 
Ok let’s level and crown these frets.

Make sure the neck is flat.

0B06818D-10B2-4D19-8CE8-DD369EEC6044.jpeg


Marked

0374D3C6-5E0C-4E98-B5EB-6688118C1FB2.jpeg


Sand away

9B63BA93-28C1-4631-B5EF-A07050F4B33D.jpeg


Then I add a little fall away to the upper frets. Little tape adds the incline

8C68C784-2D5A-47FF-9668-489CAA14BF0A.jpeg


B12E7A63-18B4-4BA0-8622-0F3B7769D64D.jpeg


Crown em

ADE4B0FD-E7C3-469D-94DD-CC2A29984524.jpeg


I’m using my z file. I like it! It’s a little more idiot proof than my other files, and I’m known to have a moment or two of idiocy

E6D5A687-C31D-4447-B292-1B49ADFA33C6.jpeg


Just a thin line left and we’re good.
0C8BA0B5-3411-4075-BFCA-65B6DA36E221.jpeg


Dress those ends

4530BC01-C0C7-4DD8-A014-D1CBFB9641F4.jpeg


E73A985A-D35C-4023-B046-EC6B3AAC7A9D.jpeg


And they look like that

F3945641-1AFF-441E-8550-0B7378C7EE1D.jpeg


The. A little sanding and buffing and we’re good.

69F2C5EE-2D29-4EF7-AE2B-BE24B436979C.jpeg


Let’s give this neck the stamp of approval.

D39BF07F-947E-4C39-86BA-E87274110079.jpeg


Branded

0876BC8B-9C5A-4F72-9EC0-147CD3C89F98.jpeg


Neck was sanded to 400. Let’s hit it with some oil.


I used odies oil. Looks great and smells even better! I’ve had it on another roasted neck for over a year and it’s held up nice. It doesn’t offer much protection from dings or dents but it’s super repairable and feels natural. On a roasted neck you can get away with such a minimal finish.

30381A39-199E-40BE-B66D-29EE536C5C11.jpeg

8E30AB05-4091-4C53-AF4B-926063D09C53.jpeg

817087F8-53AA-4DCB-B484-8301F3F6688E.jpeg


Fretboard hit with a little stewmac fretboard oil.

70D3645C-3F67-4098-89BA-52F922E018E2.jpeg


Hardware and nut up next, then assembly, set up and then I’ll plug her in and show it all off.

Gotta get this done before Avengers Endgame tonight! no spoilers!
 
Let’s make a nut.

Using bone here. Sand from 220-400 using my granite reference plate to keep it all flat.

AC2A0763-33B7-48F0-AA14-B21EA7F6AC4C.jpeg


Make sure we’re snug in the slot and mark out some lines.

C8A0F0AF-74E5-470F-BD90-9250F2E60DCA.jpeg


Buzz it on a sander.

C1D6198D-1F09-4B3C-A680-178E3141B6E5.jpeg


Little spring clamp as a holder for sanding top profile.

67AE4C85-D8CB-4160-AAF5-B2FA5A89E8F5.jpeg


Plop it in and mark some more lines.

E697D84F-8F02-4430-87A8-8B33BF6457FC.jpeg


0A0D302D-058D-4FC9-99DE-012209158384.jpeg


And start slotting. I started each slot with this tiny sharp triangle file.

C8AE001B-E23C-4431-8353-AA1B7C081A86.jpeg


Then to a gauged nut slotting file.

95578270-6003-4822-BB5F-B113784555DF.jpeg


Just get them started.

945EA369-43C8-4E99-974F-0FEE8DACAC49.jpeg


Finish up on the neck itself using the strings to check everything.

But I need to install tuners!

Quick tangent:

Line them up and install:

A3753BFE-7DF2-4BBB-BE33-885C05D2FFAB.jpeg


Small tip, one drill the right size hole, two, wax the crap out of these little screws so you don’t strip or break any. I have this old candle from my wedding that I use on every screw I put in any guitar and I barely put a dent in it yet! Lol

9ACC9197-C257-4AAC-8966-740120FFF61A.jpeg


I installed the string retainer too at this point. No tricks there, smack it on and drill.


Ok, string it up and finish the slots

B1C371F6-FFC1-4096-A126-B96F859285B3.jpeg

31E5A09B-FCBD-44DB-A0DC-E17A9028DEEC.jpeg


Once they’re all good finish up the sides and profile.

283C3FF0-6AE1-4151-AD05-69E9C415A093.jpeg


93CA0FA8-5346-4578-BA21-2FEA23D2D4AC.jpeg
BACA8B36-8672-4387-8B0C-5F02234316E3.jpeg
F0F0A1B4-5361-4E8D-8451-60D333A7AD4F.jpeg


Glue it in

7CEC425C-E27E-4C2B-8251-9D7F17073DB3.jpeg


Let it sit under string pressure to clamp it in.

FE434D7E-9476-422C-A020-3F825E8C50FF.jpeg


Teaser!

53C4E542-7615-4452-8E8D-77070320A087.jpeg
 
Truly exemplary.

Thank you sir!

Great looking bass! I also appreciate the amount of pictures of the process you've included.

Questions about your truss rod; is that a StewMac Hot Rod? How long is it? I got one but found it to be too long for my neck. Probably have to disassemble it and cut it down a bit.

Thanks, yup, hot rod 24”. They are long if you’re doing a 20 fret neck, but they work for my 22 fret necks.

Allied luthierie has them at different and custom lengths but they’re more expensive.

 
  • Like
Reactions: BishopJP
Wow! That is a great looking bass!
Ergonomics... I wanted to jump thru my mobile phone screen and grab it :).

I may have missed it but is it passive? Probably would be fine passive with those Aggie’s...


Passive indeed!

Here it is with it’s bigger active 5 string brother.

72B16D51-73B0-4E38-BE79-6A6C3198BE6A.jpeg
 
With the size/shape of the upper horn, and the bit of extra headstock wood I’m guessing makes for a nice punchy solid fundamental.

What’s the big chrome knob on the active 5?
Stacked bass/treble controls?

The 5er is a big bass in every sense lol

Sounds great though, and the B is perfect.

That one has Nordstrand 70’s wind Jazz Bars and his 2 band Preamp which is that chrome knob. Stacked bass treble.

I think I like the more aggressive sound from the Aggies on the 4, but then again it could be the wood choices
 
  • Like
Reactions: chinjazz