• TalkBass has been independent since 1998. Add your voice.
    Create a free account to reply to discussions, view embedded media, and browse with fewer display ads.
    Join freeLog in
    Want zero display ads or expanded classifieds tools? Compare plans.

Squier "Perfect Fit Replacement Parts" Mega thread

So, I just received a custom pickguard from Warmoth for my Amber VM P and had to do a little "shaving" to get it to fit. The corners of the Mighty Mite neck I currently have on it are more square than a regular Squier/Fender neck. Also the pickups are set closer to the neck (I replaced the Duncan Designed pups with Quarter Pounders; set in the same holes) so I had to shave a bit off the neck side of the pickup rout.

I could have moved the pickups back to accomodate the pickguard, but I didn't think of that until after I started up the Dremel.
 
This is basically a Squier Left Handed Vintage Modified Jazz.... But ordered a left handed Explorer body from Warmoth!

Only had to order new pots in and a jack socket because of the thickness of the body.

Neck & Pups fitted in fine.

This is now my main live bass, sounds like a right beast.

**Note: I sanded off the 'Squire' from the headstock, and placed a Fender transfer i bought on ebay.
 

Attachments

  • Explorer.jpg
    Explorer.jpg
    70.8 KB · Views: 262
This is basically a Squier Left Handed Vintage Modified Jazz.... But ordered a left handed Explorer body from Warmoth!

Only had to order new pots in and a jack socket because of the thickness of the body.

Neck & Pups fitted in fine.

This is now my main live bass, sounds like a right beast.

**Note: I sanded off the 'Squire' from the headstock, and placed a Fender transfer i bought on ebay.


QUESTION FOR YOU CONCERNING REMOVING THE LOGO:


I perform my own bass setups. However, I don't have experience removing bass logos.

Here's the deal: I want to remove the Squier logo and replace it with a Fender Jazz Deluxe logo.

Could you explain the steps necessary to achieve this? Is this something I should leave up to my bass tech? I don't want to in anyway destroy this investment.

Thanks in advance!

attachment.jpg
 
To remove the logo is easy enough, I just used a really fine sand paper. takes off the logo without marking the wood too much.

As for doing a decent job on the transfer... mines a real botch job haha!! I read your supose to do loadsa coats of laquor and build it up, so that the edges of the transfer aren't visable.
....I didnt have the patientce for that, so just did a few good coats of spray varnish. Enough so it wouldnt scratch off.

Up close its plain as day what ive done... but from afar (like on stage), you cant tell.
If anything.. id recomend getting hold of a real turd of a bass, something you could pick up for £30, and practice on that. See if you can get a decent result without ruining you good bass.

Sorry i couldnt be any more help.
 
If you don't want some color-shift difference, you've really got to remove all the factory finish from the headstock across the whole flat surface.

Sanding out just the logo and therefor gouging the wood down to the level of the wood below it - which in most cases is a silk screen process from the factory - will set up dissimilar tint of the head not to mention a trench that will be very hard to fill and hide,.

Do it right and go all the way on just that one plane of the head, as you can blend the face of the showing surface. The edges and other side of the head won't need to be touched at all.

I'd not recommend putting the decal on bare wood, but instead apply one or two clear coats of whatever product you want to use, so the decal won't discolor the wood underneath it. It's not just the water of the decal, if you seal the wood with the decal and then put clear coat over it all, it will show as a different color.

The process, simplified:::

1) strip the whole top of the headstock on just that one surface also removing the old logo using a sanding block!!!
2) put at least one - but more like two coats of clear on headstock first
3) apply decal - let dry (although I have done this in fifteen minutes later), making sure that there are no air or water bubbles under the decal.
4) apply four or five more clear coats
5) sand with 600# wet/dry sandpaper using a sanding block- BE CAREFUL HERE TO NOT CUT TO THE DECAL!
6) apply four or five more clear coats.
7) repeat No 5 above, but don't cut as deep this time.
8) apply three clear coats - let dry overnight
9) using 1200# wet/dry sandpaper, finish sanding to a smooth-level surface using a sanding block!!!
10) place the headstock so that the surface you are coating is as flat as possible - this is important!
11) apply one more clearcoat, this time a rather heavy coat until you can see it actually floating on the surface. Stop when you get a nice shallow puddle. This takes careful observation!
12) let dry overnight and maybe another day depending upon atmospheric conditions and temperatures.
13) wax heavily with a pure CARNAUBA paste wax - be careful of the spelling of carnauba - it is NOT CARNUBA, as that is a patented process of making an artificial carnauba bean wax.

100_8154.jpg


100_8155.jpg


100_8153.jpg


100_8104.jpg


100_8106.jpg


If you're gonna do it - do it right.

BTW: I like the MinWax spray Spar Varnish:::

2742633255.jpg


...... as it sets fast and resists running or dripping plus it dries really fast on a warm day. Another big plus is that you can recoat it days, weeks or years later with no blistering or crazing problems.
 
  • Like
Reactions: bass4jc0627
My new Amber VM P arrived today, and my FrankenBuild parts are en route. :hyper: My planned mods: Gotoh 201 bridge (black); Duncan SPB-1 pups; Schaller BML Tuners (black); black knobs, pickguard screws, string retainer, strap buttons; Rotosound RS88LD black flatwound strings.
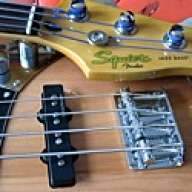
Once everything arrives early next week and I commence the creation of my monster, I will post updated pics as well as feedback on which parts are/aren't perfect replacement fits. Cheers!
 

Attachments

  • Before-low.jpg
    Before-low.jpg
    101.3 KB · Views: 370
Update...got all my parts in finally (damn you, USPS!) and have begun re-assembly. First, and most importantly, I can tell this thing is going to look sick when it's done, and hopefully it will sound that way too! But...it look's like I'm going to have to do some sweating first. The Gotoh 201 bridge fit like a dream, with all five screwholes lining up perfectly. Against the amber it looks positively sinister. Same with the replacement pickguard screws, string retainer, and strap buttons. My knobs are a no-go (too big) and the Schaller BML tuners broke my heart as well. I should be able to GET them to work, but they're a tad smaller than the stock tuners, and the screwholes don't quite line up. Two holes are very close, and the other two will be covered, so I'm going to go ahead and give it a shot. The SPB-1s look like they will slip in with no problem. Will update with pics once I get the tuners in, get it set up, and get it restrung.
 
You may wanna get some hipshot tuners they will direct fit ,i think the model number is HB7s , that is if you can return the schallers. The knobs probably dont fit as there mist likely for full size pot shafts , it they have a screw that locks them on the pot and the pots are small the screw wont reach the shaft when tightend
 
If it were me, I'd probably just replace the pots with some full size ones and keep the knobs. Better pots aren't a bad thing to have.

Agreed, and ordered last night. I was stressing over replacing the p'ups and leaving the pots - didn't make sense. Also, figured I'd go all out and replace the nut and neck plate while I was obsessing. Oh, and black dress nuts and washers for the new pots and jack (what's wrong with me?!) :bassist:
 
So...my experiment is complete. Took a stock Amber VM P-Bass and replaced everything but the neck, body, and pickguard. All black hardware, all upgraded components. I didn't really have any expectations going into this - just wanted to enjoy the process of working on a bass, have some creative input into it, and end up with a product that looked good and didn't sound identical to anything else I have. I was mentally preparing myself for the worst, actually, but since it was just a fun project I wasn't too worried about it.

Got the bass back from my luthier last night. They performed a fret level and setup, and made sure I didn't screw it up with anything I did. In summary: I left no chrome on this bad boy. I replaced the tuning pegs with Hipshot HB7s (perfect fit), and the bridge with a Gotoh 201 (perfect fit). I replaced the stock pickup with a Duncan SPB-1 vintage P-Bass pickup and replaced the stock pots & electronics w/P equivalents. Black strap buttons, string guide, neck plate, pickguard screws, knobs, and nut. I even replaced the input jack washer and nut with black ones. I was originally going to put flats on but decided to save those for my ABG, and went with Rotosound Nuxus strings - black coated roundwounds.

Final result: first, I can't believe how light this bass is. I don't think I had much to do with that, but it has to be around 8 pounds (battery in scale is out) based on how much lighter it is than my other basses whose weights I know. Sound-wise, it's very buttery. It's got a little punch, but is more smooth than attacking. It plays like an absolute dream and I can't wait to try recording with it and hearing how it sounds in the mix. I have a feeling it's going to become my regular gigging bass, and I think it looks pretty damn sexy too! :p
 

Attachments

  • 3853S.jpg
    3853S.jpg
    122.7 KB · Views: 780
  • 3851S.jpg
    3851S.jpg
    119.9 KB · Views: 458
  • Like
Reactions: eaglemachine