• TalkBass has been independent since 1998. Add your voice.
    Create a free account to reply to discussions, view embedded media, and browse with fewer display ads.
    Join freeLog in
    Want zero display ads or expanded classifieds tools? Compare plans.

Stratocaster Project

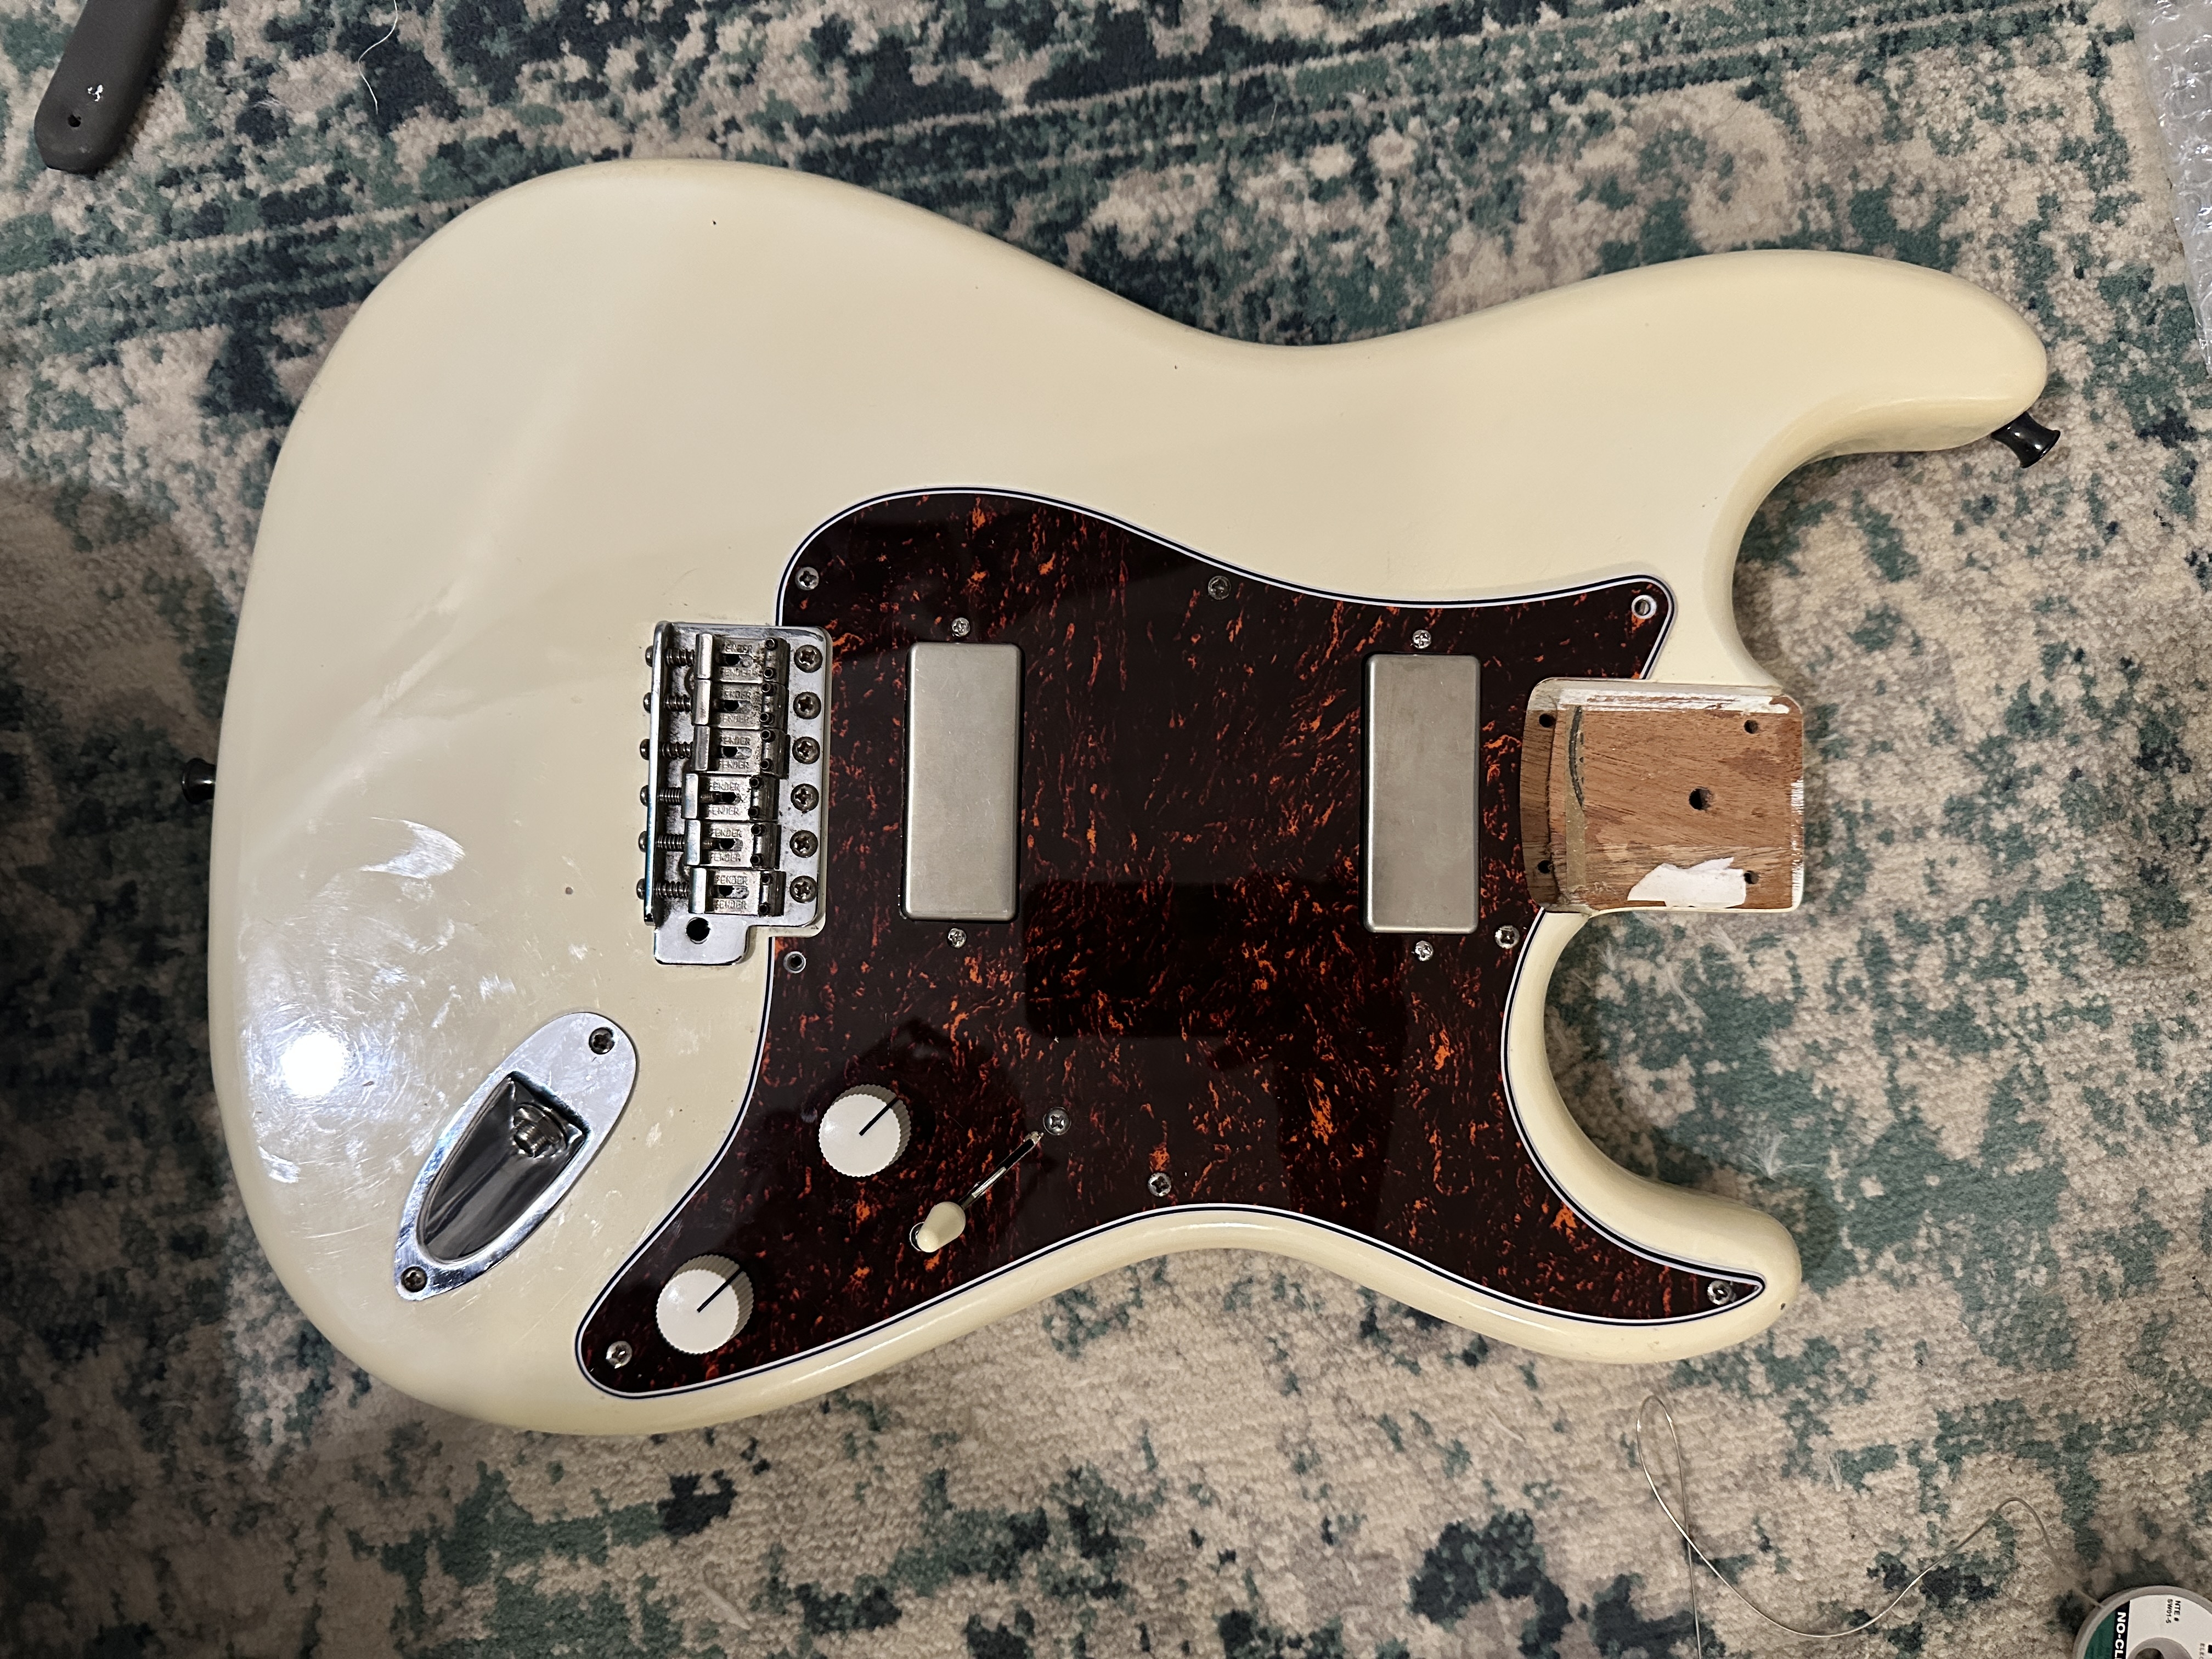
I took my first cut at wiring everything up last night. I'm happy with how the control layout feels, and it sure looks great! But I'm a little worried that I have a grounding problem somewhere from doing an initial tap test on the pickups. I'll have to put the neck back on and string it up with a single string and see how it sounds.

IMG_6966.jpeg
 
Grab your ohmmeter (multimeter in Ohms mode Ω) and go looking for the culprit. Pick a spot (perhaps the jack sleeve) and check resistance from everything that should be grounded to that point.
This seems like a better idea than my initial gut reaction to rage-quit the whole thing and start over lol. I'll do my string/tone test first and see if there really is a problem before I open it back up again.

The pickup switching works as intended in the Bill Lawrence 5-way switching scheme, but the neck pickup seems noisier than the bridge when plugged into my headphone amp and tapped with something metallic. The bridge pickup soloed sounds as expected, but the neck pickup soloed sounds like there is some static or noise when tapped. Background hum/buzz seems to be worse in some of the switch positions than others too, but I ran out of time and energy last night to track it down.
 
Last edited:
  • Like
Reactions: Matt Liebenau
Speaking of soloed... I sent Solo Guitars a pic of the damaged neck routing template and they are sending me a new one no questions asked! Great customer service from them on this so far!

Good to know. I’ve bought from Solo a few times, fortunately no need to test customer service so far.

Also, you can always rage quit and come back to it later if you want. :smug:
 
  • Like
Reactions: NKBassman and Beej
Also, you can always rage quit and come back to it later if you want. :smug:
Yeah. Then you have to wade through all the other things you started in the meantime - 3 half-built ukuleles, 1-1/2 banjos, a mandola, 4 violins (how hard could they be, they're tiny!) a bouzuki and a hair metal guitar that's so pointy it cuts you every time you get near it...
 
Yeah. Then you have to wade through all the other things you started in the meantime - 3 half-built ukuleles, 1-1/2 banjos, a mandola, 4 violins (how hard could they be, they're tiny!) a bouzuki and a hair metal guitar that's so pointy it cuts you every time you get near it...

Just kinda do it in rotation. Rage quit one project and move on to the next then, when you’ve rage quit all of them, go back to the first one and start over.
 
  • Like
Reactions: NKBassman
Chased the hum for another hour last night to no avail. I think the issue might be in the grounding of the neck pickup metal casing, but I'm not totally convinced yet. I'm going to bust the multimeter out next, but I also contacted the pickup maker to see if he would take a look at it too. The guitar is playable as-is, and the noise is not any worse than typical single coil noise, so I gave up and put it all back together so I could see how it all feels and sounds despite the hum/buzz.

I also noticed that the pickups ended up sliiiightly off center under the strings. Not sure how that happened as I was working off straight lines off the neck, but regardless, it's there. It's not so much that you'd see it at a glance, but I can hear it when strumming the low E string up towards the edge of the pickup and away from the magnetic field, there's a noticeable volume dropout. I'm almost wondering if there's a little bit of slop in the neck joint and maybe it didn't come back together exactly the same as it was before I took it apart. But from what I remember, the last PG and pickup set may have had a similar issue.

It's fine for now, perfectly usable for what I need it for in the band, but I ordered another PG to redo all of it some time in the future. Looking at the picture below, we can see that the PG is not centered over the bridge. It might be simpler to plug and redrill the PG mounting holes to shift the whole assembly over slightly towards the low E string. But it sounds okay and playable for now, so I might as well wait on all of this until after I build the replacement neck.

IMG_6971.jpeg
 
Last edited:
I've been playing the guitar through my headphone practice rig for the last week or so. In general, I like the tone of it! It's bright and snappy not unlike what you might expect from a telecaster, but fuller sounding and slightly less sparkly than single coils. However, it's also cleaner and less crunchy than I expected/kinda hoped for from humbuckers. Firebird pickups are touted as a single-coil-sounding humbucker, and I'd generally agree with that after this bit of play time. The pickup construction is pretty limited to how much wire you can get on there by the size of the bobbins, and so they are relatively low'ish output as far as humbuckers go.

After adjusting the pickup height a bit, the issue of the low E string being right on the edge of the magnetic field is tolerable for now. I'll just have to work on my down-picking lol. I did order another pickguard, in case I need or want to redo it after the new neck is done.

I had originally used a linear taper pot and 0.022 uF cap for the tone control, which as it turns out I don't particularly like. That plus the ground buzz was enough for me to place another order for more some parts and I plan to re-do some of the wiring. I will replace the linear tone pot for a standard log pot, and try a 0.047 uF cap instead for a little more range on the treble cut. These pickups definitely have a lot of treble content! There are some sweet spots in there somewhere, but right now all the action is in the last 10% of the pot and very fine to adjust from there.

I'm also going to ditch the 5-way switching scheme for now and install a 3-way blade to simplify things while I continue to tinker (and gig) with the guitar. If I know me, with my (*cough*) borderline ADHD and analysis paralysis I'll be better off with fewer options to eff around with on stage anyway. I did order a new 5-way switch and a selection of caps though, in case I want to revisit this later. I like the variety of tones that are available, but if I try it again I would go with a different cap value on the switch for a more pronounced effect in the half-out-of-phase and low-cut positions.

And of course chasing down that hum :banghead:
 
Last edited:
I also got started on the neck blank over the weekend, too. It's been downright unpleasant for winter weather this week, with a blizzard on Friday, followed by a cold snap into the -30s Celsius at the warmest part of the day. Not a great time to be riding the bus to work for the day job, but thankfully my garage is fully insulated and kept at a balmy +15C :cool:. Now, if only there was any room left to actually park the car in there in the winter, we'd be all set :roflmao: .

As mentioned in my first post, I'm using a ~100 year old Douglas Fir 2x4 that I removed from the walls of my house during a reno a few years ago. I tried this with my DIY upright folk bass project a few years ago and it came out pretty well for my first attempt at building a neck. The wood is old and dry as a bone, and a little bit brittle as I found out (the hard way), but quite workable and stable in the end. Just don't knock it off the table and everything should be fine, and even so anything is fixable with liberal application of epoxy, carbon fiber, brute force, and ignorance.

Also, Douglas Fir splinters are no joke!
[Thread Splinter Count to date: 1]

With the Lathe and plaster construction of old homes, the board is riddled with nail holes and other "character" marks. These mostly get filled with glue squeeze out during glueup, and any bad holes that remain after trimming, shaping, and carving will get filled with epoxy or CA glue before final sanding and finishing.

I had previously ripped the board into 3 strips on a friends table saw. I reoriented the pieces to achieve a more symmetrical and opposing grain pattern, kind of like (((|||))) when looking at the end grain of the piece. I coarsely laid everything out using the broken template (while I wait for the replacement), and then glued everything up with standard yellow wood glue. No pictures as my "glue spreaders" were covered with glue and I didn't want to get it all over my phone. Wax paper on everything else makes cleanup a breeze :).

I also had to widen the headstock area just slightly, using cutoffs from the respective strips of wood on either side to get a closer colour/grain match... another thing I learned the hard way from my first neck build.

Being made from a 2x4, the blank is a robust 1.5" thick at this stage. I understand a typical Fender neck construction would use a 0.75" to 1" thick blank, so some unthickening will be in order... as soon as I figure out how I'm going to do that.


IMG_6987.jpeg


IMG_6989.jpeg


IMG_6990.jpeg


IMG_6991.jpeg
 
Last edited:
Spent some more time in the garage over the weekend.

I borrowed a friends thicknessing planer and knocked the neck blank down to about 1" thick. I was originally planning to rough-cut this to thickness on a table saw and then just clean it up on the planer to save myself a mountain of sawdust, but after coming up with a make-shift dust collector for the planer using my leaf blower bag and a bit of duct tape, which worked perfectly btw, I just took it all the way down with the planer. If anyone here remembers the old Red Green show, this was one of those moment.... if the women don't find you handsome, the should at least find you handy. :roflmao:
IMG_7097.jpeg


I'm quite happy with the end result. Then I marked the centerline. I've been doing this by marking opposing 45s at each end of the board, and then just connecting the dots.
IMG_7099.jpeg

IMG_7098.jpeg


Line up the template and add some reference pins for future... reference. having the CL cut into the template made this real easy. Thanks Solo Music!
IMG_7100.jpeg

IMG_7101.jpeg


And lay out the truss rod and CF reinforcing just to see where we're at. I had ordered the "electric guitar" sized truss rod from Next Gen Music, but it looks too long?? Should it really sit all the way into the heel like that? The CF bars can be trimmed to length to avoid the mounting screws so I'm not worried about that. But do I need to order a shorter TR??
IMG_7104.jpeg

IMG_7105.jpeg


It was at this point that I realized I laid the neck out "upside down" lol. I wanted to orient the blank with a certain side up, and traced the layout the wrong way. I had put the template onto the blank upside-down so that I could line up the centerlines, which of course resulted in the headstock being backwards. So I gave it one more 1/64" pass through the planer to obliterate the evidence, and then gave up for the day :p. It will be better to wait to have the fretboard in hand anyway, to take everything down to final thickness before any routing starts.
 
Last edited:
Little update, with some questions for the LC to follow...

First, I cleaned up my neck blank and re-applied the template in the "right" orientation. I've been feeling exceptionally burned out recently, and I'm hesitant to do anything else until I have the fretboard in hand, so here it sits for now. I suppose I could drill the tuner holes and route for the truss rod and CF bars before final thicknessing... or I could chill on the couch... lol. The centerline ended up a little off by a mm or two, and/or the template shifted slightly when pinning it down, but I'm not too worried about it. I can work with it as is, or take it down to final thickness from the fretboard side and redo the template application again (again) later. Probably the latter.
IMG_7146.jpeg


Next, to prep for tearing the Strat apart again, I got this little beauty up and running from a pile of parts. My dad found this Vibra Les Paul copy at a local thrift shop for $120. Plywood body with an unknown bolt-on neck. The pickups and/or wiring was DOA, the tuners a were poopie, and the wraparound bridge was the basic fixed compensated kind which doesn't offer any intonation adjustment, so I gutted it and replaced everything. My goal was to not exceed the sticker price of the guitar in replacement parts, and I came pretty close! Locking tuners and adjustable wraparound bridge from Musiclily were pretty much drop-in replacements. New pots and switch from Next Gen Music here in Canada, and some of those really cheap "Eric / EY Custom" pickups. Wired it all up and everything functions as it should with no wiring mishaps or ground noise on the first try! A minor miracle :p. Even the intonation of the bridge saddles was pretty much spot-on out of the box for Eb tuning with some heavy strings.

IMG_7149.jpeg


The tone of this thing is... not great... lol. Everything works as it should and it's quiet, but the pickups are really "grainy" sounding. I don't really like how it sounds, but I'm not spending any more money on it and it's fine as a backup/Eb guitar while I tear down the Strat again to work on the wiring and the new neck.
 
Last edited:
  • Like
Reactions: Matt Liebenau
Question/thinking out loud... if I were building the whole guitar from the ground up, I could build the neck and fit it to the body, and then set the bridge wherever it needed to be relative to the neck for intonation purposes. But since I am going to be fitting a pre-slotted fretboard to this 3rd-party neck template, all onto an existing body and bridge, I feel like I'll need to be a little bit more precise with how everything comes together. I haven't even test fit the template heel into the body yet, so I feel like that will be a good first next step. The neck template also came with a separate fretboard template, which appears as though it is meant to line up with the heel... some investigation and comparison against the stock neck will be needed.

My next tripping point will be thicknessing the headstock and rounding over the "step" between the headstock face and the nut ledge. I don't have a good router setup to do the thicknessing, but I suppose I could make one. But if there are any other ... simpler ... methods that might work, I'd love to hear it.

Any advice on how to plan/proceed with these next steps would be appreciated at this point :).
 
Last edited:
and finally... I've been really digging this Suhr headstock I stumbled across. I might try something like this with the carved relief if I'm feeling brave enough when I get to that point :p.
1739992736809.png


And the best part is... Suhr actually provides a really nice outline right on their website... saved for future reference :cool:.

Suhr-Hybrid24.png
 
Last edited:
  • Like
Reactions: 13ghosts and Beej
Locate the position of the bridge-facing edge of the nut on your template.

Measure half the scale length from that to your 12th fret position and mark it.

Now when you test fit, make sure you have that much distance again to the most forward position of the bridge saddles. Intonation always results in the saddle being further from the 12th fret than 12th to the nut (usually to a larger extent on heavier strings) which is why you look at the most forward position of the bridge saddles - they will be moving back.

If it's significantly more or less than that, you'll need to adjust something. Likely with "stock Strat sized parts" it will be correct, but that's what you are checking for, from what I've learned here.

Some folks here do 3D/multilevel headstocks, which are quite appealing, generally. Livens it up a bit from the same old mass-production stuff. Binding between levels even, IIRC, Different face veneers for different levels. All kinds of room to make art...
 
Last edited:
  • Like
Reactions: NKBassman
Locate the position of the bridge-facing edge of the nut on your template.

Measure half the scale length from that to your 12th fret position and mark it.

Now when you test fit, make sure you have that much distance again to the most forward position of the bridge saddles. Intonation always results in the saddle being further from the 12th fret than 12th to the nut (usually to a larger extent on heavier strings) which is why you look at the most forward position of the bridge saddles - they will be moving back.

If it's significantly more or less than that, you'll need to adjust something. Likely with "stock Strat sized parts" it will be correct, but that's what you are checking for, from what I've learned here.

Some folks here do 3D/multilevel headstocks, which are quite appealing, generally. Livens it up a bit from the same old mass-production stuff. Binding between levels even, IIRC, Different face veneers for different levels. All kinds of room to make art...
Thanks for the advice! Makes sense.

It's a hard NO on even entertaining the idea of doing any binding or veneers on this. The stepped relief will be adventurous enough lol
 
  • Like
Reactions: Beej