
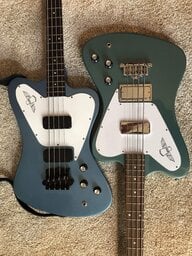
What's the world coming to? A head shot and not a foot shot.Decolas will likely get shared among my DC and 21 NR.
one of the 21 NR’s will end up in my Florida Flamingo.
View attachment 5399520


TalkBass has been independent since 1998. Add your voice.
Create a free account to reply to discussions, view embedded media, and browse with fewer display ads.
Join free Log in
Want zero display ads or expanded classifieds tools? Compare plans.
What's the world coming to? A head shot and not a foot shot.Decolas will likely get shared among my DC and 21 NR.
one of the 21 NR’s will end up in my Florida Flamingo.
View attachment 5399520

Sounds kinky.I will have a gig bag designed to fit a '64 Epi and some nice wooden bass shaped salad tongs.

My only Gibson offering for Wednesday is this.
Mid 2000’s in PDX and my tobacco burst LPB.
Yeah, I really did play live.
View attachment 5398920
View attachment 5398921

FWIW, my daughter and her Jet Blue roommate and coworkers are not old. They’re very pleasant young women and men. Unless you’re on the Florida/Boston flights. They get really grumpy with the clientele on those runs. And deservedly so. They have horrible stories about the Karens and (sorry Ken) Kens they have to babysit.LOL - they must have followed the Northwest Airlines hiring model. Swear they went to local geriatric centers for flight attendant recruitment.
It’s a wonderful bass. I would like to have it. But I’ll take my ‘15 over it. And pretty much most anything else for that matter.I might get banned for saying this, but I think my 2013EB 5 string sounds better than my 2015 Tbird.
And that’s in spite of the tone being sucked out by the tort pickguard.

I will have a gig bag designed to fit a '64 Epi and some nice wooden bass shaped salad tongs.

Nice shirt Willy!Decolas will likely get shared among my DC and 21 NR.
one of the 21 NR’s will end up in my Florida Flamingo.
View attachment 5399520

You’re rockin’ The Beach Boys look! Cool!Decolas will likely get shared among my DC and 21 NR.
one of the 21 NR’s will end up in my Florida Flamingo.
View attachment 5399520
Fine. So long as he brings his homebrew.chaperoned by Dave!….
To me, the DeCola in humbucking mode sounds close in tone to the Reissues in the ‘21 NR. YMMV.Decolas will likely get shared among my DC and 21 NR.
one of the 21 NR’s will end up in my Florida Flamingo.
View attachment 5399520
Teak would be cool..A Tong-Bird? Finished in a Salad Tong Burst!


I believe Geo suggested for the best cosmetics, take out and replace the whole mid section from where the slice won’t be seen all the way down to the bottom. Otherwise the block will likely eventually show through.I think George asked about documenting the VP to 64 changes.
Step 1 was routing the bridge pickup cavity 3/8” closer to be the neck pickup.
Step 2 will be begging Irv to make a spacer that is 1/2” wider top and 1/2” wider at the bottom.
Step 3 will be cutting a block to fill the extra 3/8” space at the lower end of the bridge pickup cavity. I just need to work around the wiring hole that’s at the bottom corner.
View attachment 5399552 View attachment 5399554
It won’t show if Irv builds a spacer bigger than the hole.I believe Geo suggested for the best cosmetics, take out and replace the whole mid section from where the slice won’t be seen all the way down to the bottom. Otherwise the block will likely eventually show through.
To me, the DeCola in humbucking mode sounds close in tone to the Reissues in the ‘21 NR. YMMV.
I believe Geo suggested for the best cosmetics, take out and replace the whole mid section from where the slice won’t be seen all the way down to the bottom. Otherwise the block will likely eventually show through.
I want to thank Richard (@Ringhammer) for graciously operating on my 2017 VP. A real professional and gentleman. Can't wait to get word on when Red Sun Ruins will be playing locally.
View attachment 5399278 View attachment 5399279


There is that.OK, but remember: they're 99 proof.
What did you do with Willy? There's no feet. What have you done to him besides stealing his hat, shirt and Corvette?Decolas will likely get shared among my DC and 21 NR.
one of the 21 NR’s will end up in my Florida Flamingo.
View attachment 5399520


