• TalkBass has been independent since 1998. Add your voice.
    Create a free account to reply to discussions, view embedded media, and browse with fewer display ads.
    Join freeLog in
    Want zero display ads or expanded classifieds tools? Compare plans.

Tuxedo Bass #3 Coming Up

A little tip in case you didn't know it:

if you take a razor blade; I use these: [Invalid or Expired Link Removed]

you can firmly press the blade onto a piece of harder metal (like a vice) at an angle and run the length of the blade down the harder metal's edge. This bends the very tip of the razor's blade over creating a tiny burr. Bam, instant disposable scraper! Of course, you can always just use a normal razor as one too, but I feel like I get better scraping action after doing this. :)
 
I'll bring this up to the minute right now:::

I started to bind the headstock last night. I had a small amount of Duco Cement and used what was left for the first layer and it's holding very well.

As you may know - I wasn't satisfied with the original way it came out, so I stripped it and here we go again.

I first pre-formed the binding for the bulbous area and the negative cutback on the underside to make sure that it wouldn't miss a full-faced contact with the wood.

1.
100_8279.jpg


2.
100_8270.jpg


3.
100_8274.jpg


4.
100_8280.jpg


5.
100_8281.jpg


I left a little tail on the binding so I can flow it into the next two layers and also meet the wood prettier.

At this point I couldn't find my cabinet scrapers, so I improvised. I tried the back of an X-Acto blade and it works really well especially for the small arcs and tiny area.

However, a used box cutter knife blade was just right. I tried the cutting edge, but found the angled edge where the blade was stamp-cut was preformed as a pretty good scraper already!

6.
100_8282.jpg


7.
100_8287.jpg


I cleaned up any burrs, being careful on the top so there wasn't any rounded area that I would create. That would show up in the next layer as a valley between the colors.

From this point on I'll be using acetone only to weld the two layers together.

Here's something I found out: this product from StewMac is ABS, not polystyrene. This means a good ABS, not PVC clear glue would be a good choice too.

I could smell the ABS smell, from experiences in irrigation systems and leech fields when I was scraping the material to the correct height. .

8.
100_8288.jpg


Again, more toothpicks and reusing the same rubber bands.

9.
100_8289.jpg


10.
100_8290.jpg


Dip a kid's paint brush into pure acetone and just touch the loaded brush to the top of the binding. This is a quick bond and there's no wiggle room to make any adjustments once you touch that first drop to the binding.

11.
100_8291.jpg


The second layer went fine, but it took a lot of toothpick placement issues to be set up correctly to make it work best.

The next layer would be standing a few thousandths of an inch proud outside the diameter of the headstock, so a new plan was needed to hold the binding tight.

I whacked off some spacers and made a formed piece of pressed board to keep some pressure on the last layer of binding.

12.
100_8294.jpg


13.
100_8295.jpg


14.
100_8296.jpg


Well - that's where it sits right now. I'll pull the rubber bands and spacers. etc., off in a few minutes and start more pixs when I shave the edges down again.

Later.
 
Here comes all I'm good for for the day::

I got the binding down to the correct level pretty quick
thanks to the acetone firing off almost as fast as
Super Glue.

I burnished the plastic that had been roughed up in the
sanding process by running a small drill bit shank all
over it to restore the shine.

Rubbing it quickly, it makes the smooth surface come
back and shine really nicely.

100_8297.jpg


100_8298.jpg


100_8299.jpg


100_8301.jpg


Here's the first coat of clear on it so far:::

100_8303.jpg


100_8304.jpg


I don't think I'll miss the yellow headstock and it just
felt out of balance to me with so much visual business
on the body itself. :hmm:

.... A side-note here:

I don't think this requires a whole lot of super luthier skills to get a good job outta it at all. I've never done anything like this and for a first time experience for me, I just know that anyone can accomplish this same customizing effect on their gear.
 
I super dig the dip at the control section.

I had a dream.......................................... (yeah sure!)


Really - I don't know what made me do it that way. It must've been something subliminal I guess, as I wasn't thinking of NACA vents at all.

What's got me moving now is trying to build my own neck - and from the way I saw it done by hand on a porta-workbench, (Congrats, gtlvr! Great job and I am in awe of your prowess and chutzpah) it makes me feel that it is a done deal.

But things have a way of getting screwed up and I've had more than my share of screw-ups, so there's that too.
 
I've just spent the last half hour or so going through this thread from the start. Must be karma that you mentioned my name in the post above me. Surprise! Here I am.
Gotta say, I'm really diggin' this bass! Pretty much everything about it. Great work!
As to a neck build, you absolutely can do it!
 
I'm going for it when I get the bass currently on the table done first. Otherwise I get confused with two projects going at the same time - and that happens a lot now to mention it.
Yeah, i know what you mean. Sitting here waiting on the finish to cure. I think I'm close. :hyper:
In the meantime, I've started designing and drawing out the blueprints necessary to build the templates for my next guitar build. I'll have to get started on that ASAP, since I only have about 2 months of weather left that's suitable to hang a body and neck in while it cures. Hopefully the build part will go pretty quick. But I made sure I was done with the P bass first, except for buffing, assembly and setup.
Again, cool build and great work! I look forward to seeing the finished product.
 
Sunday, August 18th Update:::​

Well - I got a few things done today after all the morning things got done. Sorry for not posting as soon as I could - but I had that electrical inspection and I hadda help on a new estimate for a new job.

Gads - I'm glad I'm retired and don't have to work any more - yeah sure!

Anyway - I tried one way of adding the inlay I wanted and did some more head and neck work today:::

I went with the curved lettering here:::

100_8347.jpg


100_8348.jpg


I think the binding came out OK - for my first time too:::

100_8344.jpg


100_8345.jpg


Now - the inlay is going well:::

100_8352.jpg


100_8353.jpg


100_8357.jpg


Next, I gotta fill in the back plate and HOPEFULLY my B/W/B PG material will get here soon!
 
I've been off chasing other rainbows for a bit - yes, the PG material showed up but I have to move to another state by the end of October.

Running a little hectic here. Medically I'm going to have a lot more troubles if I stay where I am right now with the smog as bad as it is and getting worse. But there's other things going on too.

Not saying where I'll wind up just yet - it might be anyone's neighborhood - surprise! I have three options open to me and I get all my 4 year investment back in cash from this house I'm in here.

Hooray! Neat complicated legal deal - - but it's working out good for me.

I expect to get the PG done before that though - almost all packed except for things that I'll transport in my Blazer and Amigo when I finally leave SoCal.

I was playing this bass today for a while in a 4-hour jam session and I really want to get it done ASAP. Perhaps when I get resettled I can concentrate on Tuxedo Bass #4 too.

Couldn't do anything else here right now anyway - serious rain and lightning storms are punching us all last night and all today - expect more tonight.

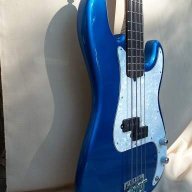
EDIT::: Some new pixs all strung up:::

100_8418.jpg


100_8419.jpg


100_8420.jpg


100_8421.jpg


100_8422.jpg


100_8423.jpg