• TalkBass has been independent since 1998. Add your voice.
    Create a free account to reply to discussions, view embedded media, and browse with fewer display ads.
    Join freeLog in
    Want zero display ads or expanded classifieds tools? Compare plans.

What's On Your Workbench?

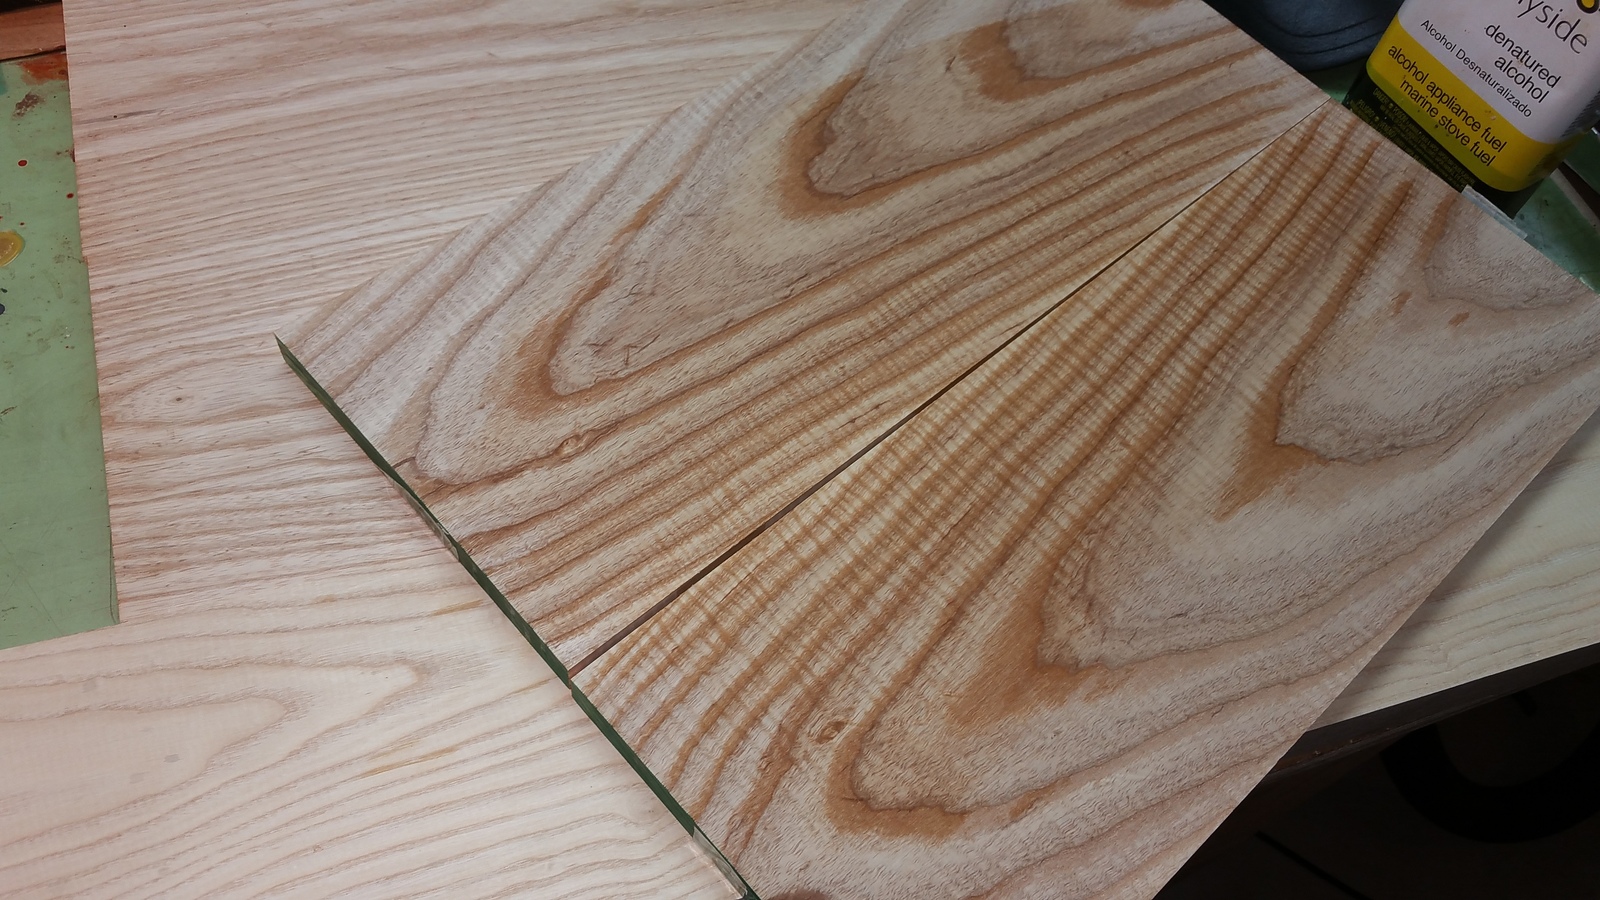
An Ash Mash
Northern Ash for the neck (Pictured below)
Swamp Ash for the body (Pictured on top)
Flamed Ash for the cap


Misc18.jpg
 
Wiring day here at the shop, getting all of the last minute NAMM preps wrapped up. This is the standard wiring harness for our passive Jbass model, with series/parallel on the volume pot + blend + a DuoTone™ on the passive tone control. It just barely fits onto a standard Jbass control plate thanks to the added heft of those CTS push/pull pots.

RD_ControlHarnessReadyToInstall2.jpg
 
  • Like
Reactions: kaoskater08
Wiring day here at the shop, getting all of the last minute NAMM preps wrapped up. This is the standard wiring harness for our passive Jbass model, with series/parallel on the volume pot + blend + a DuoTone™ on the passive tone control. It just barely fits onto a standard Jbass control plate thanks to the added heft of those CTS push/pull pots.

View attachment 1024979

That is some intense wiring. Looks great!
 
These look horrible compared to the rest of the things here, but since I'm taking a break from doing anything critical on the bass...

New fret holder
IMG_2158.jpg


Cheapass Improvised Pedalboard 2.0
IMG_2159.jpg

I'm going to make some kind of wooden understructure to raise it up and allow wires to run underneath, and hopefully hide the power strip down there to make room for more pedals without increasing the footprint.
 
Last edited:
finally got this one ready for final set-up. it'll be delivered to it's owner next week, and also spending a bit of time at the RGW booth at NAMM

RD_BlockedJneck_ReadyForFinalSetup.jpg


And maybe it's just me, but I still can't get used to a J style body with control plate and no pickguard. Simply not my thing. I'd rather have a rear control cavity and no plate ... but others really dig this look and don't like my preference.
 
  • Like
Reactions: tbrannon
Since the pedalboard isn't worthy of it's own thread, why not finish here.

Building base from an old 1/8" ply cabinet back and strips of ripped 3/4"ish plywood
IMG_2162.jpg

All layers glued and screwed. First layer has corner lap joints and I hope I never again have to nibble out a lap joint using a table saw where the blade keeps dropping down. :grrrrr:

Finished the woodwork, added magnets to the front ledge to hold down the rack without rattling, and painted in gray base coat and then a cool textured topcoat I found at Depot
IMG_2177.jpg

The base turned out pretty rigid, and pretty lightweight. I could lighten it further by taking a Forstner to the back wall, but that would mean more painting, and of thru holes.

Then added some nice rubber feet (not visible), drilled the base to mount the power strip, and mounted the rack using the two hinge blocks.
IMG_2186.jpg
IMG_2187.jpg


All that's left to do is add some kind of leash between the base and rack so that it doesn't fall backwards when open, and doesn't put too much pressure on the hinges. If anyone has any clever ideas for that, I'm all ears.

It also needs a few more pedals. :) And maybe a cover.
 
All that's left to do is add some kind of leash between the base and rack so that it doesn't fall backwards when open, and doesn't put too much pressure on the hinges. If anyone has any clever ideas for that, I'm all ears.

It also needs a few more pedals. :) And maybe a cover.
I dig it. Only thing I would do would be to paint the white rack that flat gray you used initially on the base.
 
So. Is everything going to do something?

Depends on how much I can get my son to do. He's an electrical engineering student but is really busy with school, trying to land an internship, etc. Also depends a bit on power requirements and space for circuit boards.

I would like to see the tubes light, the relays click and the flux capacitor have chasing lights. The year indicator ideally would be selectable, etc.

Worst case it ends up being a bit like an electronic version steampunk thing with a lot of parts that don't do anything.
 
I dig it. Only thing I would do would be to paint the white rack that flat gray you used initially on the base.
Yeah, my thought too, except the white coating on the rack is a vinyl dip, so I have near zero confidence that the paint would stay on with any kind of bump, scrape or scratch.

I like it, no frills low budget ingenuity at its best. The wire shelving rack may bend over time if you are an agressive stomper, but a replacement piece is cheap at Home Depot.
True enough. Also, could make a rack out of wood or metal. I found that this rack is not the the most cooperative with routing the wires, the spacing is too close for it to be easy.
 
Yeah, my thought too, except the white coating on the rack is a vinyl dip, so I have near zero confidence that the paint would stay on with any kind of bump, scrape or scratch.

True enough. Also, could make a rack out of wood or metal. I found that this rack is not the the most cooperative with routing the wires, the spacing is too close for it to be easy.
I saw one that somebody made using a piece of diamond grate. Was lightweight and the diamond grate gave more mounting options.
 
last NAMM bass completed and ready to roll. it features the first production set of the new 'modern size' P5 pickups together with a split-J. Vol (p/p 'P solo) + Blend + DuoTone passive tone control

Alder body, sealed with a Marine sealer and finished with Teak Oil. Maple/roasted Pau Ferro neck with heel adjust dual action trussrod and carbon fiber stiffening bars. Nothing fancy, just a solid workhorse with action the plays itself.

RV17501_ReadyForNAMM.png
 
On my workbench is a bunch of...
20170126_210518_001.jpg

rivets.

They were in my dad's workshop since before I was born, in one of those little organizer boxes with plastic drawers for nails and screws and assorted little doodads.

He's been gone for 25 years, but I kept as much of his shop stuff as I could. I was stumped on what to use for some side dots, but when I found these, it was a no-brainer. It's for the first bass I ever owned, so bonus sentimental value.

Ok, I was hoping to have the final product to show but... crying kiddo = finish later.
 
Aaand that didn't go so well. I snapped off 2 1/8 bits in the side of the fingerboard while drilling for the side dots. I have no idea how to recover from this... looks like it's going to be a weekend full of cursing and troubleshooting. And scarring up an otherwise great fingerboard. :(
 
Aaand that didn't go so well. I snapped off 2 1/8 bits in the side of the fingerboard while drilling for the side dots. I have no idea how to recover from this... looks like it's going to be a weekend full of cursing and troubleshooting. And scarring up an otherwise great fingerboard. :(
Larger side dots, I would think, so you can drill out those holes larger. Unless the holes are really horribly mangled. Maybe you can set it up so that the neck is suspended and clamped on blocks an inch or two above your work surface, so that you rest your drill on its side on the bench and slide it forward, kind of like a sideways drill press.
 
Last edited:
Enlarging the dots is the obvious solution. I'm already using 2 sizes (I just had to be fancy) so I'm not sure if I can upsize the smaller ones (both broken bits were the smaller size) but that might help conceal the damage.
20170127_075310.jpg

The other one snapped off right by the chuck and the chuck scraped up the fb edge:
20170127_075014.jpg

So yeah, surgery will be needed. I didn't think I could clamp the neck sufficiently on my tiny drill press, so I had it clamped kind of like you suggested, PJ, on my bench, suspended on bags of lead shot.

I think I'm going to carefully dig the bits out, somehow, and then patch the holes up (suggestions?). If there's too much damage, I can upsize the dots, but that will require redrilling about 12 holes, and I'm not too confident in that resulting in clean holes. This wood (African blackwood) is really tough to work.
 
Blackwood should be like ebony, where you can do most repairs with a glue mixed with wood dust and have it be near-invisible.

I didn't realize you had a drill press. I'm surprised you broke the bits using it. Were you free handing it, holding the neck up to the bit?
 
I was not using the drill press. I couldn't (be bothered to take the extra time to make a jig to) clamp the neck sufficiently on it, so I secured it onto my workbench with a small vise (body end), and rested it on pads (neck and headstock), and hand drilled. Shame on me. I'm pretty sure I'll never hand drill again when I can use my press, even if it means spending much more (rare) free time to get the job done right.

Hopefully I can extract those bits of bits and recover from my screw-up. I'll definitely be touching up all the dots with sawdust and glue for a clean look, so it'll just be a bit extra effort for two of the dots.

Thanks for the input!