• TalkBass has been independent since 1998. Add your voice.
    Create a free account to reply to discussions, view embedded media, and browse with fewer display ads.
    Join freeLog in
    Want zero display ads or expanded classifieds tools? Compare plans.

What's On Your Workbench?

Brad point bit, cordless drill, and neck in a small machinist's vise works fine for me in ebony, maple, cocobola, or rosewood. 1/8" plastic rod and razor saw. The brad point bit is key IMO.
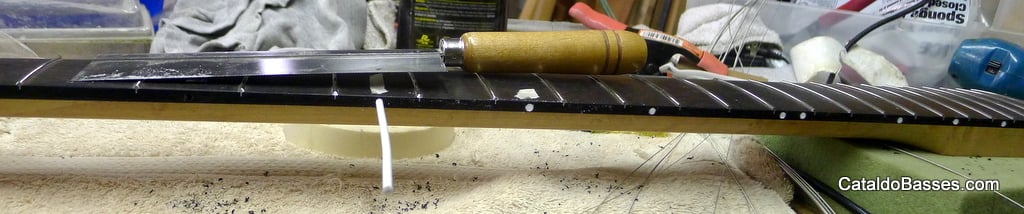

P1060203_zpsfdbe6da1.jpg
 
  • Like
Reactions: Jonny5bass
I'm using 2 sizes of dots, 1/8 and 1/16. I have a brad point for the former, but not the latter. The bits I snapped off were both 1/16. I eyeballed depth, between 1/8 and 1/4 inch. I'm making slow progress (busy weekend). I dug out one of the tips:
20170129_221742.jpg

You can see the 2 sizes on a couple of the rivets I've glued in place. I'm pretty confident that the repair will look really good - I drilled and filled holes in scrap and compared results between epoxy, CA glue, and Titebond all mixed with sawdust. The CA glue looks really good. I'll use that.
 
Looks good, glad you got it sorted. Is that a fretless? I did something similar on a fretless of mine - 3mm dots at the "normal" positions and 2mm dots at the "in between" positions. I like it. :thumbsup:
 
  • Like
Reactions: Dean N
This is a Westone unlined fretless (22 frets) from the 80's - they did white and red side dots which is cool.


Speaking of multi-colored side-dots, I saw these things in Michael's some time ago, and thought they'd make great side-dot position indicators.

[Invalid or Expired Link Removed]

Just a bunch of plastic rods in various colors.
 
Speaking of multi-colored side-dots, I saw these things in Michael's some time ago, and thought they'd make great side-dot position indicators.

[Invalid or Expired Link Removed]

Just a bunch of plastic rods in various colors.

Would probably work best if opaque/solid colours - if translucent/clear colours they might tend to disappear once slotted into small dark holes.
 
I've been playing around with pewter. I'm not sure it will pan out to any specific instrument application though I have a few thoughts, might be cool fret markers or headstock inlay, but it does add weight. I'm thinking of medallions as a head stock logo rather than the standard decal. Or like the old Silvertone metal logo. Utilising a router I could freehand a signature and pour pewter into the headstock. It would also work as a type of ballast embellishment for those project that are not perfectly balanced.

This was my first attempt at simple casting, I have made a bunch of knives over the years, this blade I got from Paul Poppins, who is known for his moccissins as well as knives. This was simply to get a feel for how the pewter flows and any difficulties in finishing. It all seems pretty straight forward and not too difficult. In this case it made the project a bit quicker in that the hole in the antler for the blade tang was large enough to pour the metal and adhere the steel to the horn, without pins or epoxy. The bolster and pommel were dammed with metallic tape.

FBB6E8E4-3121-4A3B-A9A1-590E7FD6EEF2.jpg