• TalkBass has been independent since 1998. Add your voice.
    Create a free account to reply to discussions, view embedded media, and browse with fewer display ads.
    Join freeLog in
    Want zero display ads or expanded classifieds tools? Compare plans.

What's On Your Workbench?

I just ordered this Hipshot bridge:
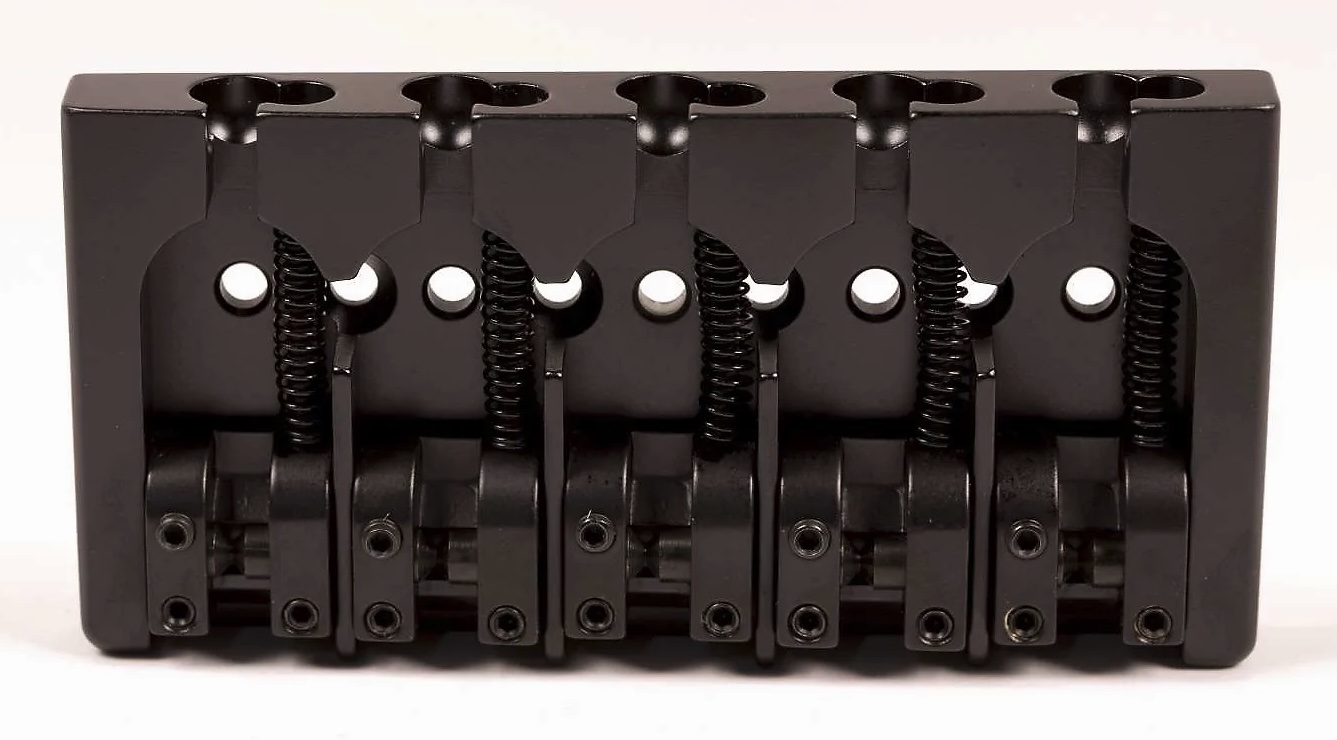
Hipshot Bridge.jpg


Yeah, it's a sickness...
 
Back around Thanksgiving I floated the idea of doing a new body for my gifted Marco Bass fretless. The original was a discontinued and mostly unloved old model, which came to me without control holes drilled so I could do my own things with the electronics. Three generations of conventional 3 band preamps later, I decide to go with a DIY filter preamp for the bridge pickup and a conventional Baxandall Bass/Mids one for the neck side. So I wanted an ew control layout and also a re-do on my revised body shape that I inflicted on the first one. To illustrate:

Original MV model body and neck as I received them:

MV4FL_11.jpg


First gen B/M/T control layout with 4 pin XLR I/O, using an external power supply and giving a Ric 'O Sound two output option down the road as well. We were contemplating adding a piezo pickup later, and/or a two filter preamp format:

MV4FL_sm.jpg


Eventually I trimmed down the goofy upper horn a bit, like so:

MV4FL_2024.jpg


Notice the rather inconvenient Q switch for the newly installed bridge pickup filter preamp, right next to the neck volume pot. The frequency sweep was also at the top of the tone control stack, not intuitive at all IMO. The horn reshape was also too mild for my taste, but I really wanted to avoid doing a wholesale refinish job, which is way out of my wheelhouse. You can see my clumsy hand painted shading at the top of the neck pocket, but Marco and I both saw some good potential here, especially with the new preamp format. So out to the shop we go, some of you may remember this from a few years ago:

MarcoBassFire.jpeg


A tragic fire, but that shop has now been rebuilt mostly for pickup making and there's a demo space upstairs. There's a new shop up the street with a huge CNC cutter, spray booth, and so on. For more than a year it was just used to try to dry out wood that was "saved" by the fire department. Dome of the less scorched bits ended up back in the old shop, and a few basses were salvageable, one even going to NAMM as a showpiece. There were 4 MV bodies IIRC, and we settled on one that I could take home and try things with:

MV4A_back.png


Lots of blistering on the back, and a big crack in the control cavity. Center block is ash, back core/wings are Doug Fir. Goofy unmatched grain, but bear in mind that this was originally an $800 entry level slab bass. The front was probably kind of pretty with the contrasting grain on the ash wings, but it was badly soot damaged and a quick spot stripping attempt showed this:

MV4A_front.png


Further stripping exposed the big control cavity crack which fortunately didn't get into the ash front wings:

bassback.jpg


In that pic I have cleaned out what I could and epoxied in some veneer to fill and stabilize. Inserting a pin or two to further stabilize things was contemplated but there were so many other uncertainties that I decided to forgo that until later, since I wasn't sure the old neck would even fit in the new pocket well enough to be usable. You can see that I've started to reshape the upper horn at this point too. If I couldn't make it prettier in some way than the original one I owned why bother, eh? Woodworking is definitely not my forte, it was wintertime, and finish work needs to be done mostly outside as I have no dedicated space inside. Marco was busy with NAMM stuff and he'd already gone way beyond anyway, doing custom neo sidewinders and an awesome epoxy infused fingerboard, so this was always going to be on me.

Everything cleaned up well enough eventually to proceed, but frankly it was just a mess with all the mismatched everything and black Krylon was looking like it might be the only hope. My nephew @Dirk Diggler talked me off the ledge and gave me a reality check on my new two tone tinted oil finish concept, which was pretty optimistic and really rather naive. I was discouraged and unwilling to drop any more money into this by then, but Dirk suggested just wiping on some Danish oil and seeing how a simple natural finish worked. Nah, I'm gonna learn about grain filling, do a two tone tinted finish, yada yada. It's a throwaway in my mind, let's learn a few things and call it good. I still haven't even done a test fit on the neck either, and Marco says that's 50/50 at best, as this model changed a lot over the years. But hey, February was unseasonably warm and I could work outdoors quite a bit, so let's see this through for a bit longer.

I finally got the horns to a shape I like well enough, tried a number of grain fill and tinting schemes, and pulled apart the old bass. The pocket was only a millimeter or two too tight, within easy hand sanding tolerance as it turned out. In under an hour I had a more or less Class A fit on the pocket sides, with a little angle shimming in the cards anyway, so it seemed worth carrying on. Lots more finish work on the top, with a lot of of wait time on oil cure and grain fill shrinkage -several weeks. The tinting agents I used turned out to be not so universal, but with persistence I never had to buy any new ones. If I had a do-over nearly everything would be different, but at six months in I have a great sounding instrument with my preferred control layout, and a look that's at least in the ballpark of what I envisioned:

MV4FLA_2a.jpg


The back could use a bit more attention someday, but hey...it's the back!

MV4FL_newback2.jpg
 
Last edited:
Future build fodder:

I cut some casting plugs for a lefty version of the bigsby-style bass tremolo I made for my 1st Paulish 30" bass.

rigsby-casting-plugs-1000w.jpg vib-test-fit-1200w.jpg

After playing the Paulish bass for a year plus, I've found that the right handed design puts the arm in the way of the knobs and switches.
Also, you've got to fumble around to find the arm for shakes and warbles. A lefty version puts the arm up, out of the way, nearly in the palm of your hand when playing finger style - instant access.
Casting will be in aluminum, though I do have some bell bronze mini-ingots that keep catching my eye. Polished bronze would look cool, but be 3x as heavy.
 
Adjusting Intonation.jpg

I know it probably looks the same, but the eagle-eyed among you may have noticed the saddle positions of the B and E string are a little further back. I've been dialing in the setup over the past weeks, and when I went to adjust the intonation, I realized I was at the max for the B and E strings. I remembered that Hipshot provided a couple of extra screws for exactly this purpose, but I couldn't find them anywhere. I measured them to be standard 4-40, and had some shorter screws in stock. So I replaced them, and was able to set the intonation.
 
Nearing the final stages of a major restoration of a late '60s Japanese long-scale bass. Some of you may have already seen my thread on it. Other than addressing neck/pu/bridge alignment issues and refinishing, a DIY genius along the line decided to "fix" the neck bow* by gluing the neck in the pocket. I was able to get it out (not pretty), repaired the pocket/heal interface and sent the compound warped neck to warped neck.com - it'll be back here on Tuesday. I've done repairs on necks and replaced tr's but this one was WCS. Eric (at wn.com) said it required multiple heat treatments but he was able to get it straight.

My thread on it is here: GEO's 1st bass restoration

1751043278512.jpeg


1751043523633.jpeg

* this bass (which was sold under multiple brand names) appears to have neck warp issues across the board due to the way it was designed. I initially addressed it adding a brass plate to stop the central tr-access stripe from lifting under tension. (details in my thread) I hope now that the warps are straightened along with my added safeguards - it won't have this issue anymore.
1751043779120.jpeg
 
Transformation from a bass wreck to a black beauty.
 

Attachments

  • IMG_0222.png
    IMG_0222.png
    3.4 MB · Views: 10
  • IMG_0223.png
    IMG_0223.png
    557.1 KB · Views: 11
I’m revisiting the ’75 P-bass refin today.

At @Bruce Johnson ‘s suggestion, I was refinishing with Minwax Oil-Modified Water-Based poly (which I still think is the right product for this job) but the project has been plagued with hassles since the start. I’ve had troubles with controlling runs and with getting an even coat right from the first coat and, seven or eight coats in, when I came to terms with the fact that I was just layering bad work on top of bad work, the project stalled a couple of months ago.

Today, with a heavy heart, I hand sanded the top, back and tummy cut back to bare wood.
IMG_8566.jpeg

IMG_8565.jpeg

IMG_8567.jpeg


So, what have I learned from this so far? One thing is that I have a lot to learn about applying polyurethane. It’s very easy to do an okay job with poly but a really good job takes some experience and some know-how. Another thing I’ve learned is that what I thought was a good surface prep…. wasn’t. I should have spent a lot more time in the sanding stage before I even considered applying finish.

So, where does this leave me? The body is sanded back to 60 grit and will need to come down to at least 220. The sides haven’t come out so badly so I may be able to just scuff sand them but I need to inspect them carefully to see if I need to sand them back as well.

I need to do a little experimenting with this finish as well. I think I may get much better results with a little bit of dilution and a much better quality brush but I need to practice a little and see if that works out.

One thing’s for certain; I now know a lot of things I shouldn’t do!
 
I’m revisiting the ’75 P-bass refin today.

At @Bruce Johnson ‘s suggestion, I was refinishing with Minwax Oil-Modified Water-Based poly (which I still think is the right product for this job) but the project has been plagued with hassles since the start. I’ve had troubles with controlling runs and with getting an even coat right from the first coat and, seven or eight coats in, when I came to terms with the fact that I was just layering bad work on top of bad work, the project stalled a couple of months ago.

Today, with a heavy heart, I hand sanded the top, back and tummy cut back to bare wood.
View attachment 7274285
View attachment 7274286
View attachment 7274287

So, what have I learned from this so far? One thing is that I have a lot to learn about applying polyurethane. It’s very easy to do an okay job with poly but a really good job takes some experience and some know-how. Another thing I’ve learned is that what I thought was a good surface prep…. wasn’t. I should have spent a lot more time in the sanding stage before I even considered applying finish.

So, where does this leave me? The body is sanded back to 60 grit and will need to come down to at least 220. The sides haven’t come out so badly so I may be able to just scuff sand them but I need to inspect them carefully to see if I need to sand them back as well.

I need to do a little experimenting with this finish as well. I think I may get much better results with a little bit of dilution and a much better quality brush but I need to practice a little and see if that works out.

One thing’s for certain; I now know a lot of things I shouldn’t do!

Hello Ethan;

Maybe try wiping it on, with a clean cloth? But don't over-rub it. And don't slop it on too thick. Multiple thin wiped-on coats. After a couple of thin coats, let it cure for a few days and lightly level sand it, dry, with 600. Then a few more coats.
 
  • Like
Reactions: 13ghosts and Lo-E

Latest posts