This one is unfinished business… In several ways.
The LC is a (fairly) safe place, so let’s talk about fathers for a minute.
Fact is, all of us have one. Good, bad, indifferent, present, gone, good role model or bad… We’ve all got a Dad. My Dad is probably no different than many of yours, and our relationship has (just like everyone else’s) had its ups and downs. Truth is, I didn’t make things very easy for him, and he didn’t make things so simple for me either. We haven’t agreed on much, and we haven’t seen eye-to-eye on almost any issue you could name. Except for apple pie. That one, we agree on.
I learned guitar from Dad starting about 8 years old. Then, round about the time I turned 14, I played my first bass. After that, while I still dabbled in the 6-string world, it was all about the bass. I played in a cover band right out of high school for a couple years and make more money (and had more fun) than should be legal! It was a small town and we were the best band in the county (granted, there were only 4 bands, but still…)
When I left to join the military, whatever gear I didn’t pawn got left with Dad. And at some point, he picked up the bass too. Fast forward 15+ years, and we’re back in the same general locale, both playing bass (mostly church gigs by this point) and at a place relationally that we can actually carry on a conversation without yelling (too much). It probably helped that I brought a couple of grandkids over on the regular.
Then he get’s the big C diagnosis. Kidneys, then lymph system; all of it chemo-resistant. He had a kidney removed in 2018 and retired in 2021. Still tougher than shoe leather, though. Every other Sunday he’s up on stage holding down the bottom end.
A few months ago he asked when I was going to build him a bass. Kinda surprised me, honestly. He told me he’d always wanted a bass with an ebony fretboard (OK, I can do that) and active (he’s been a Fender guy forever). So he scrounges up a set of used EMG jazz pickups and I drag out one of the bodies from the (very much uncomplete) 2022 Summer Build off. (Link: https://www.talkbass.com/threads/sbo-2022-the-tailgate-trifecta.1568578/ )
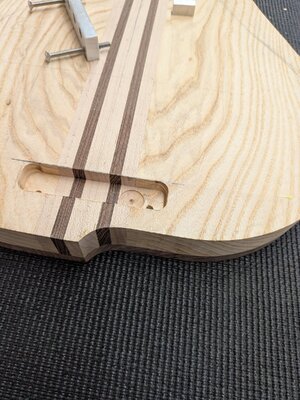
Originally, this body was going to be a Bass VI, but that proved to be a quickly passing interest (it’s not a guitar, and it’s not a bass, and I’m not Glen Campbell). On the other hand, it suited a 4-banger right down to the ground. I knocked out a 3-piece maple neck (still square) for it and here it sits:
Specs:
34”
1 9/16 nut
3/4 (19mm) bridge
String thru
EMG jazz pickups
Gotoh lightweight tuners
Northern Ash (chambered) body with walnut top
3-piece hard maple neck with walnut backplate on headstock
Like I said… unfinished business in a couple different ways.

The LC is a (fairly) safe place, so let’s talk about fathers for a minute.
Fact is, all of us have one. Good, bad, indifferent, present, gone, good role model or bad… We’ve all got a Dad. My Dad is probably no different than many of yours, and our relationship has (just like everyone else’s) had its ups and downs. Truth is, I didn’t make things very easy for him, and he didn’t make things so simple for me either. We haven’t agreed on much, and we haven’t seen eye-to-eye on almost any issue you could name. Except for apple pie. That one, we agree on.
I learned guitar from Dad starting about 8 years old. Then, round about the time I turned 14, I played my first bass. After that, while I still dabbled in the 6-string world, it was all about the bass. I played in a cover band right out of high school for a couple years and make more money (and had more fun) than should be legal! It was a small town and we were the best band in the county (granted, there were only 4 bands, but still…)
When I left to join the military, whatever gear I didn’t pawn got left with Dad. And at some point, he picked up the bass too. Fast forward 15+ years, and we’re back in the same general locale, both playing bass (mostly church gigs by this point) and at a place relationally that we can actually carry on a conversation without yelling (too much). It probably helped that I brought a couple of grandkids over on the regular.
Then he get’s the big C diagnosis. Kidneys, then lymph system; all of it chemo-resistant. He had a kidney removed in 2018 and retired in 2021. Still tougher than shoe leather, though. Every other Sunday he’s up on stage holding down the bottom end.
A few months ago he asked when I was going to build him a bass. Kinda surprised me, honestly. He told me he’d always wanted a bass with an ebony fretboard (OK, I can do that) and active (he’s been a Fender guy forever). So he scrounges up a set of used EMG jazz pickups and I drag out one of the bodies from the (very much uncomplete) 2022 Summer Build off. (Link: https://www.talkbass.com/threads/sbo-2022-the-tailgate-trifecta.1568578/ )
Originally, this body was going to be a Bass VI, but that proved to be a quickly passing interest (it’s not a guitar, and it’s not a bass, and I’m not Glen Campbell). On the other hand, it suited a 4-banger right down to the ground. I knocked out a 3-piece maple neck (still square) for it and here it sits:
Specs:
34”
1 9/16 nut
3/4 (19mm) bridge
String thru
EMG jazz pickups
Gotoh lightweight tuners
Northern Ash (chambered) body with walnut top
3-piece hard maple neck with walnut backplate on headstock
Like I said… unfinished business in a couple different ways.