• TalkBass has been independent since 1998. Add your voice.
    Create a free account to reply to discussions, view embedded media, and browse with fewer display ads.
    Join freeLog in
    Want zero display ads or expanded classifieds tools? Compare plans.

30” Scale Compact Semi-acoustic Fretless Bass Build

I'm on the edge of my seat! Can't wait to see the finished product , I have been planning to do a very similar build once I get settled in to a new shop. Your thread will invaluable to me so I would like to thank you for the detailed posts, I know first hand how much documenting a project will slow you down .
 
Thanks again for the kind words. After a long and protracted project such as this, it's all too easy to slip into rushing to the end, but as said, "No wine before its time". I've tried to slip in as many tips and techniques for my building methods as possible, and that does certainly slow down the daily march forward.

Today won't see any progress, as there's a turkey to be smoked, cooking to be done, food and wine to be consumed, and great friends to commune with...and the dog must be entertained, of course.

My finish regimen is very simple, but there's still drying time that has to be factored in, so slow incremental steps there.

Hang in there, we'll "Get 'er done!"
 
108. The neck is getting my favorite “hard wax” treatment. This is done by heating the wood to the point that pure Beeswax liquefies and soaks into the wood as it is rubbed over the surface. The Beeswax has a higher melting point than many other waxes and the heat application means that it permeates the wood and doesn't just sit on the surface as most other applied wax finishes. I do the entire neck, including the finger board. It initially looks terrible because the wax solidifies as it is applied so there's a bunch of excess wax on the surface.
zvSoeHk.jpg

I have top bar bee hives that I started three years ago and the ladies provide me with all the wax I could possibly ever use. I've had waxes that "contained" beeswax before, but the pure wax is a LOT tougher. The girls know something about making wax; each individual bar holds triangular comb and has to support several pounds of honey in a box that sits out in 95 degree heat in direct sun. That's some tough stuff!
4ockYVs.jpg

109. The second step is to re-liquefy the surface wax with the heat gun and polish it off with a soft cotton rag, leaving behind a surface that is wax-impregnated but glassy smooth to the touch. I've done a number of necks over the last three years and I simply love the feel, and it never has any stickiness of grab that other finishing methods can develop.

I discovered this finish technique quite accidentally a few years back as a result of giving some consideration to comments about the lack of protection from oil and surface waxing. I wondered if heating the wood to a point where it would allow the wax to permeate into the wood as opposed to surface-applied would yield better results. I'm guessing that you don't need my answer.

I don't want to start any "finishing wars" with folks who have contrasting opinions, but I did find out that there is historical precedence for this finish. There's evidence that beeswax was used as both pore filler and final surface finish, burnished to a high sheen. There's a bunch of web references for those who might care for further information; suffice it to say I like the heat-applied beeswax very much.
v3Vy2Yh.jpg

110. The body components get another of my favorite treatments, Minwax Wipe-on Satin Poly applied with a soft cotton "fad". For those unfamiliar with the term "fad", it is the common name for the pad that is used to apply the finish when "french polishing". I make them by wrapping a small wadded-up ball of cotton fabric with a smooth layer of the same fabric and tieing up the top with a rubber band. A lint-free soft cotton material is best; I like to use old worn-out tee shirts. I make up a fresh fad for each application and try to be meticulous about applying it in a clean and dust-free method, to the extreme of taking a shower and donning clean clothes before a new coat of finish is applied. An ounce of prevention is worth two or three pounds of cure when it comes to finish application. I do three coats with a day between applications and knock down any dust specks on the surface with 0000 steel wool before the next coat. A wipe-down with a tack cloth proceeds any finish being applied, obviously. When finish is done it's time to once again re-assemble everything and finish up by attending to the wiring details.
8BFD9KM.jpg

111. The wiring is detailed on the construction drawing, but it's quite simple with two totally independent paths from the magnetic pickup (or the L.R. Baggs bridge saddle transducer / pre-amp) routed to individual volume controls and feeding individual output jacks. The L.R. Baggs Element system originally had a tiny volume control that mounted at the edge of an acoustic guitar sound hole and L.R. Baggs was super-accommodating when I requested information and sent a diagram of how to use a conventional full-size volume control and the specification for the pot resistance that would be necessary (25K ohm).
f59ELjJ.jpg


All that's left now is to screw the control cavity cover in place and take a few “Completed” photos.
Coming up shortly...
 
Last edited:
Outstanding! Very nice to see your work.
I was actually thinking of trying something like the T-nut/machine screw technique in the future. That is a great idea.
From what I see though, great ideas seem to be the only ones you have. Keep up the stellar work.
 
You're teaching me new tricks Rudy. I'll see if I can find pure beeswax.

Thanks!

Beekeeping is a hugely popular hobbyist pursuit, so it's usually pretty easy to find. Regardless of where you live there should be an Apiary not too far away, and there's almost always someone set up at the local farmer's market selling local honey that should have blocks of beeswax to sell.

There's also Beekeeping supply houses where you can purchase bulk wax. Dadant is a popular source, I think bulk blocks go for somewhere around $8 a pound; that's a LOT of wax!

You can even order on-line from Walmart and pick it up in your local store so there's no shipping charge:

https://www.walmart.com/ip/Yaley-110016-Beeswax-1-Pound-Block-Natural/24932787

Here's a blog post about a conservator's use of beeswax with a video link to a Youtube demonstration. The video shows his method of heat application towards the end of his demo, as he's showing various application techniques.

The Village Carpenter: Don Williams on True Traditional French Polish

Hope that helps, it's a really splendid finish with a lot of possibilities. I'm certainly glad to have found it.
 
Last edited:
Outstanding! Very nice to see your work.
I was actually thinking of trying something like the T-nut/machine screw technique in the future. That is a great idea.
From what I see though, great ideas seem to be the only ones you have. Keep up the stellar work.

Thanks much.

The tee nut neck connection is a pretty commonly used technique, so I can't take credit for that. I've never liked only using screws into the neck and I think inserts are only a marginal improvement. Although inserts give you more of an ability to disassemble / reassemble the neck to the body I've also found them problematic to install correctly, YMMV. The tee nuts give me the solid connection I like with no trepidation about the number of times I might want to remove or reinstall a neck.
 
  • Like
Reactions: rojo412
Thank you once again Rudy, for that link & info!
I should be able to find pure beeswax here without much problems (I know 2 locations where they sell fresh honey).

Of course this reminds me straight away of the oldfashioned way of waxing skis (with an iron & wax), but then followed by the traditional French / spit polish.
 
Thank you once again Rudy, for that link & info!
I should be able to find pure beeswax here without much problems (I know 2 locations where they sell fresh honey).

Of course this reminds me straight away of the oldfashioned way of waxing skis (with an iron & wax), but then followed by the traditional French / spit polish.

Luckily with XC skis I never had to use an iron. One wax for cold, loose snow and another for soft & compactable stuff. :)
 
112. The whole shebang. The whole banana. Whatever you want to call it. The petite size just asks for it to be held!
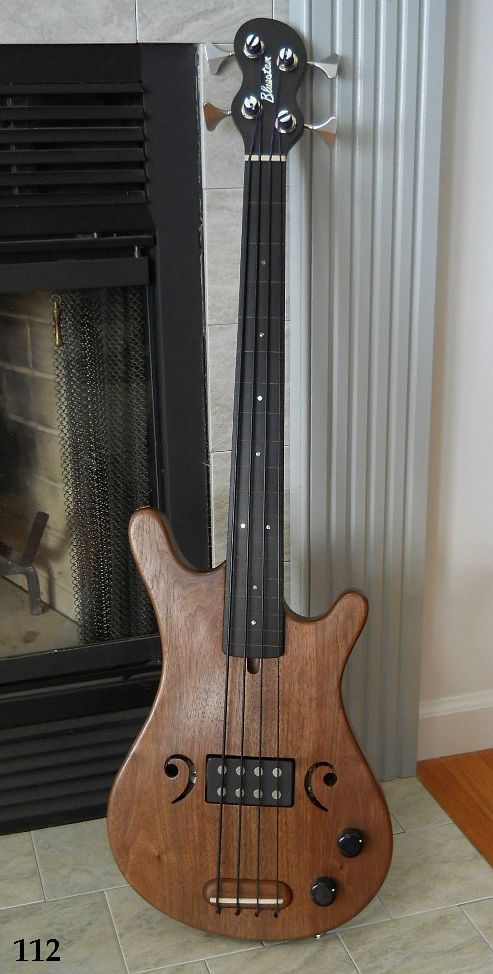
XWnqHY9.jpg


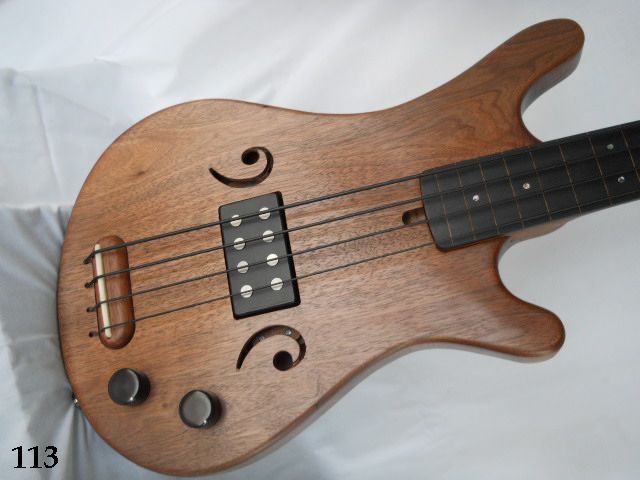
113. Body shot.
F holes for style, great body lines, low-mounted MM-style magnetic pickup, super-smooth volume controls feed independent output jacks, discrete truss rod adjustment slot, plus the nice top and back body arching.
Avt1a4P.jpg


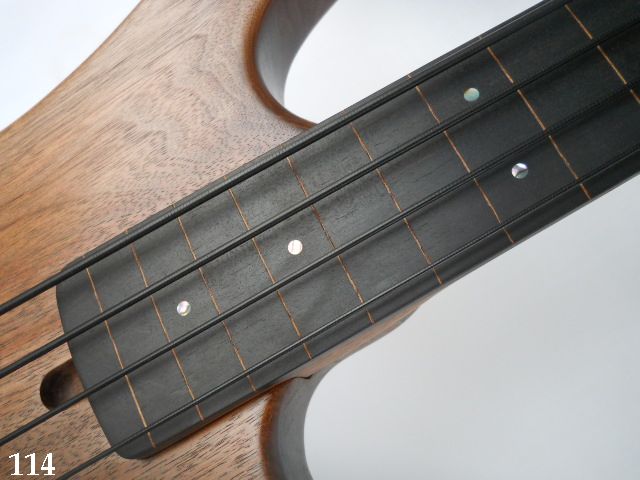
114. Upper neck / body pocket area. It just works, and the small dots are a nice touch. There are side markers, so the front mother of pearl dots are really just minimalist eye candy.
w4JmFX8.jpg


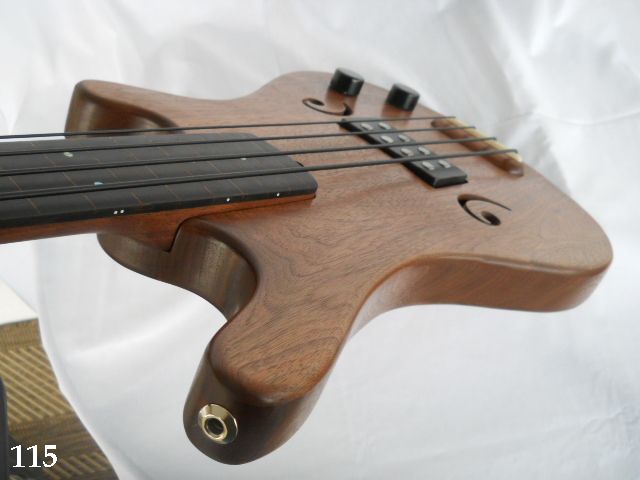
115. Lookin' down from the Matterhorn...
Not too little or too much, but just right. The strap button combined with the upper horn length makes a very workable balance point when the strap is used.
e0g2nvJ.jpg


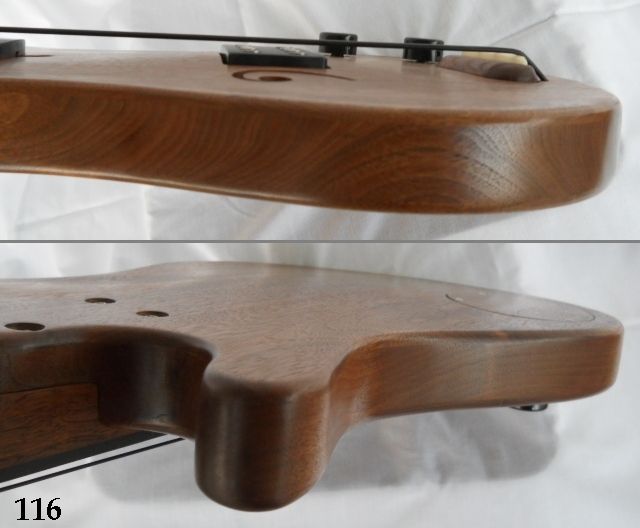
116. Subtle body profiles & contours. I considered belly and waist bevels, but thought better of it. I'm glad I chose the option of flat sides and rounded over edges. It's quite comfortable in that configuration and the forearm rests nicely along the top edge if playing in "standard" bass plucked style.
TpYAv5H.jpg


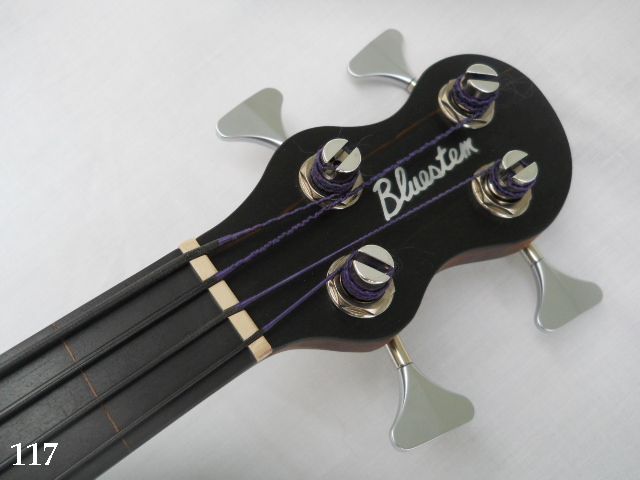
117. Understated head stock and mother of pearl logo. I love the large post Ultralights. The minimalist flush frets are a nice touch. Not strictly needed, but they DO make intonation much easier for up-the-neck work. I'll try to post an example to demonstrate that.
qJASXRz.jpg


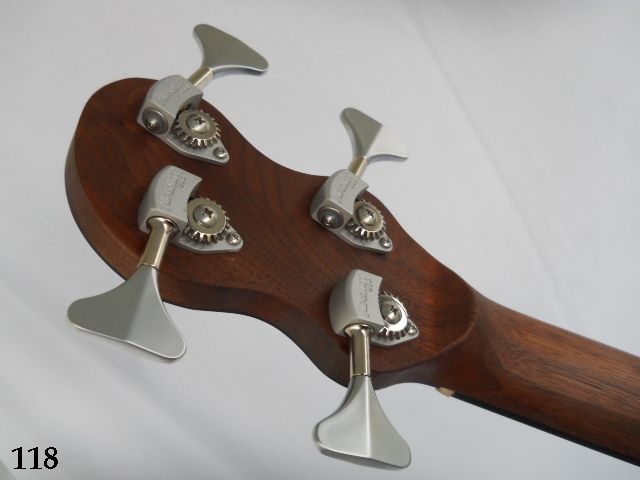
118. Rear view of head stock, Hipshot ultralights are super for minimizing any chance for neck dive.
ZfjJWhP.jpg


I'll work on getting a few sound/video examples posted.

Bottom line, "The bass, She is so sweet!"
 
112. The whole shebang. The whole banana. Whatever you want to call it. The petite size just asks for it to be held!

XWnqHY9.jpg


113. Body shot.
F holes for style, great body lines, low-mounted MM-style magnetic pickup, super-smooth volume controls feed independent output jacks, discrete truss rod adjustment slot, plus the nice top and back body arching.

Avt1a4P.jpg


114. Upper neck / body pocket area. It just works, and the small dots are a nice touch. There are side markers, so the front mother of pearl dots are really just minimalist eye candy.

w4JmFX8.jpg


115. Lookin' down from the Matterhorn...
Not too little or too much, but just right. The strap button combined with the upper horn length makes a very workable balance point when the strap is used.

e0g2nvJ.jpg


116. Subtle body profiles & contours. I considered belly and waist bevels, but thought better of it. I'm glad I chose the option of flat sides and rounded over edges. It's quite comfortable in that configuration and the forearm rests nicely along the top edge if playing in "standard" bass plucked style.

TpYAv5H.jpg


117. Understated head stock and mother of pearl logo. I love the large post Ultralights. The minimalist flush frets are a nice touch. Not strictly needed, but they DO make intonation much easier for up-the-neck work. I'll try to post an example to demonstrate that.

qJASXRz.jpg


118. Rear view of head stock, Hipshot ultralights are super for minimizing any chance for neck dive.

ZfjJWhP.jpg


I'll work on getting a few sound/video examples posted.

Bottom line, "The bass, She is so sweet!"
Sir, I've always loved "Nice Stuff".....

Your bass is as nice a bit of "Stuff" as I've ever seen :thumbsup::thumbsup::thumbsup:....
 
This has been a fun read. Thank you so much for taking the time to document your process. I have just one scratch build under my belt, with two on the bench. It is really interesting to see other approaches. All the praise is well-deserved. Excellent work!