• TalkBass has been independent since 1998. Add your voice.
    Create a free account to reply to discussions, view embedded media, and browse with fewer display ads.
    Join freeLog in
    Want zero display ads or expanded classifieds tools? Compare plans.

54 Precision Attic Find

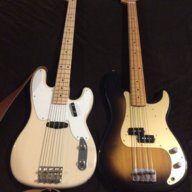
Nope....here's a few pictures that sez otherwise...they were all more or less white blonde..the clear top coats yellowed and darkened.

Tim, you are correct about the darkening of the exposed finish over time. You're doing an outstanding job...also kudos on your patience in regards to all of the cooks in the kitchen.

Now, someone is going to have to watch over this bass while you're gone for 10 days. I'm pretty busy right now but will find the time to help you out. :smug:
 
Well...this book, Fender Precision Basses 1951-1954 has been quite enlightening. I wish I had known about it before I started this restoration process. So much so that I think I will be stripping the old girl when I get home and starting over again. The original Fender finish is a lot less complex than one might think. I'm fairly certain I can get a much more authentic looking finish with a different approach. The blonde and aged clear I used are much more opaque than they need to be, I'm going to have to do some custom blending to get the depth I'm looking for without burying the grain pattern, but I'm up to the task. The book is a treasure trove of pictures of many,many 51-54 Precisions in every state of original finishes, restorations,uses,abuses...compared to what I see in the book, my patches are every bit as good if not better than some that are considered "professional". I can't reccommend this book more highly to anyone who loves these old dogs!
 
You me bote brutha! After seeing all the basses in this book I've come to realize that mine is actually in pretty F'n good condition compared to many. I was kinda flying blind trying to replicate the original finish but after seeing close ups of the real deals, it will definately be worth the extra mile of effort. Also, as another member noticed, the contoured bodies started in March of 54, this one is a slab produced in November of 54...a bit of a rare bird...
Ooohhhhh..... The suspense is killing me!... But in a really good way.
 
Good to hear you will start over. I read the book before having finished my MIJ 51 Reissue. That is why I replied that I was affraid the grain was to much gone.
Hard headed Dutchmen thinking alike..! The correct vintage color is a blonde translucent that has yellowed to the popular "butterscotch" color...it is only as thick and opaque as the original finish allowing you to see the grain clearly...the original finish did not gain opacity through the process of yellowing...using tinting to achieve the yellowing adds opacity..ultimately, I would like to have the milky white blonde under the neck plate,bridge and pick guard, slight yellowing under the PU and bridge cover, with the most yellowing on the exposed areas....me thinks alot of 'sperimenting is in order..or I could just ship it off to a pro refinisher, tell him what I want, and hope for the best...not quite ready to go that route.....yet. I'm trying to achieve the most authentic results which seems to be an extremely fine line of translucency vs. color...
Perhaps some Fender historians can help out here...was the original finish sealed the way we do now, or was the blonde a white grain filler that was cleared over? Any insight to the steps the original finishers used would be greatly appreciated.
 
Last edited:
I'm extremely confident that whatever path you choose will make that bass glow....

You care....That's the important thing here....:thumbsup:
Thanks,man...much appreciated! The more I get into this thing, the more I want to do it correctly...it didn't start out to be a museum restoration, but after seeing a bunch of these old girls in the book, I realized that except for the PU route repair, this body is in pretty outstanding condition. I think re-creating the layers of yellowing adds a unique and valuable touch.
 
Perhaps some Fender historians can help out here...was the original finish sealed the way we do now, or was the blonde a white grain filler that was cleared over? Any insight to the steps the original finishers used would be greatly appreciated.
TB member John_10K worked for Fender and has a great grasp of vintage finishes and does fantastic work on them. I think he'd find this thread of interest and could perhaps offer guidance.
 
Last edited:
At the end of the day there aren't any right or wrong decisions with this stunning find. It's your choice and you are the current owner so ultimately, it's your choice / taste and decision. We can all ponder what we would have done if we were in your shoes and throw up 100 different ideas based on our own opinions. But it's you bass and it's your project and I have to say I've really enjoyed reading this thread and thank you so much for sharing it with us. It's been a delight. Personally, I loved the "au' naturel" look of the lacquered ash. I liked the history of the pickup hole being re-fitted, I like the fact that this bass has been used and clocked up some serious ware and mileage. It's a very genuine and honest instrument made right at the beginning of the history of basses. It's not pretending to be some treasured relic in a glass case...it's been road worn and it's a survivor.
 
I've been spending time on this boat ride looking up everything I could find related to early Fender finishes...its there if you look for it I guess! I'll pass along a few tidbits I found while surfing.(the net).
1950s Fender Vintage Guitar Craftsmen Tadeo Gomez Vintage Guitars Info - Fender custom color finishes on vintage Fender guitarsVintage Guitars Collector - Fender collecting vintage guitars fender, stratocaster, strat, telecaster, tele To paraphrase Yogi Bera, it's amazing what you can see just by looking...
 
Last edited:
Well, I ordered a bunch of different stuff from Stew-Mac to experiment with, and I found this article on a Telecaster site.. "Well here's where it gets tricky. We know what Leo's own costing analysis specified for materials and processes (shown below) but that was a single moment in time and obviously changed. Also, product descriptions can be deceiving. What one manufacturer refers to as "sealer" another might call "stain" and so on. Further complicating it is that 1950s product nomenclature differs from today's. But here's the rundown briefly (this information is in The Blackguard Book and Dan Erlewine's Guitar Refinishing book by the way).

1.) Spray primer and check over........3 min.
2.) Fill with filer and rub off.......20 min.
3.) Stain and check over..........5 min.
4.) Spray Sealer - 10 in 30 min.......3 min.
5.) Hard Sand............15 min.
6.) Spray Gloss - 10 in 50 min........5 min
7.) Polish (all good bodies).........15 min.

You will notice that there is no reference to spraying a pigmented blonde shader coat. That's because the "stain" listed in step # 3 was actually a blonde shader coat, Harper's # L-804. We know that from researching the product numbers. It was mixed with 40% primer, # 1362. So a little investigative work is needed to understand the steps outlined above. But one thing is clear, they didn't waste a lot of time painting these things!

Anyway, there are actually more questions left then there are answers to, but hopefully this gives you some idea of the process. What we can say with certainty is there was definitely a white blocking "stain" of some sort applied and possibly to the raw wood. It was likely brushed at first, then sprayed. Then the bodies were sealed again, pore filled, and a pigmented shader coat was sprayed (the opacity and color varied quite a lot) followed by clear. So if you want to recreate an authentic looking blonde those are the steps you need to follow. You can achive an "aged" look by tinting your final clear coats to whatever look you are after. "
I have a keen sense of adventure, a full can of stripper, and a box full of stains,tints,pigments,fillers,and lacquers. I've been studying the pictures in the 51-54 Precision book, and I think I got this..! I'll be back home in 2 days...Pictures to follow after the fumes clear out...
 
And a request, if I may. If anyone out there has one of the single coil basses, original, Squire, Custom shop, or whatever, could you measure the depth of the PU route and post it here? Comparing mine to what I see in the book...mine looks a bit too deep. I want to correct it before I start spraying again.
I came upon the Fullerplast topic a few times...maybe...in the book there a numerous pictures of different years with original finishes worn off to different degrees. Some look like they were really thick and I can't imagine how they got the grain to show through but it did, and others look like they were coated with skim milk that turned yellow. It looks like there were a few different types of layering going on from 51-56..but it seems the one common denominator is that they were meant to be done quickly and cheaply.
 
  • Like
Reactions: AltGrendel
And a request, if I may. If anyone out there has one of the single coil basses, original, Squire, Custom shop, or whatever, could you measure the depth of the PU route and post it here? Comparing mine to what I see in the book...mine looks a bit too deep. I want to correct it before I start spraying again.
I came upon the Fullerplast topic a few times...maybe...in the book there a numerous pictures of different years with original finishes worn off to different degrees. Some look like they were really thick and I can't imagine how they got the grain to show through but it did, and others look like they were coated with skim milk that turned yellow. It looks like there were a few different types of layering going on from 51-56..but it seems the one common denominator is that they were meant to be done quickly and cheaply.
My Squier appears to be exactly 3/4”. Since yours is an original I wouldn’t have any reason to doubt it.
 
And a request, if I may. If anyone out there has one of the single coil basses, original, Squire, Custom shop, or whatever, could you measure the depth of the PU route and post it here? Comparing mine to what I see in the book...mine looks a bit too deep. I want to correct it before I start spraying again.
I came upon the Fullerplast topic a few times...maybe...in the book there a numerous pictures of different years with original finishes worn off to different degrees. Some look like they were really thick and I can't imagine how they got the grain to show through but it did, and others look like they were coated with skim milk that turned yellow. It looks like there were a few different types of layering going on from 51-56..but it seems the one common denominator is that they were meant to be done quickly and cheaply.

Tim, are you planning on an original vintage SC pickup or one of the stack "quiet" pickups like a Duncan 51 P bass stack? The stack pups require a bit more depth.

EDIT: I might recommend that you consider keeping the current depth since you're going to be selling this eventually. This would give the buyer the option of using a standard pup or one of the stacked versions. I have a Fender custom shop P with dual SD 51 stack pups as standard (same ones as the Dusty Hill). Let me know if you want me to measure that depth.
 
Last edited:
  • Like
Reactions: TomB