• TalkBass has been independent since 1998. Add your voice.
    Create a free account to reply to discussions, view embedded media, and browse with fewer display ads.
    Join freeLog in
    Want zero display ads or expanded classifieds tools? Compare plans.

First Build - "Lucifer"

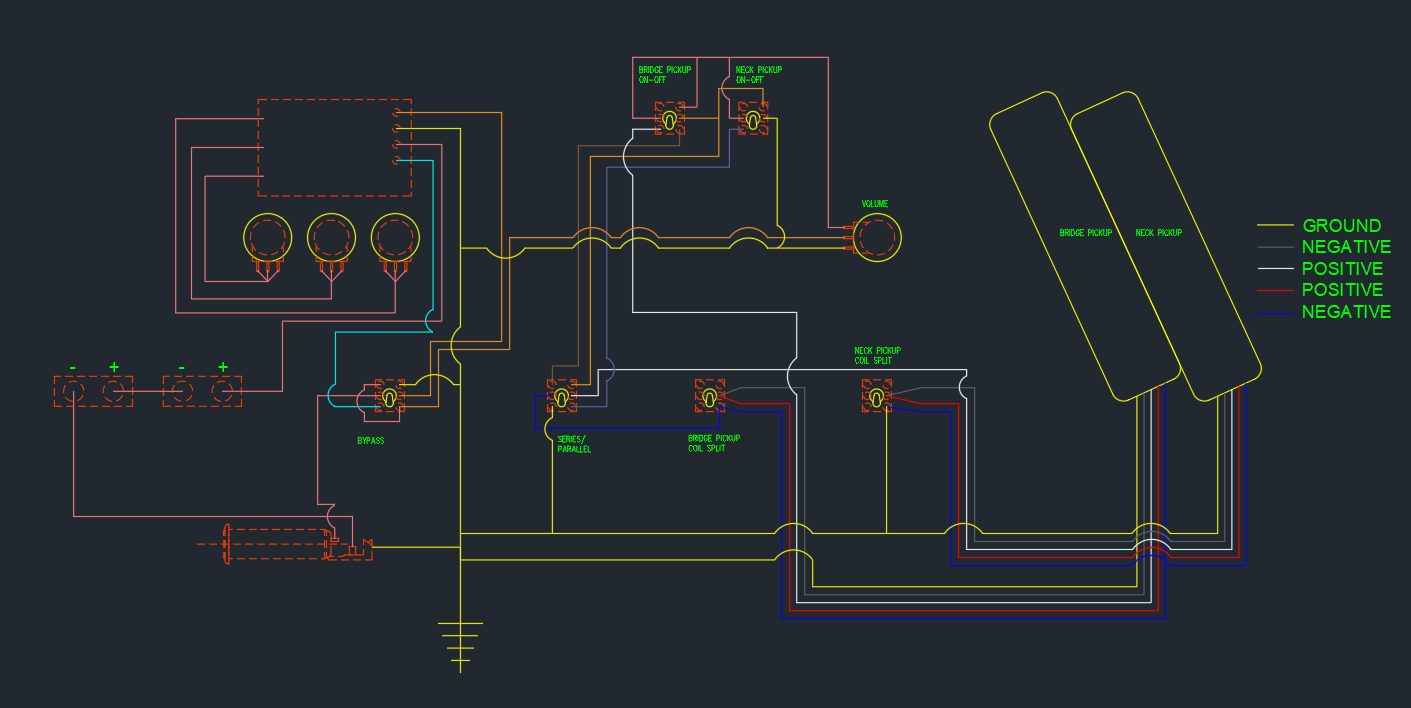
Okay, with much help from @Jon Clegg I have what I believe to be a finished wiring diagram -
Wiring Diagram.png

So we are coil splitting each pickup, then sending that signal to a series/parallel, then sending that signal to individual on/off for each pickup, then sending that signal to the volume and then to the Darkglass Tone Capsule with an active/passive bypass. It's a lot of "stuff", and I know a lot of you are like "Why do all that?" but honestly I've never owned a bass with coil-split, series/parallel or active/passive bypass so why not just build what you don't own?

Yes, I'm aware that the coil-split switches can be the SPDT 3-pin style, but I can't find those in the black mini blade style that I want here.

Now I gotta order about $100 worth of switches, pots and jack. :roflmao:
And then come up with some wire. What gauge are you guys using for wire? We have tons at the race shop, just need to figure out gauges before I start swiping stuff. ;)

Again, massive thanks Jon, you are the man!

You guys feel free to look this over and go "Nope, you missed one...." or maybe you go "Looks good to me man!" I know literally nothing about wiring, so I'm all ears. :thumbsup:
 
I use 28 awg UL 1007 for all my instrument wiring. I know lots of people use thicker stuff. It really doesn't matter much. Sometimes in a really tight cavity with lots of wires I will use solid instead of stranded, since you can pre-bend and it'll stay put.
thanks @dwizum, I think all of our stuff at the race shop is stranded, but this is great info! :thumbsup: :cool:
 
28 is nice when you're working with a lot of mini toggle switches or push pull pots, since the terminals on those have teeeny tiny holes in them and thicker wire won't fit.

Also - you may already take this approach, but for the sake of making things easy to work on, I like to punch a few holes in a piece of cardboard and stick the pot shafts and switches into it, then wire up as much as possible - outside the bass. Then you can drop the completed assembly into the bass and hook up the last few things (like the ground points and/or pickup leads). Sometimes that's easier than reaching down into a control cavity to put a bunch of wires on tiny terminals.
 
28 is nice when you're working with a lot of mini toggle switches or push pull pots, since the terminals on those have teeeny tiny holes in them and thicker wire won't fit.

Also - you may already take this approach, but for the sake of making things easy to work on, I like to punch a few holes in a piece of cardboard and stick the pot shafts and switches into it, then wire up as much as possible - outside the bass. Then you can drop the completed assembly into the bass and hook up the last few things (like the ground points and/or pickup leads). Sometimes that's easier than reaching down into a control cavity to put a bunch of wires on tiny terminals.

Excellent advice!
 
28 is nice when you're working with a lot of mini toggle switches or push pull pots, since the terminals on those have teeeny tiny holes in them and thicker wire won't fit.

Also - you may already take this approach, but for the sake of making things easy to work on, I like to punch a few holes in a piece of cardboard and stick the pot shafts and switches into it, then wire up as much as possible - outside the bass. Then you can drop the completed assembly into the bass and hook up the last few things (like the ground points and/or pickup leads). Sometimes that's easier than reaching down into a control cavity to put a bunch of wires on tiny terminals.
Yeah, for sure! I've seen the cardboard method a few times here on the LC and that was 100% my plan! Anything I can do to make this easier to get at and more of a complete drop-in assembly is the way I'm going! :thumbsup: :cool:
 
Yeah, for sure! I've seen the cardboard method a few times here on the LC and that was 100% my plan! Anything I can do to make this easier to get at and more of a complete drop-in assembly is the way I'm going! :thumbsup: :cool:
You could even do it on a shielding plate which would literally drop in as one piece, just hook up the jack after
 
Now I gotta order about $100 worth of switches, pots and jack. :roflmao:
And then come up with some wire. What gauge are you guys using for wire?
Dude... props for the undertaking. :thumbsup:
I pretty much cheat & use (wiring included) plug n play stuff like EMG.
The MIDI bass I did?.. about gave me a stroke.:rollno:
Imagine my delight when I opened this box from Delano...(an unfamiliar circuit spec'd for Astaroth) ...and most all that spaghett was pre-soldered! :woot:
20210219_115130.jpg

I know literally nothing about wiring, so I'm all ears. :thumbsup:
Me...trying to read schematics...:facepalm: especially ones with neat colors.. like yours :wacky:
gSJfzjAfRUCly.gif

20210219_114749.jpg
 
Okay, with much help from @Jon Clegg I have what I believe to be a finished wiring diagram -
View attachment 4173838
So we are coil splitting each pickup, then sending that signal to a series/parallel, then sending that signal to individual on/off for each pickup, then sending that signal to the volume and then to the Darkglass Tone Capsule with an active/passive bypass. It's a lot of "stuff", and I know a lot of you are like "Why do all that?" but honestly I've never owned a bass with coil-split, series/parallel or active/passive bypass so why not just build what you don't own?

Yes, I'm aware that the coil-split switches can be the SPDT 3-pin style, but I can't find those in the black mini blade style that I want here.

Now I gotta order about $100 worth of switches, pots and jack. :roflmao:
And then come up with some wire. What gauge are you guys using for wire? We have tons at the race shop, just need to figure out gauges before I start swiping stuff. ;)

Again, massive thanks Jon, you are the man!

You guys feel free to look this over and go "Nope, you missed one...." or maybe you go "Looks good to me man!" I know literally nothing about wiring, so I'm all ears. :thumbsup:

Your wiring diagram looks good!

Regarding the gauge, I typically use 22 AWG but even lighter, like 24 or 26, is probably better
 
Last edited:
Okay, with much help from @Jon Clegg I have what I believe to be a finished wiring diagram -
View attachment 4173838
So we are coil splitting each pickup, then sending that signal to a series/parallel, then sending that signal to individual on/off for each pickup, then sending that signal to the volume and then to the Darkglass Tone Capsule with an active/passive bypass. It's a lot of "stuff", and I know a lot of you are like "Why do all that?" but honestly I've never owned a bass with coil-split, series/parallel or active/passive bypass so why not just build what you don't own?

Yes, I'm aware that the coil-split switches can be the SPDT 3-pin style, but I can't find those in the black mini blade style that I want here.

Now I gotta order about $100 worth of switches, pots and jack. :roflmao:
And then come up with some wire. What gauge are you guys using for wire? We have tons at the race shop, just need to figure out gauges before I start swiping stuff. ;)

Again, massive thanks Jon, you are the man!

You guys feel free to look this over and go "Nope, you missed one...." or maybe you go "Looks good to me man!" I know literally nothing about wiring, so I'm all ears. :thumbsup:
I've heard that shielded wire is a good idea. Others here may know more.
:thumbsup:
 
I've heard that shielded wire is a good idea. Others here may know more.
:thumbsup:

Not needed (and would be very awkward) for the wiring within the control cavity, i.e. between pots and switches etc. It would be redundant to the cavity's shielding.

Shielded wiring is great though between pickups and the cavity, if the wiring channel isn't shielded.
 
I think the biggest trick will be getting the hole for the shaft the correct size. ;)

I've used custom wooden knobs that were made without inserts like this... and they cracked if you tighten the set screw more than a little bit.
...highly recommend these to prevent headaches.
This was the first advert I came across
Screenshot_20210219-185740_Google.jpg
 
Also I would drill the hole first before mounting on the lathe, it will be much easier than trying to drill an on-center hole in a small turned knob. The hole can then be used to center the piece on the lathe.
Interesting. I generally drill my holes on the lathe using a jacobs chuck in the tailstock. Seems like the better way to assure the hole is on center. :cautious:
Screenshot 2021-02-22 074930.png
 

Latest posts