Jumping in there. I have some reranch tinted clear that I'm going to use as a project, but I want to top coat that with a "clear" clear. What works best on top of the reranch stuff?

Enjoy the benefits of a premium membership!
Upgrade Account
-
TalkBass has been independent since 1998. Add your voice.
Create a free account to reply to discussions, view embedded media, and browse with fewer display ads.
Join free Log in
Want zero display ads or expanded classifieds tools? Compare plans.
You are using an out of date browser. It may not display this or other websites correctly.
You should upgrade or use an alternative browser.
You should upgrade or use an alternative browser.
Rattle Can Refinish Club
- Thread starter redlikejazz
- Start date
-
- Tags
- club
More options
Who Replied?
I'd only recommend you top coat it with nitro clear. Reranch clear would be my first suggestion, but pretty much any other brand of nitro clear would work. I definitely would not suggest any type of poly.

Envincibal, that is absolutely gorgeous...I might commission you to paint my next one!
Thanks! It was a very pleasant and relaxing experience, and all-in-all, not so difficult. They key was preparing for each step & not rushing anything.
Wow! That is the most incredible rattle can job I have ever seen...
The solids are cool and there are some very professional looking paint jobs on this thread but that flame... And that clear... Man, it looks like it's a mile deep!
Thanks for the compliment! I used the ColorTone polishing compounds (Fine and the swirl remover) from StewMac, which really helped to add depth to the clear coat. They also have a Presevation polish that's peaked my interest... maybe another project in the near future...red-black burst over flamed maple...


Hey guys, so it's looking pretty good so far but I'm having a hard time getting the clear coat to look nice and even. I'm using the MTN brand and this is an acrylic clear coat. I don't want to fall into the trap of continuing to spray it and end up with too many heavy spots. At this point, should I use a really fine grain sandpaper and/or finishing paper or polishing cloth to get it more uniform? I guess at this point I don't mind if it has more of a satin look, it's more important to me that it be consistent. Photos don't really show it because you have to kinda tilt your head and watch the light hit it. Any ideas?
So one of my co-workers suggested using one of those Mr. Clean Magic Erasers. They totally suck for actually cleaning whatever they're supposed to, but they work like a charm as a fine polishing/sanding sponge. Try it out! 

So one of my co-workers suggested using one of those Mr. Clean Magic Erasers. They totally suck for actually cleaning whatever they're supposed to, but they work like a charm as a fine polishing/sanding sponge. Try it out!
The only problem with them is that there's no way of telling what grit it is, or if there are impurities in the sponge that'll leave scratches.
I'd go with Micromesh instead.

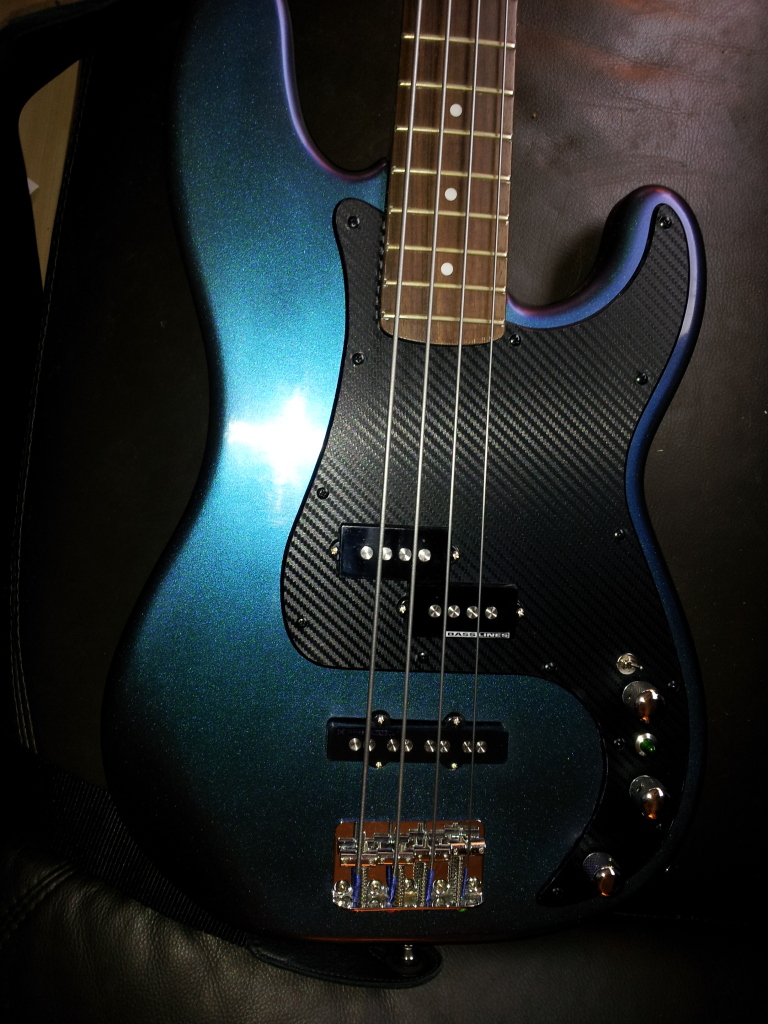
Not sure if I posted this bass...I has a matching head stock too
what color is that D:looks nice!
I tried the Magic Eraser figuring I'd chalk this whole thing up to one big experiment anyway. If you tear the sponge in half and wet it, it polishes very nicely, even more so with guitar polish and not water.
I had matte-finish paint that I thought was gloss or at least satin (doh!), acrylic clear coat, a limited budget, limited tools, limited ventilation/time/space, and am still pretty satisfied that I came out with this. I discovered I could work with the clear coat while it was still tacky, used the Magic Eraser to blend it down a bit...ended up with a few bubbles and imperfections, but for a first-time refinish, I think it's pretty good.
I'll hit the back of it with good old glossy Krylon black and probably put a zebra-print pickguard on there someday. What do y'all think? The only thing that kinda sucks is I got a bit of paint on the pickups. Thankfully at work I have the space to pull them out, blow out any paint chips that might've gotten in there with the air hose, and then clean them off at my leisure.
There are many things I will do differently next time, but I really enjoyed and appreciated the process involved in a DIY refinish and look forward to doing many more.
Link Removed
Here is a snazzy shot with the flash. It's still slightly wet near the tone/volume knobs.
Link Removed
I had matte-finish paint that I thought was gloss or at least satin (doh!), acrylic clear coat, a limited budget, limited tools, limited ventilation/time/space, and am still pretty satisfied that I came out with this. I discovered I could work with the clear coat while it was still tacky, used the Magic Eraser to blend it down a bit...ended up with a few bubbles and imperfections, but for a first-time refinish, I think it's pretty good.
I'll hit the back of it with good old glossy Krylon black and probably put a zebra-print pickguard on there someday. What do y'all think? The only thing that kinda sucks is I got a bit of paint on the pickups. Thankfully at work I have the space to pull them out, blow out any paint chips that might've gotten in there with the air hose, and then clean them off at my leisure.
There are many things I will do differently next time, but I really enjoyed and appreciated the process involved in a DIY refinish and look forward to doing many more.
Link Removed
Here is a snazzy shot with the flash. It's still slightly wet near the tone/volume knobs.
Link Removed

I need to ask a totally stupid question before I embark on refinishing a beater Squier P-bass: What exactly is meant by "wet sanding?" Is it A) using dry sandpaper while the coat of whatever (Paint/clear coat) is still wet? or B) using sandpaper/sanding block/sander that has been moistened with water, or C) same, only moistened with a solvent for that particular coating, or D) Dragging your bass along the beach at high tide for an hour?
I know it's a dumb question but in nearly every online source it seems to be a given that we all know what that is.
I know it's a dumb question but in nearly every online source it seems to be a given that we all know what that is.


I need to ask a totally stupid question before I embark on refinishing a beater Squier P-bass: What exactly is meant by "wet sanding?" Is it A) using dry sandpaper while the coat of whatever (Paint/clear coat) is still wet? or B) using sandpaper/sanding block/sander that has been moistened with water, or C) same, only moistened with a solvent for that particular coating, or D) Dragging your bass along the beach at high tide for an hour?
I know it's a dumb question but in nearly every online source it seems to be a given that we all know what that is.
D) would be fun
but it's most certainly B. Just make sure it's wet sanding sandpaper!!! 

I tried the Magic Eraser figuring I'd chalk this whole thing up to one big experiment anyway. If you tear the sponge in half and wet it, it polishes very nicely, even more so with guitar polish and not water.
I had matte-finish paint that I thought was gloss or at least satin (doh!), acrylic clear coat, a limited budget, limited tools, limited ventilation/time/space, and am still pretty satisfied that I came out with this. I discovered I could work with the clear coat while it was still tacky, used the Magic Eraser to blend it down a bit...ended up with a few bubbles and imperfections, but for a first-time refinish, I think it's pretty good.
I'll hit the back of it with good old glossy Krylon black and probably put a zebra-print pickguard on there someday. What do y'all think? The only thing that kinda sucks is I got a bit of paint on the pickups. Thankfully at work I have the space to pull them out, blow out any paint chips that might've gotten in there with the air hose, and then clean them off at my leisure.
There are many things I will do differently next time, but I really enjoyed and appreciated the process involved in a DIY refinish and look forward to doing many more.
Link Removed
Here is a snazzy shot with the flash. It's still slightly wet near the tone/volume knobs.
Link Removed
Thank you, you were what I needed to give me a final fush and refinish my VM fretless!
My situation was a bit different. I don't mind sunbursts. But the previous owner did not like them, like you, and put a Fender body, in "shoreline gold". I hated that colour.
So I sprayed it Capri Orange.
Orange directly on the golden body looked dull when I did a quick test, so I used a white nitro primer first, and then Capri Orange nitro.
This is what it's looking like (still not wet sanded or buffed... just straight from spraying... I actually like the textured surface)
That's not the original bridge, which is still attached to teh strings... I just put this one there for the mock picture.

Is that the Capri Orange from Gracey's paint? I've thought about using that color and am thinking it might be good for when I redo my ESP B5-JR.

If you're thinking flat black, John Deere Blitz Black is a good choice. It's available in rattle cans from John Deere dealers.
& WAYYY too expensive imo
i used this, it's much cheaper
on this
no clear on top, i've touched it up numerous times, & the new just blends with the old
haven't done a bass yet, but maybe

I realized I never posted this guy in here:

I got the P/J body for $25...it was originally shoreline gold and joint compound. I sanded it down until it was such that it could be primed, then applied primer, and a few coats of charcoal metallic automotive paint. I then realized I was in over my head as far as the clear coat (trying to to all of this in the bathroom of an NYC apartment), so I gave it to a local guy to do handle that.
Squier body, MIM P neck, DiMarzio Model P/J pickups each with series/parallel), Hipshot A bridge, Hipshot D-tuner, V/B/T, strung with D'Addario Chromes.
I got the P/J body for $25...it was originally shoreline gold and joint compound. I sanded it down until it was such that it could be primed, then applied primer, and a few coats of charcoal metallic automotive paint. I then realized I was in over my head as far as the clear coat (trying to to all of this in the bathroom of an NYC apartment), so I gave it to a local guy to do handle that.
Squier body, MIM P neck, DiMarzio Model P/J pickups each with series/parallel), Hipshot A bridge, Hipshot D-tuner, V/B/T, strung with D'Addario Chromes.

I need to get some pics up. I just completed a P Bass build with my first Rattle Can paint job and it came out really well thanks to all the info in this thread. I used Reranch Primer, Reranch Lake Placid Blue and cleared it with Minwax Gloss Lacquer. I am stoked by the results. Special thanks to ThaLowEndTheory for answering a couple of questions I PM'd him with.
I need to get some pics up. I just completed a P Bass build with my first Rattle Can paint job and it came out really well thanks to all the info in this thread. I used Reranch Primer, Reranch Lake Placid Blue and cleared it with Minwax Gloss Lacquer. I am stoked by the results. Special thanks to ThaLowEndTheory for answering a couple of questions I PM'd him with.
Glad it went well for you. Post those pics when you get a chance.


