• TalkBass has been independent since 1998. Add your voice.
    Create a free account to reply to discussions, view embedded media, and browse with fewer display ads.
    Join freeLog in
    Want zero display ads or expanded classifieds tools? Compare plans.

Rattle Can Refinish Club

Quick question... I was about to use Duplicolor Perfect Match Deep Jewel Green metallic... I've already primed with the Duplicolor primer.

I'm having a last minute change of heart back to my original idea of Surf Green using the Krylon Pistachio Satin mentioned above.

Will I have any problems putting the Krylon color on top of the Duplicolor primer?
 
Another question to drop on ya...

I've finished all the coats on the bass. I had it glossy after the 3rd coat which was perfect until a gust of wind blew plastic on the face while it was still wet. I ended up wet sanding the imperfections down, and repainting a few days later when the temperature had cooled down (apparently not enough though) to repaint. I did a few more coats after more sanding and some light touch ups, and while the color and consistency is great, it is no longer glossy. It almost feels like it has dust all over it even though it doesn't, and has a bit of a rough satin finish to it. I thought a clear coat over it would help but it still has that rough finish to it. I would be okay with it but I bought a shiny red pick guard to match and it just doesn't look right as it is.

While I have not finished the clear coats (I was suggested 2 cans here, I have barely done half a can as of this moment), what would you think would be better, to continue to use the clear coat and hope it glosses over, or wet sand it back and add some more base paint?

EDIT: a picture would probably go a long way here lol
 

Attachments

  • IMG_6494.JPG
    IMG_6494.JPG
    391.9 KB · Views: 36
Last edited:
Another question to drop on ya...

I've finished all the coats on the bass. I had it glossy after the 3rd coat which was perfect until a gust of wind blew plastic on the face while it was still wet. I ended up wet sanding the imperfections down, and repainting a few days later when the temperature had cooled down (apparently not enough though) to repaint. I did a few more coats after more sanding and some light touch ups, and while the color and consistency is great, it is no longer glossy. It almost feels like it has dust all over it even though it doesn't, and has a bit of a rough satin finish to it. I thought a clear coat over it would help but it still has that rough finish to it. I would be okay with it but I bought a shiny red pick guard to match and it just doesn't look right as it is.

While I have not finished the clear coats (I was suggested 2 cans here, I have barely done half a can as of this moment), what would you think would be better, to continue to use the clear coat and hope it glosses over, or wet sand it back and add some more base paint?

EDIT: a picture would probably go a long way here lol

Were you sanding between coats? That picture looks pretty rough with a lot of overspray. If I were you I'd do some sanding and running through the grits to get it back to an even texture.

Reranch.com has some great tips on prepping surfaces and sanding and painting to get great finishes. A lot of it is geared to lacquer finishes, but a lot of it applies across the board as well.

At that point is let it cure and give it a base. It almost looks as if you haven't got a good enough or wet color base down. With a good prep and enough paint, it should be pretty glossy even before you wet sand final and then buff
 
How did you accomplish the crackling?

the checking is usually most effective using lacquer paints, as the poly are too resilient and resist the cracking.

Saying that, apply a good thicker color coat, and finish as you normally would. When finished, find a freezer large enough to get the body in, and let it sit over night. Once you pull it out into the room temp, the cracking will occur. To accent the cracking, take a little dark due and go over the body with it before it warms to room temp, and the cracks close up more. The dye will get in the cracks, then wipe the rest off.

The dye process is tricky, and I'd suggest practicing on some painted blocks of wood first to get the feel. After the relic process is done further, you can run dye again to weather the chips and exposed wood, but a little goes a long way, more of a dry brushing technique. With practice you can get some great results as seen here.
 
Were you sanding between coats? That picture looks pretty rough with a lot of overspray. If I were you I'd do some sanding and running through the grits to get it back to an even texture.

Reranch.com has some great tips on prepping surfaces and sanding and painting to get great finishes. A lot of it is geared to lacquer finishes, but a lot of it applies across the board as well.

At that point is let it cure and give it a base. It almost looks as if you haven't got a good enough or wet color base down. With a good prep and enough paint, it should be pretty glossy even before you wet sand final and then buff


I did do some wet sanding between coats, but maybe not as much as I should have. The time I remember it getting bad was after I sanded down the imperfections from the plastic touching the wet paint, then I tried to apply a light coat over it and it didn't look right (especially over the part I sanded), so I applied some more paint a few days later to try to even it out. Then the first coat of clear made it stand out even more. I'll get back to sanding it sometime this weekend, hopefully the weather can get to a reasonable temperature next week so I can paint some more.

Thanks for the tips!
 
  • Like
Reactions: JGbassman
I did do some wet sanding between coats, but maybe not as much as I should have. The time I remember it getting bad was after I sanded down the imperfections from the plastic touching the wet paint, then I tried to apply a light coat over it and it didn't look right (especially over the part I sanded), so I applied some more paint a few days later to try to even it out. Then the first coat of clear made it stand out even more. I'll get back to sanding it sometime this weekend, hopefully the weather can get to a reasonable temperature next week so I can paint some more.

Thanks for the tips!

Remember to use wet paper, go slow, and move up to the next grit once all of the scratches are gone. It's a slow meticulous process, but if you don't do it right, you will have to start over again. Sand it until the imperfections are gone.
 
Quick question... I was about to use Duplicolor Perfect Match Deep Jewel Green metallic... I've already primed with the Duplicolor primer.

I'm having a last minute change of heart back to my original idea of Surf Green using the Krylon Pistachio Satin mentioned above.

Will I have any problems putting the Krylon color on top of the Duplicolor primer?

It should be OK, but definitely do a test on a piece of scrap wood and let dry before proceeding.
 
  • Like
Reactions: TwinDad
Remember to use wet paper, go slow, and move up to the next grit once all of the scratches are gone. It's a slow meticulous process, but if you don't do it right, you will have to start over again. Sand it until the imperfections are gone.

Very true. Also, if it wasn't mentioned before, change the direction of sanding as you move up to each grit. I usually start sanding vertically (up/down the length of body), then move to horizontally (across width of body) with the next grit, then repeat till done. I'm referring to the final clear coat sanding, just to be clear. @GnarwhalNick, how long did you wait for the paint to cure? Once you get to the final clear coat, I'd recommend at least 2 weeks. A month would be better if you aren't in a rush.
 
Another question.... someday I'll be able to give answers...

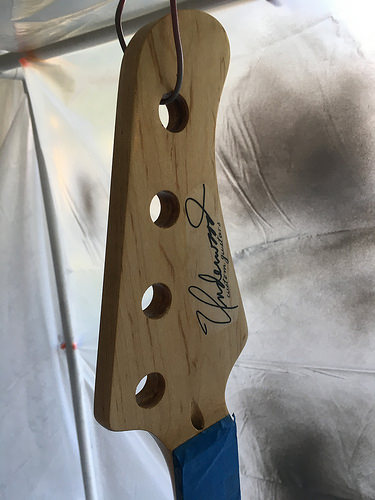
I did my logo decal on the headstock... the good news, from head-on it looks pretty good:
Invalid Link Removed by Invalid Link Removed, on Flickr

The bad news, from an oblique angle, you can see the decal outline...
35279233282_93c5908049.jpg
Logo!
by Invalid Link Removed, on Flickr

This is basically several coats of Minwax spray-on gloss Poly, sanded 320 grit lightly, decal applied, then several more coats of Minwax (still curing, not yet sanded). Clearly one thing I could/should have done was trim the decal closer to the actual script...

If I were working on my model trains, I would have hit the decal with some MicroMark Micro-Sol to help dissolve the label, but that's usually applied on plastic, and I would have also been over-coating with a matte finish to help hide the decal (don't want glossy finish on railroad cars anyway).

I'm not sure what can be done here... either with further treatment now that it's got 4 coats of Minwax over the decal, or if I need to sand it down and re-do the headstock differently. For now it's "good enough" as a first attempt... I can study/learn a bit and try to refinish it later, if only I know the right technique.

Advice?
 
Here's the test shot. This is a quickie spray on a scrap piece of unsanded/unsealed scrap lumber just to see how the color adheres to the DupliColor primer. The color is RustOleum 2X "Lagoon", as selected by my lovely wife who is bankrolling this whole project.

35326045531_01c183bf8e.jpg
Color test sample
by Invalid Link Removed, on Flickr

What does it look like after drying overnight? You may be OK to proceed, but make sure you find a compatible clear.
 
Another question.... someday I'll be able to give answers...

I did my logo decal on the headstock... the good news, from head-on it looks pretty good:
Invalid Link Removed by Invalid Link Removed, on Flickr

The bad news, from an oblique angle, you can see the decal outline...
35279233282_93c5908049.jpg
Logo!
by Invalid Link Removed, on Flickr

This is basically several coats of Minwax spray-on gloss Poly, sanded 320 grit lightly, decal applied, then several more coats of Minwax (still curing, not yet sanded). Clearly one thing I could/should have done was trim the decal closer to the actual script...

If I were working on my model trains, I would have hit the decal with some MicroMark Micro-Sol to help dissolve the label, but that's usually applied on plastic, and I would have also been over-coating with a matte finish to help hide the decal (don't want glossy finish on railroad cars anyway).

I'm not sure what can be done here... either with further treatment now that it's got 4 coats of Minwax over the decal, or if I need to sand it down and re-do the headstock differently. For now it's "good enough" as a first attempt... I can study/learn a bit and try to refinish it later, if only I know the right technique.

Advice?
Sand over the decal more than the rest of the headstock. It's noticeable right now because the decal portion is raised. You need to level them. So wet sand more intensely over the the decal, then lightly scuff up the rest of the headstock face, then re-spray. Continue to do this until you see the seams disappear.
 
  • Like
Reactions: TwinDad
Another question.... someday I'll be able to give answers...

I did my logo decal on the headstock... the good news, from head-on it looks pretty good:
Invalid Link Removed by Invalid Link Removed, on Flickr

The bad news, from an oblique angle, you can see the decal outline...
35279233282_93c5908049.jpg
Logo!
by Invalid Link Removed, on Flickr

This is basically several coats of Minwax spray-on gloss Poly, sanded 320 grit lightly, decal applied, then several more coats of Minwax (still curing, not yet sanded). Clearly one thing I could/should have done was trim the decal closer to the actual script...

If I were working on my model trains, I would have hit the decal with some MicroMark Micro-Sol to help dissolve the label, but that's usually applied on plastic, and I would have also been over-coating with a matte finish to help hide the decal (don't want glossy finish on railroad cars anyway).

I'm not sure what can be done here... either with further treatment now that it's got 4 coats of Minwax over the decal, or if I need to sand it down and re-do the headstock differently. For now it's "good enough" as a first attempt... I can study/learn a bit and try to refinish it later, if only I know the right technique.

Advice?

For sure, more aggressive trimming around the logo helps so that it does not show up like such a "roundish" shape but more clear and more wetsanding, rinse, repeat will reduce that decal edge. Cool logo!
 
  • Like
Reactions: TwinDad
Here's the test shot. This is a quickie spray on a scrap piece of unsanded/unsealed scrap lumber just to see how the color adheres to the DupliColor primer. The color is RustOleum 2X "Lagoon", as selected by my lovely wife who is bankrolling this whole project.

35326045531_01c183bf8e.jpg
Color test sample
by Invalid Link Removed, on Flickr


Here is a guitar I painted using RustOleum 2X Lagoon; I used it because I really dug the color.
1006172_4986374572277_1346735066_n_zpsauplpuok.jpg


Funny thing was I could not sell this guitar to save my life. It sat for several months at Carter's Vintage Guitars in Nashville then it went on the road with a couple players, the response was always the same "Love the guitar, the color... not so much". It did eventually sell, lesson learned; just because I like something doesn't mean the public will...

I still like the color.


Moonshine :bassist:
 
Well the wife likes the color. That's all that matters :). Odd though. The "lagoon" I have seems much more green and less blue than that..

Nice guitars, tho... :)


Thanks.

I'm sure it is due to lighting... I know it looked more green in other pics.

It has a fifties kind if vibe to me.

Moonshine :bassist:
 
  • Like
Reactions: TwinDad
Which colour name did you use for the red guitar?

Plus, I like the Lagoon Blue too.

I mixed the Fiesta Red and sprayed satin over it (all nitrocellulose).

I usually mix my colors but I do use rattle cans on occasion when I find a color I like.

Here's a custom Esquire I sprayed with RustOleum Ballet Slipper...
MCG%20ESQUIRE_zpskctfsxoe.jpg


Moonshine :bassist:
 
I mixed the Fiesta Red and sprayed satin over it (all nitrocellulose).

I usually mix my colors but I do use rattle cans on occasion when I find a color I like.

Here's a custom Esquire I sprayed with RustOleum Ballet Slipper...
MCG%20ESQUIRE_zpskctfsxoe.jpg


Moonshine :bassist:

That's so close to Shell Pink. If you'd told me it was, I would have believed you! One of my fave colors, too. What kind of primer/clear did you use on that one?
 
That's so close to Shell Pink. If you'd told me it was, I would have believed you! One of my fave colors, too. What kind of primer/clear did you use on that one?

It's an exact match for Shell Pink (as close as possible seeing how many shades of shell pink there is...).

I used this for the primer:
[Invalid or Expired Link Removed]

Clearcoat was Nitro Lacquer.


Moonshine :bassist: