
Enjoy the benefits of a premium membership!
Upgrade Account
-
TalkBass has been independent since 1998. Add your voice.
Create a free account to reply to discussions, view embedded media, and browse with fewer display ads.
Join free Log in
Want zero display ads or expanded classifieds tools? Compare plans.
You are using an out of date browser. It may not display this or other websites correctly.
You should upgrade or use an alternative browser.
You should upgrade or use an alternative browser.
The Über-Jay Mark2
- Thread starter miziomix
- Start date
More options
Who Replied?Uber 5 - My vote is lots of tone controls.
Here's one to consider: [Invalid or Expired Link Removed] It has a passive mode as well as active.
OR maybe use passive pickups with a series/parallel switch along with a Stellartone and vol/bal/tone.
Check out these tone controls: Link Removed
Here's an Ed Friedland fretless bass demo link you might want to check out: YouTube - Lightwave Saber VL5 Fretless
Here's one to consider: [Invalid or Expired Link Removed] It has a passive mode as well as active.
OR maybe use passive pickups with a series/parallel switch along with a Stellartone and vol/bal/tone.
Check out these tone controls: Link Removed
Here's an Ed Friedland fretless bass demo link you might want to check out: YouTube - Lightwave Saber VL5 Fretless
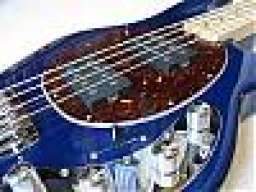
Wow, this bass is turning out incredible! I had to wipe the drool from my keyboard more times than I'd like to admit haha.
I really like all the small details that you take care of, even though they're not necessary in the slightest, it just goes to show how much work and time goes into every single bass, they truly are pieces of art.
Cant wait to see this one finished up, I hope to hear some soundclips of it!
Greg
I really like all the small details that you take care of, even though they're not necessary in the slightest, it just goes to show how much work and time goes into every single bass, they truly are pieces of art.
Cant wait to see this one finished up, I hope to hear some soundclips of it!
Greg

So...I'm back, finally. Rather, half of me is. The other one is fighting off a nasty jet jag 
Hey Stumbo, thanks again for the links... that Gretch mod. by Eastwood is so cool. I love these retro replicas.The sound is not my thing. But I'd love to own one of these to pluck away from time to time
Greg, I'm glad you like the bass and those little details. Albeit some are indeed technically unnecessary, they all somehow contribute to the character of the bass. I know that most times I'll be the only one to see that but it's great to hear that you feel the same way.
As far as this build goes, I should be done in about 3 weeks. I plan to get dusty starting Monday.
I'll certainly upload sound clips. I am very eager to compare the sound and feel of this one to that of the previous Ü-J. It's a wild guess right now, as the two basses differ in many aspects - different p-ups; passive one, active the other one; chambered vs not chambered; lighter vs heavier... ebony....different neck profile
I do have a feeling of how this might turn out... but...well, we'll see
If you are interested, there are clips of the first Über-Jay on TB. here's the link to the page with both sound clip and description of set up. Pictures and specs are earlier in the thread. cheers!
http://www.talkbass.com/forum/f57/building-uber-j-620583/index18.html
Hey Stumbo, thanks again for the links... that Gretch mod. by Eastwood is so cool. I love these retro replicas.The sound is not my thing. But I'd love to own one of these to pluck away from time to time
Greg, I'm glad you like the bass and those little details. Albeit some are indeed technically unnecessary, they all somehow contribute to the character of the bass. I know that most times I'll be the only one to see that
but it's great to hear that you feel the same way.As far as this build goes, I should be done in about 3 weeks. I plan to get dusty starting Monday.
I'll certainly upload sound clips. I am very eager to compare the sound and feel of this one to that of the previous Ü-J. It's a wild guess right now, as the two basses differ in many aspects - different p-ups; passive one, active the other one; chambered vs not chambered; lighter vs heavier... ebony....different neck profile
I do have a feeling of how this might turn out... but...well, we'll see
If you are interested, there are clips of the first Über-Jay on TB. here's the link to the page with both sound clip and description of set up. Pictures and specs are earlier in the thread. cheers!
http://www.talkbass.com/forum/f57/building-uber-j-620583/index18.html
I dont know how you feel about this, but I think a birdseye maple pickguard would make this baby look real good. I've always loved wooden pickguards on basses, and its definitely very uber.
Greg
Greg
I dont know how you feel about this, but I think a birdseye maple pickguard would make this baby look real good. I've always loved wooden pickguards on basses, and its definitely very uber.
Greg
wooden pick guard....I'm dying to make one...
 I was tempted to give it a go on this build. Then the Camphor Burl top went on strike...
 IMO it's kinda tricky to strike the right balance with the other woods because a p/g is actually one of the defining features of a build.
OTOH it is such a FJazz trademark that I simply cannot ignore it any longer
Even though the woods combination of the next build would actually work well with a p/g, the design won't. And given that I build one bass at the time...well... September might be able to see one
Here's another bass to check out: Invalid Link Removed
Scroll down a bit.
AH! A P-berger!

That, my friend, is the very reason why I ended up with the Über-J project
Though I'm a supporter of the headless idea, I just felt that doing that to a J or P in exchange for practicality wasn't what I was looking for. BTW, interesting thread. As it often happens with the Steinberger, myths and urban legends abound. There seem to be more 'Bergers experts out there than actual 'Bergers.
...And since I'm here, few random news....
I have just collected my new drill press, much bigger than the previous one. I'll be able to do a lot more with this thing.
Sanding chore started yesterday. I love this part
The prototype of my very own headless bridge has finally arrived. It'll make his first appearance on the next build

I still think your idea of having a headstock that functions like a headless bass is ingenious.
I still think your idea of having a headstock that functions like a headless bass is ingenious.
Thank you. The headless hybrid has been done before, of course. I know of a few custom shops doing it their way. I only did it mine
I still think your idea of having a headstock that functions like a headless bass is ingenious.
+1
Got tone? [Invalid or Expired Link Removed]
Thanks! looks interesting eh?
so many cool options out there...I'm never gonna build enough basses to try them all 
And it's update time at last!
One thing I really hate is misalignment or screws not going in smoothly.
I do the whole thing with the bridge or tuners in place - marking the screws position, drilling pilot holes and driving the screws in.... If I do it this way my eye can tell if the screw is going to be right in the center of the hole and straight in relation to the bridge. If I don't...well...
I place a nail in each hole making sure it sits right in the center. I find it easier to do this way than with a bit attached to a power drill.
With the bridge/tuner fixed, I then remove one nail at the time, drill the pilot and secure the screw.
With the tuners in place and before fitting the bridge I once again have to check for strings alignment. I know... it's a condition
Finally, I decided to waste one evening and sand down the headstock to 12,000. The plan is to lacquer this dude. But I was so tempted to give those micro mesh a try...
Well, I am pleased to report that it wasn't a waste of time after all
IMO it works better with the Maple than with the soft Burl though. I'm tempted to finish only the back of the neck this way. Any thought?
thanks for following this far
Been looking forward to this update, and its looking great man! Micromesh sure does a good job, I was astonished at how smooth wood can be unfinished.
Thats a good tip about the bridge, I'll definitely have to keep that in mind seeing as I snapped a brass screw last time I attempted to attach a bridge (I fixed it in the end but I was real pissed at myself for being stupid and not thinking things through).
Really cant wait to see this bass finished, she's gonna be a real beaut
Greg
Thats a good tip about the bridge, I'll definitely have to keep that in mind seeing as I snapped a brass screw last time I attempted to attach a bridge (I fixed it in the end but I was real pissed at myself for being stupid and not thinking things through).
Really cant wait to see this bass finished, she's gonna be a real beaut
Greg


Have you considered fixing a pickguard with double sided tape or something else non-permanent? Although I have no idea how it may react with the Camphor, or if the pickguard will be strong enough to resist snapping if taken off.
Have you considered fixing a pickguard with double sided tape or something else non-permanent? Although I have no idea how it may react with the Camphor, or if the pickguard will be strong enough to resist snapping if taken off.
Hi! In this case it would not work because of the arched top. Also, the fingerboard sticks out of the body by only 4mm. Adding a p/g at this point would reduce the strings to body distance too much IMO.
On another build and with a different woods combination, certainly
Update time
First of all, it's official - this bass will stay with me. Truth be told, it never really stopped being my second prototype.
Moreover, after having seen Sergio playing the Macassar bass I felt I had to make him a different Ü-J, both in terms of construction and woods choice. We spoke about it and discussed what HIS bass could/should be like.
He agreed, so...well...one more 4 stringer is on the horizon and I'm very excited about this new build! I might have to build two basses at the same time though....oh boy....
With this new scenario in mind, the first thing I have locked down are the p-ups. They will be a Fender J retrofit type, which means some more work on cavities is needed. Sound of router follows....
Next, superglue to fix a few imperfections and cracks on the C Burl.
Being glued to a arched body, the 5mm top had cracked along the center line. The crack is very small, a fraction of a mm in the worst segment, and fairly superficial - just about 1mm deep or so. I filled it with CB dust and superglue. It should disappear with sanding and lacquering.
The week end will be devoted to getting body and neck ready for lacquer.
Two more decisions have been made. 1. No stain on the S Ash - feels like a bit of an overkill. 2. The neck will be lacquered like the rest of the bass. Micro-mash and oil finish will work better on a different type of build.
Thanks for reading
If I ordered an Uber-Jay (and I'm not, yet, need my money for other things right now...)
I think I've finally settled on the woods I would want.
For the neck: Goncalo Alves for the shaft, Pau Ferro for the fingerboard.
For the body: Walnut with possibly a Bubinga top.
I love a translucent colored poly finish on nice woods, but I think I could go for a natural or oil finish on walnut or bubinga. Besides, that seems to be the "Uber" way...
I think I've finally settled on the woods I would want.
For the neck: Goncalo Alves for the shaft, Pau Ferro for the fingerboard.
For the body: Walnut with possibly a Bubinga top.
I love a translucent colored poly finish on nice woods, but I think I could go for a natural or oil finish on walnut or bubinga. Besides, that seems to be the "Uber" way...
If I ordered an Uber-Jay (and I'm not, yet, need my money for other things right now...)
I think I've finally settled on the woods I would want.
For the neck: Goncalo Alves for the shaft, Pau Ferro for the fingerboard.
For the body: Walnut with possibly a Bubinga top.
I love a translucent colored poly finish on nice woods, but I think I could go for a natural or oil finish on walnut or bubinga. Besides, that seems to be the "Uber" way...
That's so very nice of you!
Funny you should mention Bubinga. Earlier today I came across a gorgeous piece and I thought really hard what kind of excuse I could give myself to buy it. Regretfully I couldn't find any. Not to mention that I had ordered new woods just a couple of days ago Quick update.
The sanding is basically over. I am now awaiting for the cavity cover which is being laser engraved with the name of the bass etc etc.
Once it's done it will need some sanding and shaping to nicely fit the profile of the body.
A few little things I have done along the way and thought might be worth sharing.
The edges of the screw holes were a bit too sharp. To soften them I used this little bit. It's made of stone and not too rough. Its size fits the hole perfectly and doesn't touch the veneer at the bottom - which was my fear. I took my time doing it by hand.
The black veneer inside the bridge recess wasn't that black after all. Painting it should be a simple task. I fear simple tasks
I don't want a drop to end up on the body. I don't want that can anywhere near it either - or in the way. The only way I know to avoid that is to place the can as far away as possible - still within reach
- and cover everything in the way. God bless old t-shirts.The red veneer had become quite dull after all the sanding. I wiped it and wiped it. Better, but still dull. Then I used a soft erasure, working it along the grain; then brushed away the dust. The result was quite surprising
A good week end to all


