• TalkBass has been independent since 1998. Add your voice.
    Create a free account to reply to discussions, view embedded media, and browse with fewer display ads.
    Join freeLog in
    Want zero display ads or expanded classifieds tools? Compare plans.

The Hossenfeffer Bass Build

My HF gun is definitely a "bleeder" type, the airflow is constant whenever its on, all I can control is paint volume. It sounds like a small vacuum cleaner, which is probably what it is essentially, except it blows instead of sucks. A full blown compressor and gun are obviously superior, but this whole project has been about making the most of a very limited budget.

Tinting the epoxy sounds interesting, in that any eventual chip would then reveal... more black, instead of bright white maple. Id still tint the Varathane for color coat. I think Bruce arrived at the Behr Premium Plus for opaque because it dissolves well in WB Varathane. Transtint is supposed to be water soluble, though id have no idea how much to put in for a jet black tint, 20 drops? 30 drops?
 
For what it's worth, I got significantly more orange peel on my finishes when I was using rattle cans, compared to using the spray gun/compressor combo. I have a sneaking suspicion that orange peel is a result of the messenger, rather than the message (delivery system, rather than the paint).
 
In this case, I'm the messenger, and that's definitely where the problem lies! Its hard to know if I've overlooked some combination of distance, speed, needle size, formula, etc that would produce a better initial finish. Not much (none actually) database of trial and error results for this combination of turbine sprayer and WB finish to draw from. I appreciate all the suggestions and advice, In the end I'll do the best I can with what I have. I accept the possibility I may make a mess of it have to sand back and start over, hoping not.
 
Last edited:
HVLP systems are all, as you said, basically vacuum cleaners. Even the most expensive ones are basically vacuum cleaners at heart. You should be able to get superior results with what you have, we just haven't nailed down the variables yet. Have you tried thinning the Varathane? I've never used Varathane, but here are some comments that I've gathered from around the web:

  • Relax. I've sprayed many a gallon of polyurethane with excellent results. I thin it about 10-15%,(depending on the gun), with turpentine. The turpentine smells a bit, but it improves the flowout. My gun is a DeVilbiss JGA style, suction feed, with a cup. (Conventional, not HVLP.)
  • I've sprayed both oil-based and water-based polyurethane with my HVLP with good results. I usually thin the oil-based poly with ~10% paint thinner.

    With either finish, I go for a pretty fine spray and go over each piece several times allowing a few minutes for the last pass to "set" before spraying it again. The objective is to get good coverage without creating drips or sags.

  • I have sprayed the Varathane water base semi gloss finish with great success over Maple doors, stair treads, base & casing, plinth blocks and the finish will dry fast for recoating 30 to 40 minutes in 70 degree weather. I will be using it over Oak this week.

    It has good sanding between coat characteristics like lacquer. It requires a light sanding between coats and the use of a tack rag.

    Remember to stir and use a cone paper filter with the finish.
  • I sprayed my kitchen cabinets with Minwax poly and they turned out great. I also shot the body of my bass guitar with the same stuff, thinned both times with naptha (about 20%+). I talked to a painter about how to get the best results and after telling him that I used mineral spirits but had flaws, he recommended naptha because it flashes over faster and flattens better. I have to say that he was absolutely right.

    I have a gravity feed Harbor Freight HVLP conversion gun, which I bought purely as a way to try one and stick my toe in the water. It was $39.95, on sale and I have absolutely no complaints about it, at all. I brushed the poly on the base cabinets and it took a long time, probably as long to do only face frames as it did to spray the uppers, which are face frame/maple plywood, so all interior surfaces were sprayed, too. Way faster, less messing around and better results than brushing.

    I drank the cool-aid and unless it's a small piece, I have no plans to brush it on again. The same gun works great for shellac, too.

  • There are many companies today that spray poly and have been doing it for years. Like any other coating, there is a learning curve, and the proper solvent reduction and the gun adjustments are two of the things that need to be worked out. Normally, poly is slow drying, and lacquer thinners are added to speed it up, but there are many different formulas. Just as most other coatings have additives, so does polyurethane, and lacquer thinners and kerosene do work in poly in moderation.

  • https://www.rustoleum.com/~/media/D...8_Varathane_Polyurethane_Spray_Gloss_TDS.ashx
Personally, I like General Finishes products quite a bit. I know many people who have sprayed it. As a matter of fact, here is a link to their website where they discuss spraying water based finishes: How to Spray Water-Based Wood Finishes by General Finishes | General Finishes
 
  • Like
Reactions: Gilmourisgod
Looking at the pro/con list for sprayers, it says the bleeder type spray guns have instant atomization. I know that's a different thing but I remember Bruce saying that he was having problems, maybe orange peel, when the water in the finish was evaporating too quickly, i.e. before the finish hit the surface. I'm wondering if that's part of the problem. I had better results with turning the pressure down on my regulator. Not sure what to tell you on the Harbor Freight setup, though.
 
Hey Maple
On the white Devil bass, did you tint the epoxy, or just the Varathane? How did you apply the epoxy? I was thinking a foam brush of cheap chipping brush, scraping off excess with a plastic scraper.

I tinted just the ProFinisher. I apply the epoxy with a small piece of cotton rag. Dip into the epoxy and wipe on thin. Wipe until smooth and even.
 
  • Like
Reactions: Gilmourisgod
@dsgoen1
Thanks for the advice and links. The "recipe" I used was taken from the WB thread as follows:

3oz. Varathane Gloss
2tbsp water
1tbsp Behr Pure Premium Acylic Latex Gloss
1/2 tbsp Floetrol

The water, black, and floetrol are mixed separately, then poured into the Varathane, and left to sit for 30 mins. I strain it through a medium paper cone into the gun bottle.

Bruce was recommending very low pressure to prevent the water from flashing off too quick. I can't find any documentation for this gun that tells the PSI, but I've read numbers in the 7-9 PSI for other turbine sprayers.

I fiddled a lot with the volume of paint, and used the finest needle (1.0mm). At distances of 6-8", the paint will run unless I keep volume adjustment no more than a couple turns above zero. That's a balancing act of sorts, I might be able to increase the volume slightly, right to the "bleeding edge" of runs, so to speak. The blueish clouding is my indication that I've put it on as thick as I can without runs. The blue clouding fades almost immediately, but the finish never really levels out beyond orangepeel.

Got some black Transtint on order , I'll do some experiments with it mixed with Varathane to see if I can get an opaque black in fewer coats. Next up, epoxy seal the bass!
 
Yep. Get it from a hardware store. Nice and simple. Put some teflon tape on the rails to make it go smooth and easy.

View attachment 2367510 View attachment 2367511

Wow, I like that planing/surfacing jig! Could probably drill a few more holes on the edges toward the middle to reposition to work on narrower pieces. How thick are those aluminum pieces? Sorry for the years later reply :)
 
I've dump picked plenty over the years, but now my dump has a resident "dump Nazi" (everybody calls him that locally) who enthusiastically discourages picking. He sells anything worthwhile on the side. The thing that freaks me out is how many $1,000 Weber stainless grilles I see tossed for want of a $20 replacement burner. He keeps them in a special hoarding area along with working TV's, old computers, etc.
 
  • Like
Reactions: chinjazz
They have aluminum angle like that available in most hardware or big box stores, but it's pricey. I think around $20 for 6'-0". One alternative a lot of people use is the L shaped steel bed frames you see at the dump all the time. I have one up in my attic I'm hoping my wife will forget we own before I take a hacksaw to it!

Yes it is pricey, but clean. I have a local habitat for humanity store that I picked up several pieces of bed frame for $5 a bit ago. I cut them up, and sometimes they aren't totally the same level size so the rule of measuring is key :).
I may get a few more long pieces and try it again if the Aluminum isn't fitting the budget at the time.
 
OK.....
After months of experiments and false starts trying to find a good opaque colorant for Varathane WB poly, I was on the verge of giving up and going with a rattlecan laquer finish. Anybody interested in watching me waste Varathane on failed attempts, check out the WB Finishes thread, lots of informative stuff on there, just not by me!
Using water based products for instrument finishing, Target Coatings 9000 6000 and Varathane WB

The "secret sauce" for getting a jet black opaque finish with Varathane turns out to be using the Stewmac Colortone tint for waterbase laquer, right under my nose, but apparently nobody else on TB had tried it.

I had built this half-body mockup using scrap poplar, bound so I could practice masking vs. scraping
maVYSOg.jpg


Here it is after 5 coats of tinted Varathane, right over the white binding to see if I could learn to scrape
4UGWwRe.jpg

And level sanded
90oNUF7.jpg


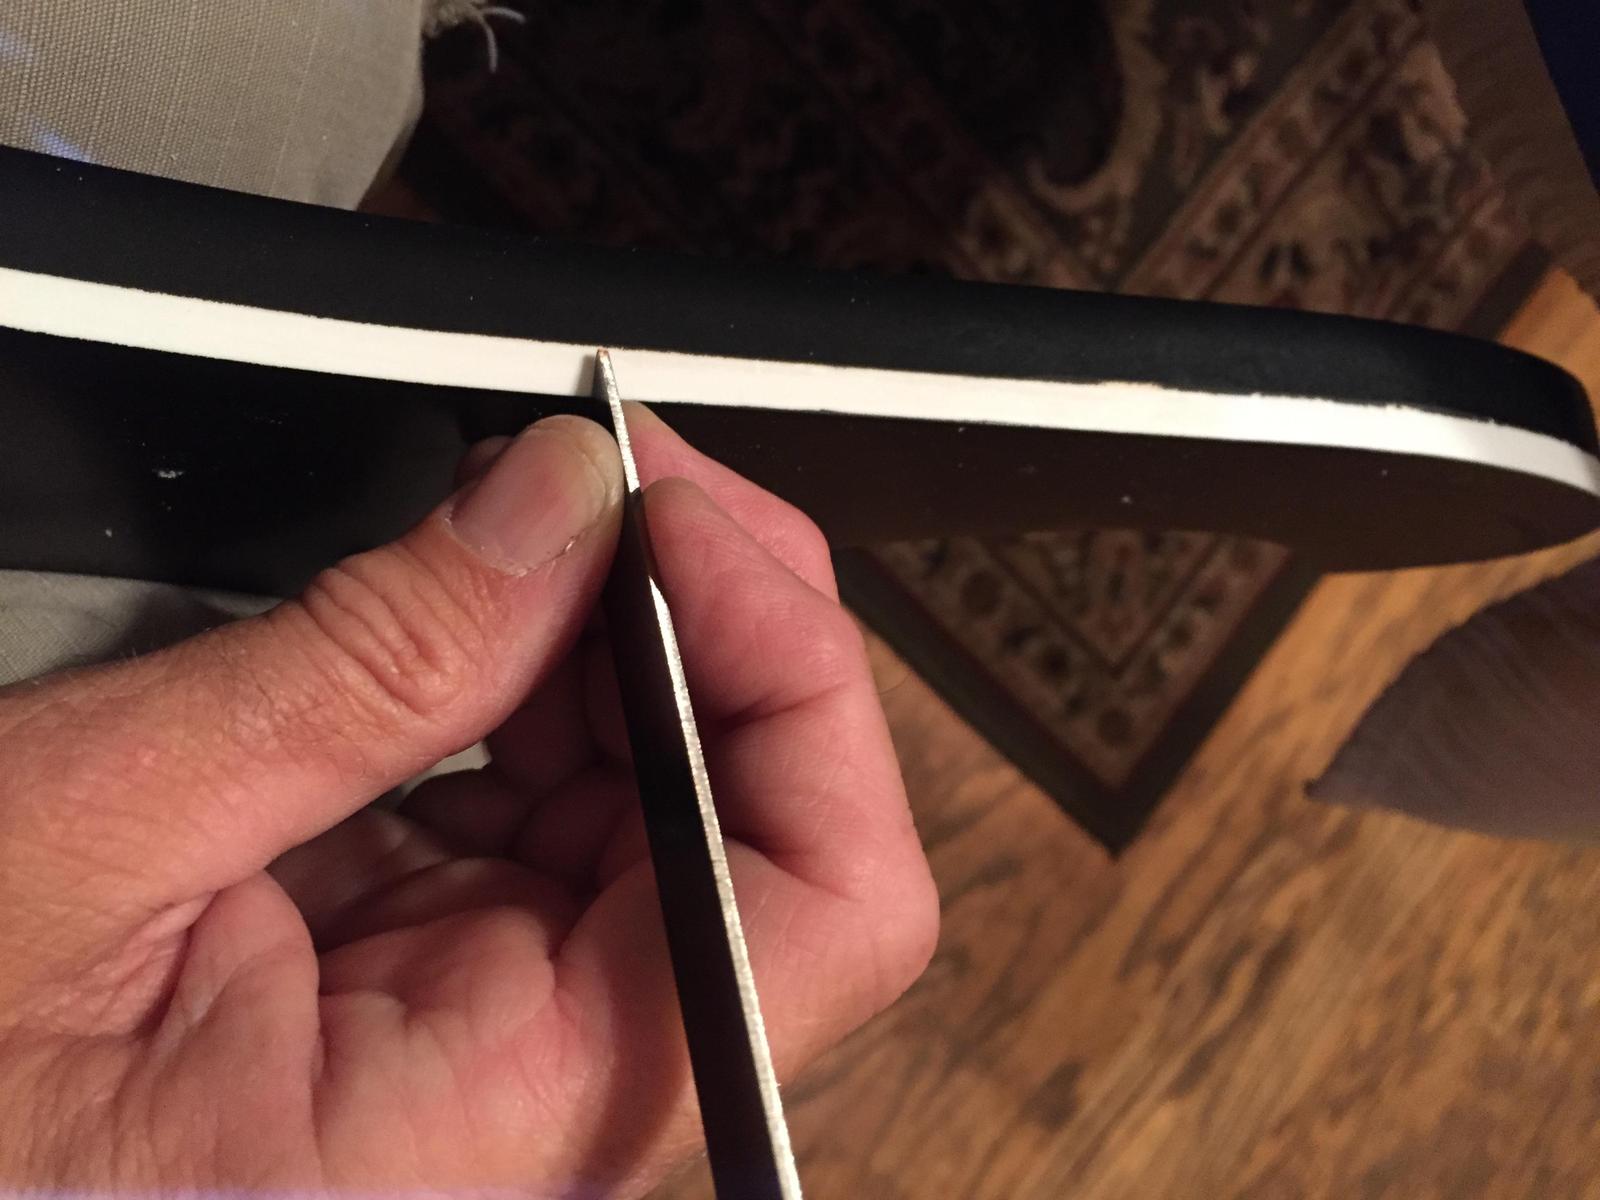
After letting it dry a few days (probably a mistake), I attempted my first scrape job on the mockup using the Stewmac Binding Scraper, basically just a sharpened piece of spring steel. The highly skilled binding scrapers at Rickenbacker and Gibson make this look easy. It isn't! The best I could achieve after a few hours of scraping practice was no better than I'd expect to get by masking the binding. No matter how good the tape, what always seems to happen is a tiny bit of capillary action up under the tape leaves flecks of black on the binding. Scraping right up to the edge of the white binding was damn near impossible, first because after being sanded flush with the body it's hard to see where the edge is, and secondly because it tends to flake and crumble before it scrapes to a fine line. This may be because I let it dry too much, which I've read can be a problem scraping laquer as well. You can see where I overshot the white binding here, exposing raw maple.
iexOmUk.jpg


Looks OK if you squint a little, but way too rough for my perfectionist brain.
m4m9KaD.jpg


I put a coat of Zinsser Universal Sanding Sealer on the body, probably belt and suspenders as I then applied three clear Varathane sealer coats, but they went on like silk, so I'll call it good. I'll level sand this and shoot another three coats clear to complete sealing and leveling, then on to colorcoats. Finally!!!!

I didn't see any point in layering the binding with sanding sealer or clear sealcoats, so I masked off the binding and FB with green frog tape and some 3M fineline masking tape I got at Autozone. I expected it to be some kind of plastic tape, but it's just thinly sliced treated paper like the frog tape. If anybody knows of a plastic tape flexible enough to use on the top binding that won't bleed, please toss me a link. If I can't find one that looks like it will work, I'll probably mask the binding on the sides and plan on having to scrape the top.
F9Cp1wS.jpg

wBqeJRp.jpg


Thanks for looking, the Zombie Has Risen!
 
Last edited:
I was very careful putting the masking tape on the sides, so now that I've sprayed three coats of clear over it with tape in place, maybe I can just leave it on there and proceed to black? The 1/8" fineline tape I used on the top of the edge binding and checkerboard is pretty flexible, but not flexible enough to to take the tight curves perfectly on the horns, that's where I may end up having to scrape. I think part of my problem on the mockup was letting it dry too long, and also trying to scrape through 5 coats of black. Most spray guides have you doing only 3 color coats or so. I'll see how it looks after 3 coats. If its completely opaque, guess there 's no point in more coats. Whats the common wisdom on level sanding color coats? Necessary, or a waste of time? I'm planning on at least 10 thin coats of clear. Kinda mandatory with the WB, thick coats just run or collect blue haze.