• TalkBass has been independent since 1998. Add your voice.
    Create a free account to reply to discussions, view embedded media, and browse with fewer display ads.
    Join freeLog in
    Want zero display ads or expanded classifieds tools? Compare plans.

What's On Your Workbench?

Also started to remove the paint and found out there is a thick and robust clear finish on the body. This may change my plans and I may end up polishing the existing clear finish instead of putting a new one. Sanded with 150 grits a small portion and already looks good, see the little brownish spot on picture below. Wood grain looks very nice, surprisingly.
Does someone know if it’s urethane finish and what would be the best practice to re-polish this finish ?
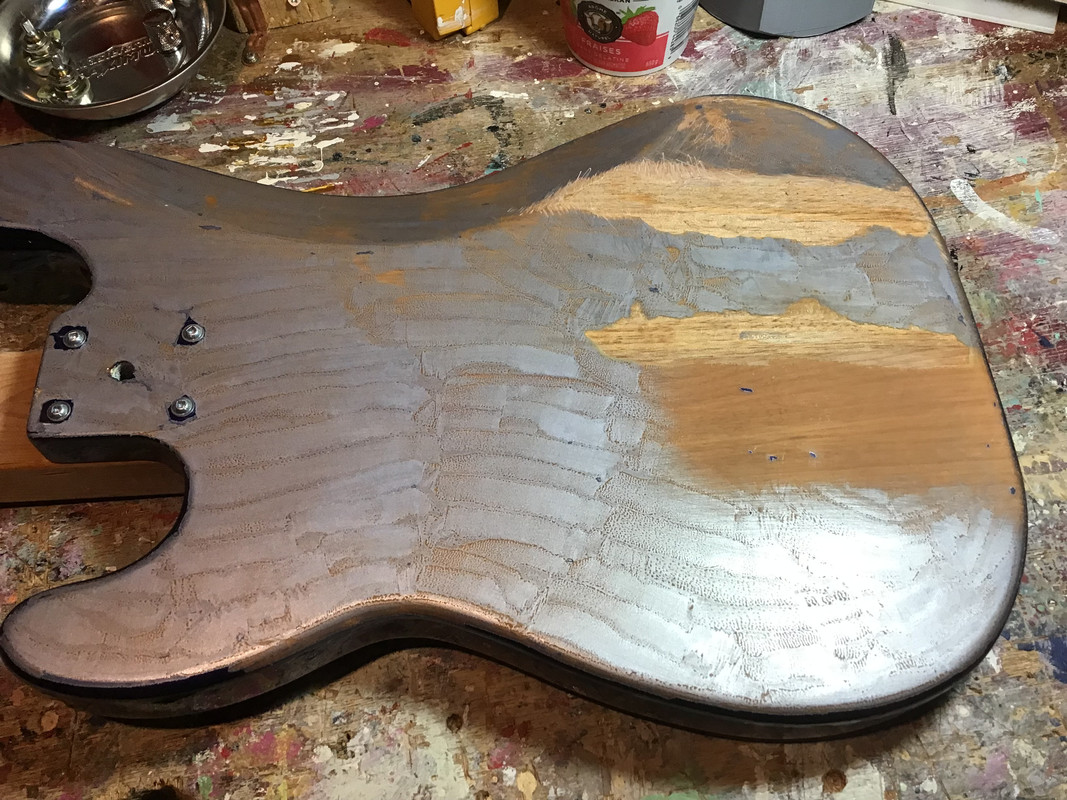
 
Also started to remove the paint and found out there is a thick and robust clear finish on the body. This may change my plans and I may end up polishing the existing clear finish instead of putting a new one. Sanded with 150 grits a small portion and already looks good, see the little brownish spot on picture below. Wood grain looks very nice, surprisingly.
Does someone know if it’s urethane finish and what would be the best practice to re-polish this finish ?


Does anyone used the Watco wipe on ploy glossy to resurface an existing clear finish ?
Looks easy to do but don’t know if it’s compatible and result is good looking………..

Rust-Oleum 341848 Watco® Wipe-on Poly Stain
 
Does anyone used the Watco wipe on ploy glossy to resurface an existing clear finish ?
Looks easy to do but don’t know if it’s compatible and result is good looking………..

Rust-Oleum 341848 Watco® Wipe-on Poly Stain

You'll need to remove all traces of coatings before you apply wipe on poly - completely bare wood. I mostly use it on necks, but it will work on bodies also. Wipe on, wipe off excess, let cure, repeat. Emory cloth (wet) to keep it smooth between coats. I usually apply at least 3 coats - more if you like.
 
You'll need to remove all traces of coatings before you apply wipe on poly - completely bare wood. I mostly use it on necks, but it will work on bodies also. Wipe on, wipe off excess, let cure, repeat. Emory cloth (wet) to keep it smooth between coats. I usually apply at least 3 coats - more if you like.
Oh I see……….
I didn’t have the intention to remove the existing urethane finish as it is rather thick and very robust, bringing it back to bare wood almost looks impossible for me.
Maybe I should just sand to 180 grits and apply a few coats of Varathan instead.
Anyway, thanks for the information.
 
Oh I see……….
I didn’t have the intention to remove the existing urethane finish as it is rather thick and very robust, bringing it back to bare wood almost looks impossible for me.
Maybe I should just sand to 180 grits and apply a few coats of Varathan instead.
Anyway, thanks for the information.

Have you tried just polishing the existing finish? Sand up the grits then hit it with the normal polishing compounds.
 
I realized today it's been a looong time since I took a couple hours to just... play... in a woodshop. :p

Guitars are cool and all... but dang.

& I've always wanted to make a set of castanetés.
:eyebrow: Olé!!
20231215_201548.jpg

These are cocobolo. Just roughed-in.
They came out a little small.
They're closer to... amateur y concierto - de niños.
And my big mitts need... Profesionales hombres y mujer manos grandés.
Gonna make some more out of ebony, padauk & grenadillo.
Maybe some clavé. :rolleyes:.... tongue drums?
.... Hmmmm... "Rockhewer Percussion"
I like that a lot. :D (Side hustle) :roflmao:

Anybody else make wood percussion instruments from scrap?
I'd love to see em.
 
I realized today it's been a looong time since I took a couple hours to just... play... in a woodshop. :p

Guitars are cool and all... but dang.

& I've always wanted to make a set of castanetés.
:eyebrow: Olé!! View attachment 5284991
These are cocobolo. Just roughed-in.
They came out a little small.
They're closer to... amateur y concierto - de niños.
And my big mitts need... Profesionales hombres y mujer manos grandés.
Gonna make some more out of ebony, padauk & grenadillo.
Maybe some clavé. :rolleyes:.... tongue drums?
.... Hmmmm... "Rockhewer Percussion"
I like that a lot. :D (Side hustle) :roflmao:

Anybody else make wood percussion instruments from scrap?
I'd love to see em.
My sister made tongue drums for a few years and sold them at craft shows. I’m not sure if she kept any (she’s a banjo player) but they were pretty cool and a good way to use up small scraps of hardwood.
 
My sister made tongue drums for a few years and sold them at craft shows. I’m not sure if she kept any (she’s a banjo player) but they were pretty cool and a good way to use up small scraps of hardwood.

I've got a couple of tongue drums on the todo list (dovetail pine or box-joint baltic ply for the base; padauk or wenge for the top, I'm thinking). It's probably Pavlovian conditioning: there's something about the decay and release of a wooden tongue drum that sounds very ewok-y to my ears, and I want a couple of octaves' worth.

I was originally thinking of doing one and just using a selection of notes from the pentatonics, but I feel like you're going to want all the notes at some point. I may well do it / them for the build-off after this one.
 
My workbench consists of a few things, all of which are mine xD:

- Gibson Les Paul Standard 1979; refret from Jumbo Nickel/Steel to Medium/tall frets Stainless Steel.

- 1974 Peavey century 120 bass head; New capacitors, resistors, filter cap. It's my 3rd, but the only one which doesn't operate.

A few painting/clear coating on an alder Pbass body, an epiphone Thunderbird body (bolt on neck), & a telecaster of which i plan to sell off afterwards (this is one of the builds from my time in the old guitar shop i used to work at for 2.5 years, sadly shut down due to bankrupcy)

& amid all that, currently figuring out how to rebuild my peavey 5150 tube guitar amp because it's been giving me problems to the point where no sound would come through when plugged in the input (but fx return proved that my transformers worked & power section as a whole produced sound/output). So i removed all pcb boards, & left only the two transformers in the chassis. Plan is to rebuild on turret boards, with better components, & omitting a few things of the original circuit in this rebuild (all of which i never really used), & just have this amp be more serviceable in the future when something goes wrong (easier to trace, & see visually).
 
Working on some templates. Once they’re rough cut i will edit, smooth, and finalize the body shape on the oscillating spindle sander.

IMG_5281.jpeg
IMG_5280.jpeg


EDIT: added this next pic later. These templates aren’t done, but they give the idea of what I’m going for…. classic and familiar, but not the same. Like a sleeker new version of an old girlfriend :D


IMG_5288.jpeg
 
Last edited:
My Christmas rush project is to finish the cabinet I've been building for my wife. All the major woodworking is complete. But between traveling and being under the weather, I just haven't had time or energy for it.

I've got a week. I bought a spray tent for the basement and a small sprayer. Wish me luck! 3 drawers, plus the cabinet probably 3 coats each.... no pressure.

Also, it's amazing how something that seemed normallish in the shop looks so huge indoors! The cabinet is roughly 18x36...
20231216_114927.jpg
 
It's an idiophone (tuned percussion family, like the marimba) where the barres / blocks are only attached at one end. They're more commonly made in steel but it's the semi-marimba decayed sound of the wooden ones that I'm after.

This, basically:


Defs needs a build thread. I’m particularly interested in the tuning process.
 
Defs needs a build thread. I’m particularly interested in the tuning process.

As I understand it, you remove mass from the tip to increase the frequency (raise pitch) and remove mass from the 'hinge' to decrease frequency. I've seen people using Forstner bits / die grinder and carving burrs / chisels and gouges to do this. Catch is: You only have a certain amount of adjustability leeway, so you ideally want to get it as close as possible based on length calculations to begin with.

Good, general all-round video of a build here (she uses CNC for the top, but you don't have to): Youtube.
Physics idealization of barre calculations here: Hyperphysics.
Prototype barre-length calculator here: MIT project.
 
As I understand it, you remove mass from the tip to increase the frequency (raise pitch) and remove mass from the 'hinge' to decrease frequency. I've seen people using Forstner bits / die grinder and carving burrs / chisels and gouges to do this. Catch is: You only have a certain amount of adjustability leeway, so you ideally want to get it as close as possible based on length calculations to begin with.

Good, general all-round video of a build here (she uses CNC for the top, but you don't have to): Youtube.
Physics idealization of barre calculations here: Hyperphysics.
Prototype barre-length calculator here: MIT project.
My sister made most of hers out of fruit woods; apple, cherry or pear. Occasionally mahogany if she had a scrap handy. Backs and sides were often repurposed drawer sides or backs from discarded dressers.

She was selling hers more as novelties or for kids than as serious musical instruments so tuning was, shall we say, approximate. :) She definitely wasn’t doing a lot of math. She did all her cutting with an old-fashioned coping saw and then tuned to relative pitches using gouges.