• TalkBass has been independent since 1998. Add your voice.
    Create a free account to reply to discussions, view embedded media, and browse with fewer display ads.
    Join freeLog in
    Want zero display ads or expanded classifieds tools? Compare plans.

Winter Build Off 2022 - Back to '56

Took a few minutes to wind the split coil pickup. The goal was for 5.0k Ohms on each half, but came up with 4.79k and 4.77k. It should be okay, as I'm in the ballpark. There was enough room to get another 1000 turns on each, but might have been pushing it. Just played it safe. Haven't decided on the wiring, but probably just series with these readings. Also thinking of putting walnut veneer on the top with just two poles visible. Just thinking outloud.
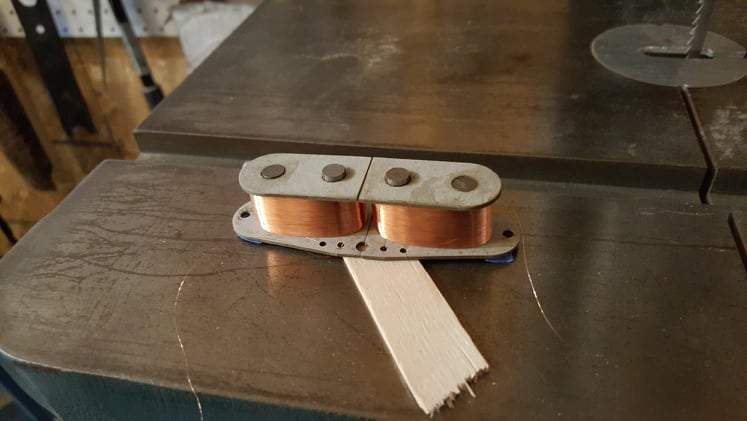
split coil wound.jpg
 
Doing a little multi-tasking, so shifting to template making. The body template was cut about two weeks ago, but still needs the neck pocket, pickup and control cavity portions. Designspark Mechanical is a great (free) CAD program for accomplishing this. It also produces files that that can drive my laser cutter. When routing, I use a guide bushing and spiral cutter bit, rather than a pattern bit, so the templates will be oversized to accomodate the bushing. Designspark handles this nicely. Attached are images of the progress of designing the templates, from tracing a '56 bass to isolating the parts to be laser cut and attached to a final template. There's still some adjustments to be made on the neck pocket.

When going through this process, I noted that the roundover on the body looks smaller than 1/2" on the edge. I read that 7ender may have used a 7/16" radius. The pickguard just seems less than 1/2" from the edge.

P bass body for template.jpg
P bass body template.jpg
P bass neck pocket pickup and control cavity template.jpg
The goal is to have all of these ready for the weekend, complete the routing, sanding, and drilling on Saturday, then start the finish process for the body on Sunday.
 
Last edited:
Thought about the single coil I wound to 6.3k and looking at it there was just a lot of room left on the bobbin. It also has a second set of eyelet holes. It was just screaming at me to add a second winding over the first and treat it as a tapped coil 6.3K and a second, higher output. Doing some math, I estimated an additional 2000 winds would put it around 7.9K and with two sets of wires, I could toggle between the two. A push/pull pot to be added at a later date will handle that! With just a few minutes on the winder I had it done. Also cut some walnut veneer to go on the top of the pickups I've made. Pictures will follow once all is done.
 
Okay, I just read this post and waited about 60 sec.
I feel like that's a long time for me.
Any pics?

More pictures after I get home from work. Got to thinking about the sequence of next steps, soldier, attach veneer, potting, potting before attaching the veneer? If potting first, I have to get the wax off the top before gluing the veneer. I think that's the right way to do it. Then I can add a nice coat of poly to the veneer. Also need to get 4 conductor pickup wire. I'm attaching a photo of the veneer just sitting on the pups.

walnut veneer on pups.jpg
 
Got a couple things done. First, wired up the split coil pickup and its about 9.5K resistance. I'll pot it in the morning and glue the veneer on.

Second, I worked on the belly cut on the body. I looked at this and realized that its not a true arc, but close and that a jig running in an arc would do 90% of the work. It took about ten minutes to make the jig and about 10 minutes to route the belly cut. It will need some clean up on the ends, as I said it not actually an arc. That can be done with a rasp. It was a part I was sort of dreading, but now its really anticlimactic.

jig making 2.jpg
jig use 1.jpg
jig use 2.jpg
first step belly cut.jpg
wires on split coil pickup.jpg
 
Last edited:
Really cool pickups! May I ask how many turns you put on these?

There's 12,000 on each coil, but according to the math I should have put a 12,121 on. I wanted slightly underwound to see if that would retain a little more of the hi frequencies. I suspected it would come in a little low based on previous windings. The magnets are .25" alnico V, rather than 1.87" or 1.95". That should make up for output. Its a balancing act and more art than science at some point.
 
There's 12,000 on each coil, but according to the math I should have put a 12,121 on. I wanted slightly underwound to see if that would retain a little more of the hi frequencies. I suspected it would come in a little low based on previous windings. The magnets are .25" alnico V, rather than 1.87" or 1.95". That should make up for output. Its a balancing act and more art than science at some point.

Thanks a lot for all the details! Do you really mean .25 and not 1.25"? They don't look so short?
 
  • Like
Reactions: 41hzthunder
Thanks a lot for all the details! Do you really mean .25 and not 1.25"? They don't look so short?

The magnets are .75" tall and .25" diameter. The bobbin measurements can be found on page one of this thread.

Oh! I see my mistake. The standard poles are .187" or .195", not 1.87" or 1.95". Gotta' stop posting when I'm tired. :)
 
Last edited:
Worked on a lot of small items today. These are the ones that require attention to detail. Drilling holes for the neck screws, drilled the through body string holes, routed the body cavity, and worked on a template for trimming the pickguard. Templates are my friend. Its better to make a mistake making a template than on the final project. Cheaper too! Tomorrow I'll cut a recess for adjusting the neck and drill pilot holes for the control plate. If all goes well, I'll start the burst finish on Sunday.

I had to expand the control cavity to get to the hole for the pickup wires. It will be covered, so I'm okay with it.

bridge holes 2.jpg
Ferrule countersunk.jpg
jig for countersinking.jpg
template for body cavity.jpg
control cavity asymetrical.jpg
neck screw holes.jpg
template for pickguard trimming.jpg
 
Worked a bit more today. Finished the last of sanding on the body and trimmed the pickguard for starters. Then soldiered the pickup wires and potted it in wax. Took time to clean the shop, as I really don't like a messy shop. Its just part of woodworking.

The most fun was receiving my $29, yes $29, airbrush kit. I saw a similar kit on youtube and decided that price was too easy on the wallet to pass up. I ordered some wood dye and decided to just try it out. Honestly, I've never used wood dye or an airbrush, so totally new territory. I mixed the dye with isopropyl alcohol. Learned that a little dye goes a long way. A little too much and yellow starts to look orange. I tried spraying on paper as practice and got to a point where I felt I could control the spray, distance and speed to get an even coat. Not confident enough to work on the actual body! Will look for other solvent options as I wasn't completely satisfied with the mix. I dit get the yellow I was looking for, or close to it. I think a couple more days of practice before hitting the body. The $29 kit does seem to work pretty well. Wonder how it will last.

sanded body.jpg
Inner coil resistance.jpg
inner and outer coils.jpg
wax potting pickup.jpg
$29 airbrush kit.jpg
first test yellow(2).jpg